These banana peanut butter oatmeal bars are the sort of recipe I come back to when mornings are rushed, the kids need snacks, or I want something to throw in my gym bag. They’re lightly sweet from ripe bananas, nutty and a little creamy from peanut butter, and have that comforting, oaty texture that eats like a snack you don’t have to feel guilty about. I’ve baked these dozens of times and they always vanish fast — warm from the oven they’re soft and tender; chilled from the fridge they firm up and make a great portable breakfast.
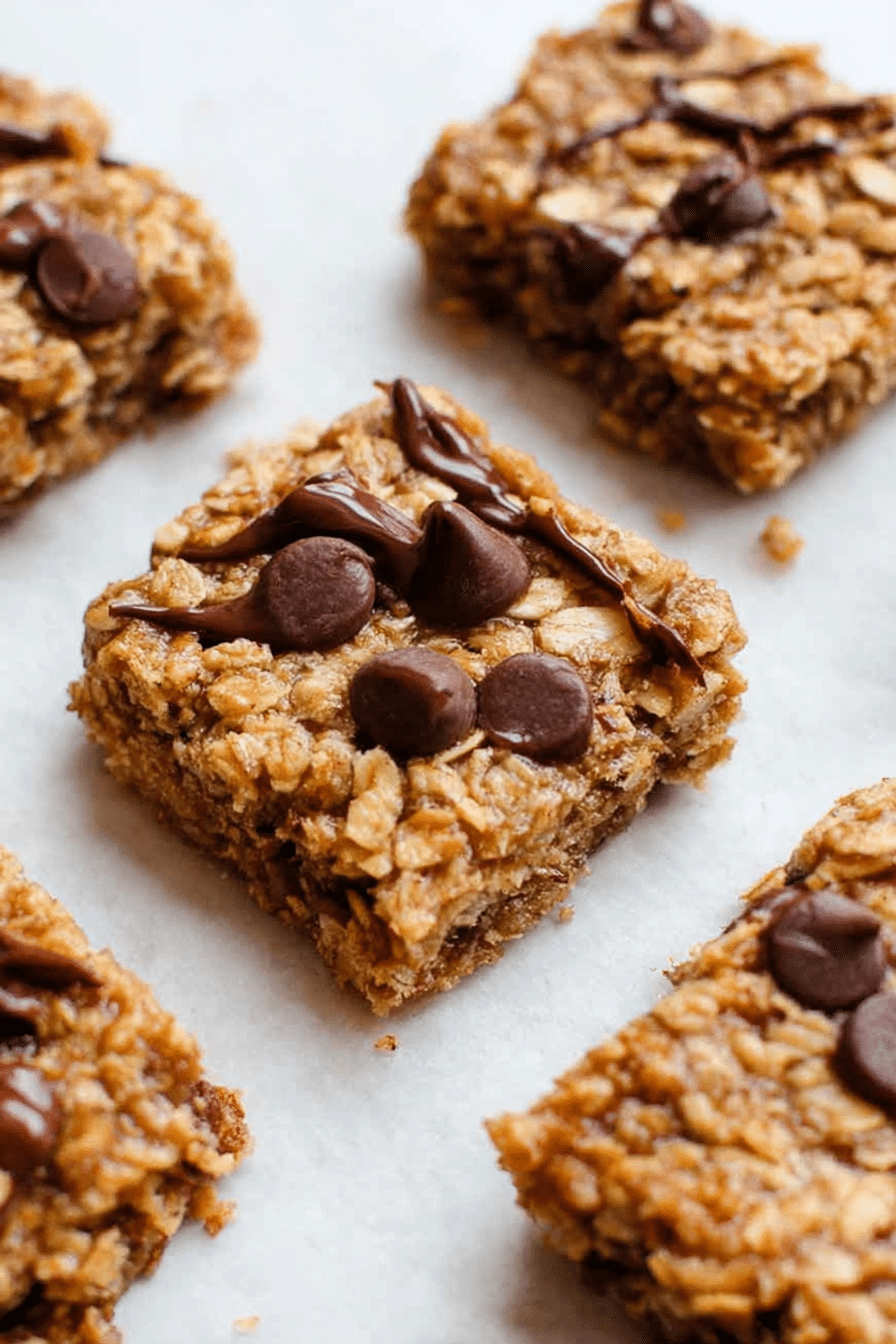
I’ll be honest — the first time I made these I under-mashed the bananas and the texture was uneven. After a few tweaks I landed on a version that’s reliably soft in the center with golden edges and little pockets of melted chocolate. Below I’ll walk you through everything I learned so you can skip the trial-and-error and get a perfect batch on your first go.
Health Benefits of Key Ingredients
These bars are simple but pack a surprising nutritional punch. The main players — banana, peanut butter, and oats — each bring something useful to the table.
- Bananas – provide natural sweetness, potassium for muscle function and fluids, and contribute soluble fiber that helps keep you full.
- Peanut butter – adds satiating healthy fats and plant-based protein; it makes the bars rich and helps bind the ingredients together.
- Oatmeal – supplies slow-burning, complex carbohydrates and beta-glucan fiber which is linked to heart health and steady energy.
Together these ingredients make a snack that’s energy-boosting and practical for pre- or post-workout nibbling: carbs from oats and banana for fuel, and protein/fat from peanut butter to aid recovery and keep hunger at bay.
Step-by-Step Recipe Instructions
Below is the tested recipe I use every time. I include equipment notes and a few timing cues that saved me from underbaked or gummy bars on early attempts.
Yield: About 15 bars
Prep time: 10 minutes
Cook time: 20–25 minutes
Total time: 30 minutes
Ingredients (for the recipe):
- 1 1/2 cups rolled oats
- 1/2 teaspoon ground cinnamon
- 1/4 teaspoon salt
- 1/2 teaspoon baking powder
- 2 ripe bananas (about 1 cup mashed)
- 1/2 cup peanut butter (creamy or runny is best)
- 1/3 cup maple syrup (can substitute honey)
- 1 teaspoon vanilla extract
- 1/3 cup dark chocolate chips
Equipment needed: 8×8 inch baking pan, parchment paper, mixing bowls, spatula, fork or potato masher, measuring cups/spoons, and an oven preheated to 350°F (175°C).
- Preheat and prep. Preheat your oven to 350°F (175°C). Line an 8×8 inch baking pan with parchment paper so the bars lift out easily — this is one of those small steps that makes slicing neat bars so much easier.
- Mix dry ingredients. In a large bowl combine the rolled oats, cinnamon, salt, and baking powder. Stir them so the baking powder and spices are evenly distributed; otherwise you can get pockets of salt or cinnamon in a bite.
- Prepare the wet mixture. In another bowl mash the ripe bananas with a fork until relatively smooth — I leave a few small lumps for texture. Add the peanut butter, maple syrup, and vanilla extract and mix until glossy and uniform. If your peanut butter is very stiff, microwave it for 10–15 seconds so it blends smoothly.
- Combine. Pour the wet ingredients into the dry and stir until just combined. Overmixing can make the bars dense. Fold in the chocolate chips gently; reserve a few to sprinkle on top if you like the look of melted chips on the surface.
- Transfer to pan. Spread the batter into the prepared pan, pressing it into an even layer. The mixture will be sticky but spreadable — if it clings to your spatula, wet the spatula slightly or use a piece of parchment to smooth the top.
- Bake. Bake at 350°F (175°C) for 20–25 minutes, or until the edges are golden brown and a toothpick inserted in the center comes out mostly clean with a few moist crumbs. The first time I made these I pulled them out at 18 minutes and they were too soft; err on the side of the full 25 minutes if your oven runs cool.
- Cool and slice. Let the bars cool in the pan for 10 minutes, then lift out using the parchment and transfer to a wire rack if you have one. They finish setting as they cool — slicing too soon will make them fall apart. I usually wait 20–30 minutes in total before cutting into 15 bars.
Time-saving tip: line the pan ahead of time or use a silicone baking pan — cleanup is immediate and you don’t need to grease anything. If you’re short on an 8×8 pan, a 9×9 will work but the bars will be slightly thinner and may need a minute or two less baking time.
Ingredients — what they do
- Rolled oats – the base of the bars, giving chew and structure.
- Cinnamon – warms and balances the sweetness.
- Salt – brightens flavors and keeps the banana from tasting flat.
- Baking powder – gives a slight lift so bars aren’t dense.
- Bananas – add natural sweetness, moisture, and flavor.
- Peanut butter – binds the mixture and adds richness and protein.
- Maple syrup – liquid sweetener that keeps bars tender; honey is an easy swap if you aren’t avoiding animal products.
- Vanilla extract – enhances overall flavor and makes the bars taste more rounded.
- Dark chocolate chips – little bursts of indulgence; optional but recommended for texture contrast.
Tips for Meal Prepping and Storage
I make a double batch on Sundays and eat these throughout the week — they’re one of my go-to make-ahead breakfasts.
- Airtight storage: Store cooled bars in an airtight container at room temperature for up to a week. I stack parchment between layers to keep them from sticking. If you live somewhere humid, refrigerate to prevent early spoilage — the texture will firm up.
- Freezing: These freeze beautifully. Slice into individual bars and wrap each one in plastic wrap or parchment, then place in a freezer-safe bag for up to 3 months. Thaw in your bag at room temperature for 30–60 minutes or microwave for 20–30 seconds for a warm snack.
- Portioning: I slice into 15 bars and keep them in a lunchbox-ready stack. If you want larger portions, cut into 9 bars instead and adjust nutrition expectations accordingly.
- Signs of spoilage: Because these contain bananas and no preservative, discard if you notice sour smells, off flavors, or visible mold. Refrigeration slows spoilage but doesn’t prevent it indefinitely.
Customizable Variations with Mix-Ins
I love tweaking these depending on what’s in my pantry. Here are reliable additions and swaps I’ve tested:
- Chocolate chips — swap dark for semi-sweet or mini chips for even distribution.
- Nuts — chopped walnuts or pecans add crunch; fold them in down to halved pieces so bars slice neatly.
- Dried fruit — raisins or chopped dates add chew and sweetness; keep total add-ins to about 1/3 cup so the bars still hold together.
- Seeds — chia or flax seeds give a nutritional boost; flax can also help bind the mixture if your bananas are on the small side.
- Nut butter swap — almond or sunflower seed butter work well if you need a nut-free option.
When you add extra mix-ins, the general rule of thumb is: small-volume add-ins (a few tablespoons) don’t change bake time, but add-ins that bulk up the batter (more than 1/3 cup) may require an extra 2–4 minutes in the oven. Keep an eye on the edges and do the toothpick test to confirm doneness.
For a twist on breakfast, consider making banana-stuffed French toast as an alternative use of bananas in your recipes.
In-Depth Nutritional Information
Below are the nutritional values provided for these bars. Exact numbers can vary by brands (especially peanut butter and chocolate chips), so treat these as a reliable baseline rather than an absolute.
- Calories per bar: 98 calories
- Fat: 2 g
- Carbohydrates: 14 g
- Protein: 2.5 g
About fiber and vitamins: these bars contain dietary fiber from the oats and banana, and small amounts of vitamins (notably potassium from bananas). The exact fiber and micronutrient counts will vary by ingredient brand and banana size, so if you need precise nutrition for a program, calculate using the specific products you use.
How this fits into goals: if you want a light, energy-focused snack before a workout, one bar paired with a small cup of Greek yogurt gives you carbs plus extra protein. If you’re counting calories for weight loss, two of these can be a satisfying mini-meal without a huge calorie hit.
Pairing Suggestions for Balanced Snacks
These bars are great on their own, but pairing them properly rounds out the nutrition and makes them feel more like a meal.
- For extra protein: pair one bar with a serving of plain Greek yogurt or a scoop of cottage cheese.
- For more fiber and vitamins: add a piece of fresh fruit or a small side salad with a squeeze of lemon.
- Pre-workout: one bar plus a banana or small smoothie gives quick fuel.
- Post-workout: one bar plus a protein shake or a handful of roasted chickpeas helps with recovery.
For an added crunch and flavor, try pairing these bars with our peanut butter yogurt bark, which complements their taste perfectly.
Another great option to enjoy alongside your oatmeal bars is a healthy pumpkin pie smoothie for a nutritious snack.
FAQs about Banana Peanut Butter Oatmeal Bars
Can I make these banana peanut butter oatmeal bars vegan?
Absolutely! You can easily make these bars vegan by using maple syrup instead of honey. Just ensure that your peanut butter is also vegan.
How should I store the oatmeal bars?
To keep your bars fresh, store them in an airtight container at room temperature for up to a week. You can also freeze them for longer lasting freshness!
Can I add other ingredients to the recipe?
Yes! Feel free to get creative with mix-ins like chocolate chips, nuts, or dried fruits. If you add extra ingredients, you may need to adjust baking time slightly.
What is the serving size for these bars?
This recipe yields about 15 bars, and you can enjoy one as a healthy snack, breakfast, or dessert.
Are these bars gluten-free?
Yes, these bars can be gluten-free if you use certified gluten-free oats. Just check the packaging to be sure!
If you’re looking for other ways to enjoy the flavors of banana and peanut butter, check out our delicious peanut butter banana smoothie.
Conclusion and Final Thoughts
These banana peanut butter oatmeal bars are one of those dependable recipes I turn to again and again. They’re simple, forgiving, and forgivingly tasty — plus you can adapt them with whatever you have in the pantry. Expect a soft, slightly chewy bar with warm banana flavor, pockets of peanut richness, and melted chocolate flecks if you opt in.
My final piece of advice: don’t rush the cooling. Let them rest long enough to set and you’ll get clean slices and tidy packing for lunches. If you try them, leave a note about what variation you made — I’m always curious which mix-ins make them a favorite in your kitchen.
Banana Peanut Butter Oatmeal Bars
Ingredients
Method
- Preheat your oven to 350°F (175°C). Line an 8×8 inch baking pan with parchment paper.
- In a large mixing bowl, mix the rolled oats, cinnamon, salt, and baking powder together.
- In another bowl, mash the bananas, then add peanut butter, maple syrup and vanilla extract and mix until well combined.
- Pour the wet ingredients into the dry ingredients and stir until just combined. Add the chocolate chips and mix.
- Pour the mixture into the prepared baking pan and spread it out evenly with a spatula. Optionally sprinkle a few more chocolate chips on top.
- Bake in the preheated oven for about 20-25 minutes, or until the edges start to turn golden brown. Let the bars cool for 10 minutes before removing from the pan and slicing.