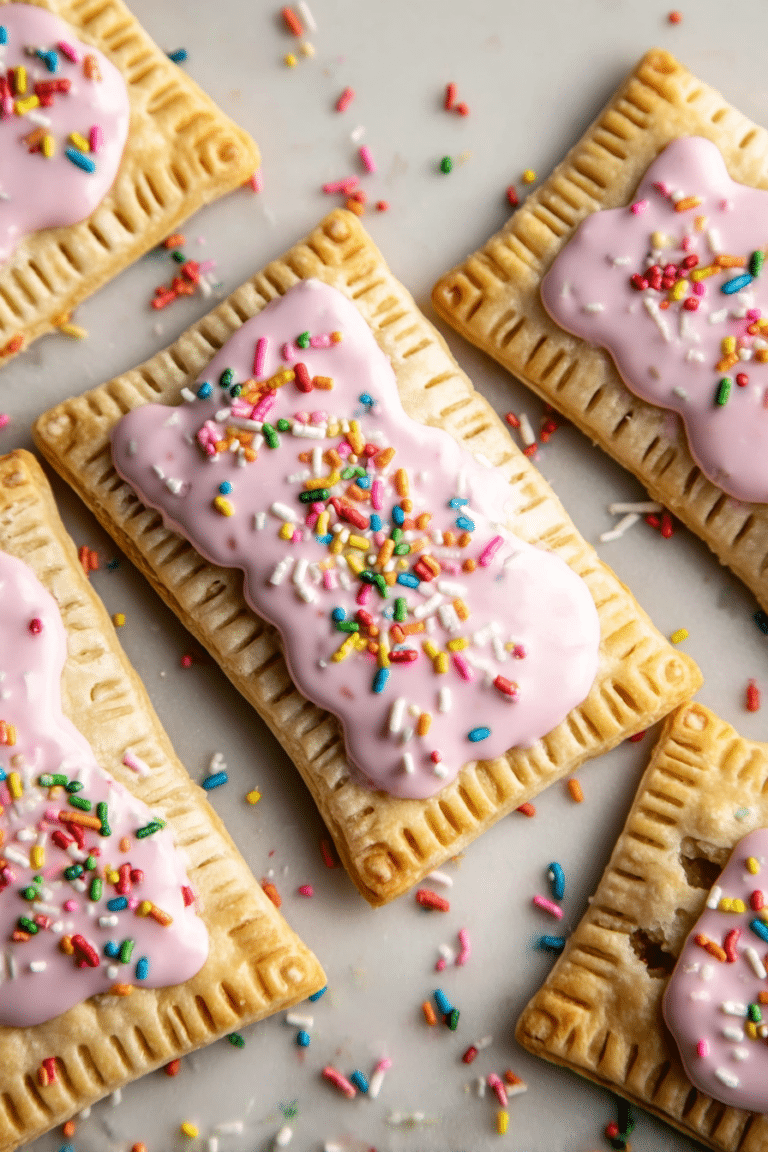
I have warm memories of Saturdays in my kitchen with flour on our cheeks and the smell of cinnamon filling the house. These brown sugar cinnamon pop-tarts became our go-to weekend project because they let kids be hands-on—from rolling the dough to poking the vents—while parents keep things safe and simple. I still remember the grin when my child crimped the edges for the first time and we both breathed in that buttery, brown-sugar aroma.
I love how this recipe is forgiving: kids can help with the messy, tactile parts and you can take care of the precision bits. The result is nostalgia on a plate—flaky pastry, a soft bed of brown sugar and cinnamon, and a glossy glaze that sets just enough for sprinkling. Over the years I’ve learned small adjustments to keep things calm when little hands are involved.
My goal when I bake with kids is always the same: make a reliable plan so the baking is the fun part. In this recipe I’ll share simple swaps for allergies, easy ways to keep the dough chilled and manageable, and decorating ideas that make each pop-tart feel like a mini celebration. These moments are about more than a sweet breakfast—they’re tiny lessons in patience, measurement, and pride in something you made together.
Why You’ll Love Making Brown Sugar Cinnamon Pop-tarts with Your Kids
Baking these pop-tarts is more than pastry—it’s a slow-motion craft project that invites creativity. You’ll notice the kitchen filling with warm cinnamon and a cozy, sweet scent that kids link instantly to comfort. Because the steps are clear and hands-on, children can do real work: filling, sealing, crimping, and glazing. Homemade pop-tarts are also easy to customize, so picky eaters can have their favorite flavors while you control ingredients and sugar levels.
Everything You Need for Brown Sugar Cinnamon Pop-tarts
Below is a conversational ingredient and tool guide that you can read aloud to kids when you shop or prep. I avoid exact measurements here so you can focus on choices and substitutions that fit your family.
- All-purpose flour – The backbone of the pastry; swap with a gluten-free blend that’s designed for baking if needed.
- Granulated sugar – Adds a bit of structure and helps the crust brown; coconut sugar can be used for a deeper flavor.
- Salt – Small but essential for balance; don’t skip it even in sweet bakes.
- Cold unsalted butter – Creates the flaky layers; for a dairy-free option, use a firm vegan butter that’s meant for baking.
- Egg – Binds the dough and makes the egg wash; for vegan swaps use a thick plant-based milk glaze and a little aquafaba to replace the wash.
- Milk – Adds richness to the dough and wash; any plant milk works as a substitute.
- Light brown sugar – The filling’s star, giving moisture and caramel notes; try coconut sugar for lower glycemic index.
- Cinnamon – The warm spice that defines the flavor; mix in a pinch of nutmeg for autumnal depth.
- Powdered sugar – For the glaze; use a fine sugar alternative if you need a lower-sugar finish.
- Tools – Rolling pin, ruler, pizza cutter or sharp knife, fork for crimping, measuring spoons, mixing bowls, baking sheet, parchment paper. These simple tools help kids participate safely and keep mess contained.
If you’re looking for a variation, check out our frosted brown sugar cinnamon pop tarts recipe for an extra sweet treat!
How to Make Brown Sugar Cinnamon Pop-tarts (Step-by-Step)
- Mix the dry ingredients and cut in cold butter until the dough looks like coarse crumbs; kids can help by pouring and mixing while you keep the butter handling.
- Whisk egg and milk, add to the mixture until the dough just comes together; avoid overmixing so the pastry stays tender.
- Shape the dough into two discs, wrap and chill in the fridge for at least two hours so the butter firms up — this is the part where you can do a quick activity with the kids while it chills.
- When ready, let one disc sit for a short time at room temperature so it’s easier to roll, then roll into a thin rectangle on a floured surface; use a ruler and pizza cutter for uniform rectangles and let kids help press the dough flat with light hands.
- Place bottom rectangles on a parchment-lined sheet and keep them chilled while you prepare the tops — chilling reduces spreading and keeps edges neat.
- Mix the brown sugar filling and place a spoonful in the center of each bottom rectangle, leaving a small border for sealing; teach kids to leave that edge so filling won’t ooze out.
- Brush egg wash on the underside of each top rectangle and place over the filling; press around the edges, then crimp with a fork to seal—kids love the fork pattern and the satisfying press.
- Use a toothpick to poke vents in the tops so steam can escape. Chill the assembled pop-tarts briefly before baking to ensure they hold shape.
- Brush the tops with more egg wash for a golden finish and bake until deeply golden; let cool and then spread a thick but spreadable glaze on top and decorate.
The Secret to the Perfect Pastry Texture
Texture comes down to two big things: cold butter and minimal handling. Cold butter flakes in the oven, creating tiny steam pockets that give you that tender, layered bite. If you handle the dough too much, gluten develops and the pastry becomes tough rather than soft and flaky.
- Keep your butter cold and cut it into pea-sized pieces so pockets remain in the dough.
- Work quickly and use a gentle touch when adding liquids; I stop mixing the moment the dough holds together.
- Chill the dough thoroughly before rolling and again after assembling so the pop-tarts maintain their shape and bake evenly.
For another delightful pastry experience, try making sourdough cinnamon rolls to master your pastry skills.
Why Temperature Matters When Making Dough
Temperature controls everything: how the butter behaves, how the dough rolls, and how the pastry bakes. Cold butter gives flakiness; warm butter makes a greasy, dense dough. Chilling between steps keeps the butter solid and the dough relaxed so it’s easier to handle with kids underfoot.
- Chill dough after forming discs so it’s firm and easy to roll later.
- Briefly warm the dough at room temperature only when rolling to prevent cracking—kids can help with short rolling turns.
- Chill assembled pop-tarts before baking so they rise properly rather than losing their shape.
Customizing Your Pop-tarts: Fillings and Toppings Galore!
These pop-tarts are a great canvas for creativity. Once kids learn the basic assembly, they can invent combinations that are sweet, tangy, or chocolaty. Think about balancing sweetness with a bit of brightness from fruit or a touch of salt.
- Fillings: fruit preserves, chocolate spread, nut butters (or allergy-friendly spreads), or a spiced brown sugar mix—encourage kids to try a thin layer so the pastry isn’t overwhelmed.
- Toppings: powdered-glaze, drizzled chocolate, chopped nuts, or colorful sprinkles for a party look; thicker glazes set nicely and make decorating easier for small hands.
- Balance: if a filling is very sweet, add a smear of cream cheese or a squeeze of lemon to cut sweetness and add contrast.
Get creative with your toppings, just like in our delicious homemade chocolate turtles recipe that combines fun flavors and textures!
Pro-Tip for Perfect Brown Sugar Cinnamon Pop-tarts
- Use a ruler to cut even rectangles so each pop-tart bakes uniformly—kids can mark the dough with the ruler while you cut.
- Chill both the dough discs and the assembled pop-tarts; I always find the bake turns out better when everything is cold going into the oven.
- Don’t skip the egg wash—this gives the pop-tarts that warm, golden surface kids expect and helps the glaze stick.
- Keep some extra flour on hand while rolling so you can rescue slightly sticky dough without overworking it.
Storage Tips and Variations to Try
Store pop-tarts in an airtight container to keep them tender. At room temperature they stay fresh for a few days; refrigerated they last longer but may firm up a bit—reheat briefly to bring back that just-baked warmth. Serve them with plain yogurt, sliced fruit, or a warm mug of milk for portable breakfasts or cozy brunches.
- Room temp storage in an airtight container for a short stretch—great for sharing with neighbors.
- Refrigerate to extend freshness; warm briefly in the oven to restore flakiness before serving.
- Pairing ideas: yogurt, fruit compote, or a simple bowl of sliced apples to cut sweetness and add texture.
Troubleshooting
- If the dough is too sticky: chill it for a bit and dust the surface with a little flour; I do this when little fingers have warmed the dough.
- If the dough is too dry and crumbly: add a small splash of milk and press gently until it holds together.
- If the pop-tarts don’t seal: press edges firmly and use the fork to crimp well; brush a little egg wash on the rim to act like glue before pressing tops on.
- If the tops brown unevenly: rotate the pan halfway through baking and make sure your oven racks are centered; I always rotate once for even color.
If you’re feeling adventurous with baking, check out our guide on the best chocolate chip cookies for tips that may help with troubleshooting your pop-tarts.
Variations to Try
- Apple-cinnamon filling with a maple glaze for a cozy autumn version.
- Peppermint-chocolate filling and a dark chocolate drizzle for a holiday treat.
- Berry preserves with a lemon glaze for a bright, tangy contrast.
- Pumpkin spice filling with brown butter glaze for seasonal mornings.
- Mini pop-tarts shaped by cookie cutters for tea parties or lunchbox surprises.
Frequently Asked Questions
How long can I store my homemade Brown Sugar Cinnamon Pop-tarts?
You can store your pop-tarts in an airtight container at room temperature for up to 3 days or in the fridge for a week.
Can I customize the filling of my pop-tarts?
Absolutely! Feel free to experiment with different fillings and toppings to make them your own. Think about fruit preserves, chocolate, or other spices!
What is the secret to getting the perfect pastry texture?
The key is in keeping your butter cold and chilling the dough before baking. This helps achieve that flaky, tender texture we all love.
Do I need any special tools to make these pop-tarts?
No special tools are required! A rolling pin, pizza cutter or knife, and a fork for crimping the edges will do the trick.
What should I do if my dough is too sticky?
If your dough feels too sticky, try adding a little more flour while rolling it out, or chill it in the fridge for a bit longer to firm it up.
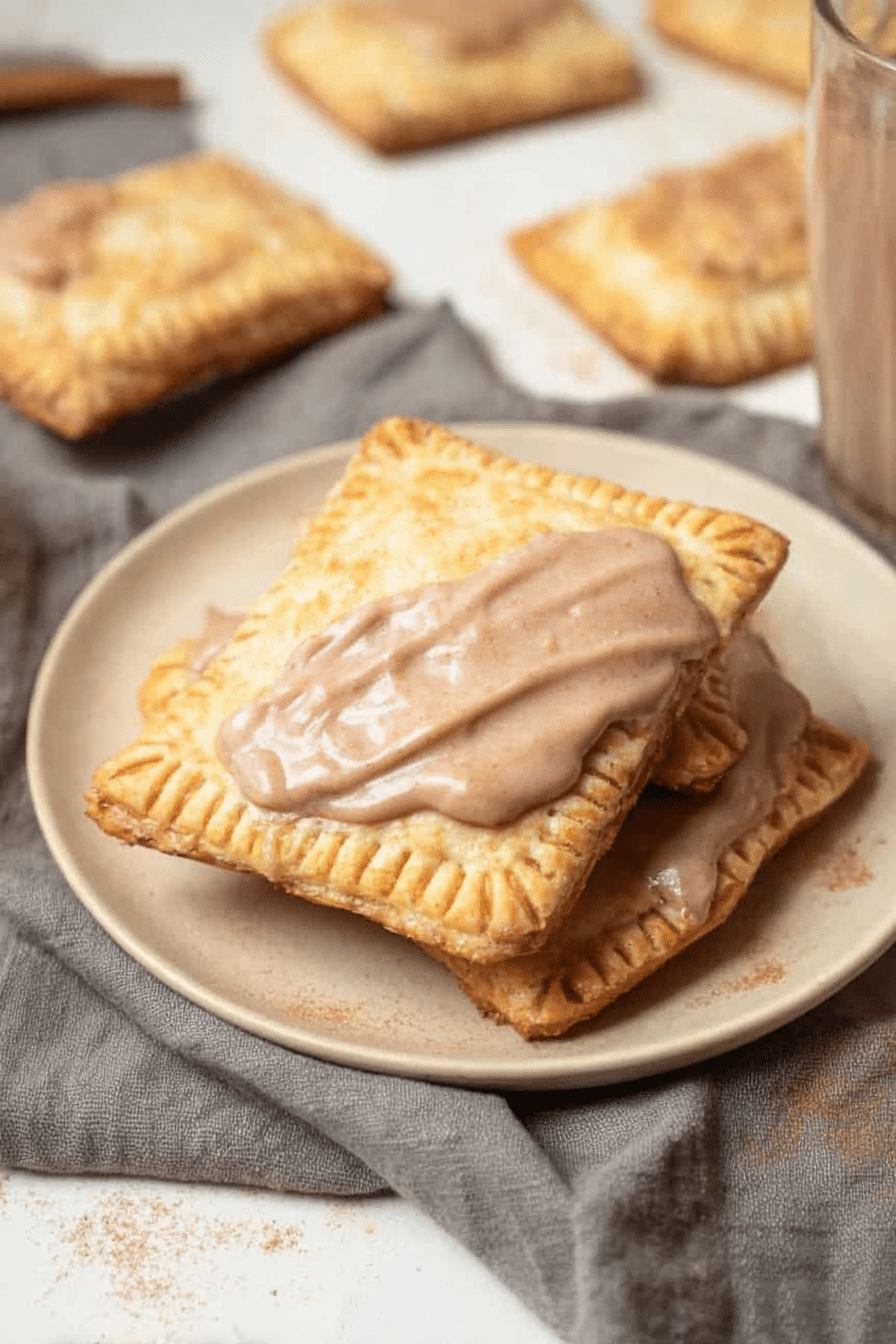
Brown Sugar Cinnamon Pop-tarts
Ingredients
Method
- Whisk together the flour, sugar, and salt. Add in the cold cubed butter and cut in using a pastry cutter or forks until it forms pea-sized crumbles. Whisk together the egg and milk and add to the dough, mixing until it clumps together.
- Roll out the dough on a floured surface. Form into a ball, divide in half, shape into discs, wrap in plastic wrap, and refrigerate for at least 2 hours.
- Roll out the dough and cut into rectangles, place on a baking sheet, and refrigerate while making the filling.
- Mix brown sugar, cinnamon, and flour. Brush one sheet of rectangles with egg wash, add filling, top with the second rectangle, seal and poke holes.
- Refrigerate the filled pop-tarts for at least 20 minutes.
- Preheat oven to 350°F, brush with egg wash and bake for 22-26 minutes until golden brown.
- Whisk glaze ingredients together until spreadable. Glaze pop-tarts once cooled.
- Store in an airtight container at room temperature for 3 days or in the fridge for a week.