When the holidays compress into a handful of busy evenings, these chocolate cream cheese truffles became my go-to quick gift and party treat. I remember pulling together a tray for last-minute guests, and the mix of creamy filling and snap of the chocolate shell always got people to stop mid-conversation. They look luxe, but the work is simple — which is exactly what I want when I’m short on time.
I learned early that a few small habits make a world of difference: use softened cream cheese, add melted chocolate slowly, and always chill the filling before you try to shape it. Those steps keep the filling silky and prevent the truffles from becoming greasy or too soft when you dip them.
Over the years I’ve adapted the basic mix for quick flavor swaps — a splash of extract here, a citrus zest there — so you can tailor these to your guests or your pantry. They store well in the fridge, travel nicely in small boxes, and are forgiving if you’re juggling more than one thing at once.
Why These Chocolate Cream Cheese Truffles Are Perfect for Busy Cooks
These truffles hit the sweet spot between speed and polish. From start to chilled-finished they take about an hour when you factor in the brief rest in the fridge. You don’t need a lot of tools — a bowl, a mixer or strong whisk, a baking sheet and something to melt chocolate in are enough. They’re plate-ready and gift-ready with very little extra effort.
I often make a double batch when I have a spare half hour, because they freeze and refrigerate well; that way I can pull out a small box for neighbors or a tray for a surprise guest with almost no ceremony. The memory I mentioned above is exactly that: one pan, two flavors (mint and orange), and a pile of ribboned boxes made in an evening.
Everything You Need for Chocolate Cream Cheese Truffles
- Cream cheese – The foundation for that silky, slightly tangy filling; if you need a dairy-free option, use a stable vegan cream cheese.
- Powdered sugar – Adds structure and smooth sweetness; powdered form blends without grainy texture.
- Chocolate chips – The melted chocolate becomes part of the filling; use dark, semi‑sweet, milk, or a blend depending on how sweet you like them.
- Chocolate candy melts or coating chocolate – For the shell: melts set up quickly and give a glossy finish; you can also use tempered couverture if you prefer.
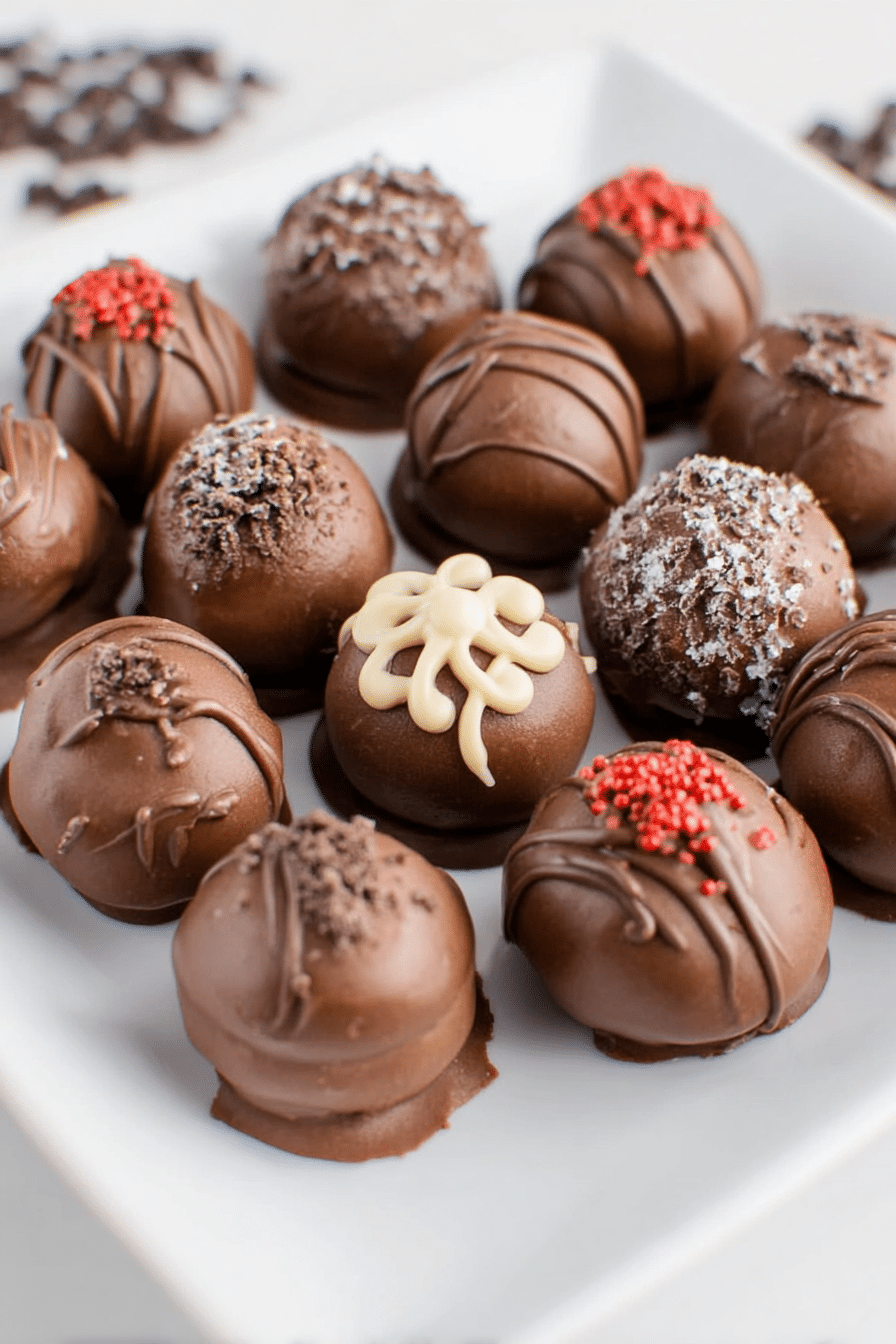
- Optional toppings (sprinkles, chopped nuts, shredded coconut) – Add contrast in texture and color; keep toppings varied for gift boxes.
If you want a quick variation, try mixing in nut butter for a denser filling or folding in a little instant espresso powder for depth. For inspiration with a different no-bake base, try this classic idea:
The Secret to a Silky, Melt-in-Your-Mouth Filling
The texture is everything here. Make sure the cream cheese is softened at room temperature so it blends smooth without lumps. When you introduce the melted chocolate, add it slowly so the fats combine and you don’t shock the mixture. The goal is a glossy, spoonable filling that isn’t runny — it should hold a gentle peak and feel velvety when you pull a spoon through it.
As you mix, stop and scrape the bowl frequently so no pockets of unmixed chocolate remain. If the mixture ever looks greasy, a short chill will bring it back to a workable consistency without affecting flavor.
Best Chocolate and Cream Cheese Ratios for Easy Truffles
A balanced approach keeps the truffles neither too sweet nor too dense. I generally aim for a roughly equal weight of chocolate and cream cheese for a classic, stable filling — more chocolate makes them firmer and richer; less keeps them creamier and tangier. Switching to higher‑cocoa dark chocolate lowers perceived sweetness and adds bitter notes, which is a great choice if you want a less sugary treat.
For dipping, let your coating chocolate be warm but not scorching; too hot and it can melt the filling or cause the shell to look pocked. Gently warm it until smooth and glossy, and work in small batches so the dipped truffles cool and set quickly.
Flavor Add-Ins That Take Seconds (Extracts, Zests, and More)
Small additions make big impressions and barely add time. A teaspoon of extract, a pinch of spice, or a quick grate of citrus zest will change the character of the filling immediately. Try vanilla or almond extract for classic warmth, orange zest for brightness, or a tiny pinch of cinnamon or cayenne for a surprising note.
For bright variations or playful pairings, split your batch and flavor each portion differently — one with mint extract, another with orange zest. If you like a richer contrast, melting a little peanut butter into a portion gives you an easy chocolate–peanut combo; for a peanut butter pairing idea, consider running a parallel batch:
How to Make Chocolate Cream Cheese Truffles (Step-by-Step)
- Beat softened cream cheese in a large bowl until smooth and slightly airy so the texture is light.
- Slowly add powdered sugar while mixing, pausing to scrape the bowl, until the filling feels silky and holds together.
- Melt chocolate chips gently (double boiler or short bursts in the microwave), then fold the melted chocolate into the cream cheese mixture a little at a time until uniformly colored and smooth.
- Divide or flavor the batter now if you want multiple flavors; extracts and zests work best at this stage.
- Chill the bowl in the refrigerator for about 20–30 minutes so the filling firms up and is easy to handle.
- Roll chilled filling into even balls between about 1/2″ and 1″ in size using a melon baller or a spoon, and place them on a silicone-lined sheet.
- Melt the coating chocolate or candy melts until glossy; dip each truffle, letting excess drip off, or drizzle for a lighter coating.
- Top with sprinkles, chopped nuts, or coconut before the shell sets, then transfer to a tray and refrigerate to fully harden.
- Store in the fridge in an airtight container and bring to a near-room temperature before serving for the best mouthfeel.
Pro Tip for chocolate cream cheese truffles: Chill Before Rolling
- Chilling firms the filling so you can roll clean, round balls instead of sticky blobs; I always set a timer when I chill so I don’t forget it in the fridge.
- If your kitchen is warm, extend chilling by 5–10 minutes — the filling should be firm but still pliable, not rock hard.
- If the filling is too soft after chilling, return it to the fridge rather than adding more powdered sugar; over-sugaring changes the texture noticeably.
How to Store, Gift, and Make-Ahead Chocolate Cream Cheese Truffles
For short-term storage, keep truffles in a single layer in an airtight container in the refrigerator; they stay fresh for up to two weeks. For longer storage, you can freeze them on a tray until firm and then transfer to a sealed container for several months — thaw in the fridge before serving to avoid sweating.
Decorate gift boxes with tissue and partitioned layers of parchment to protect coatings. If you’re putting together several homemade confections for gifting, it’s efficient to make different types at once (it saves on melting bowls and cleanup). For more ideas on boxed homemade candies to pair with these truffles, try a buttery option like homemade turtles to round out a gift set:
Nutritional Breakdown and Dietary Swaps
Typical truffle nutrition is modest when enjoyed in small portions — on average a single truffle is around 60 calories with a balance of fat and carbohydrates from the chocolate and cream cheese. If you need lower-sugar options, swap powdered sugar for a powdered sugar substitute designed for baking and choose high-cacao dark chocolate to reduce sugar content.
For dairy-free or vegan truffles, use a firm vegan cream cheese and vegan chocolate. Mascarpone is a good substitute if you want a richer, silkier filling. For a protein-forward twist, you can fold in a small amount of nut butter to the filling, which increases healthy fats and satiety.
Personal Anecdotes: My Love for Chocolate Cream Cheese Truffles
I made a tray of these during a snowy evening when unexpected guests arrived; everyone asked where I had purchased such elegant sweets. That moment — a simple bowl, a few minutes of stirring, and a small stack of boxes tied with twine — is why these truffles are on repeat at my house. Like my affection for other quick treats, they’re part of the toolkit for evenings when I want something homemade without fuss.
Troubleshooting, Pro-Tips, and Variations
Pro tips (quick, practical fixes I use):
- If the filling feels tacky while rolling, chill it again for 10–15 minutes — I prefer this to adding more sugar.
- Use a melon baller for consistent sizes; uniform truffles dip more evenly and look professional.
- If the coating sets with small dimples, give it a short microwave blast to smooth it, then quickly re-dip or drizzle.
Troubleshooting (common problems and solutions I’ve tested):
- Filling too soft: refrigerate until firm instead of adding more powdered sugar.
- Coating won’t set: make sure your chocolate or melts are completely dry and not overheated; cool slightly before dipping.
- Truffles sweating after removing from fridge: let them sit briefly in the fridge to stabilize temperature before moving to room temp to reduce condensation.
Variations (fast swaps for different flavors):
- Mint: add a small amount of mint extract to half the batch for a holiday classic.
- Orange: fold in fresh orange zest for a bright citrus lift.
- Spiced: a pinch of cinnamon or a tiny dash of cayenne adds warmth or heat for adventurous palates.
- Nutty: stir in a spoonful of smooth peanut or almond butter to create a richer, denser filling.
Frequently Asked Questions
Can I use different kinds of chocolate for the truffles? Absolutely! You can use dark, semi-sweet, milk chocolate, or even a mix according to your preference.
How long do the truffles stay fresh? The truffles should be stored in an airtight container in the refrigerator and can stay fresh for up to two weeks.
What can I use instead of cream cheese? If you’re looking for a substitute, you can use mascarpone cheese or even a dairy-free cream cheese for a vegan option.
Do I need to chill the filling before rolling? Yes! Chilling the filling for about 20-30 minutes helps it firm up, making it easier to roll into balls.
Can I add flavors to the truffles? Yes! You can personalize your truffles by adding extracts like vanilla or almond, or zests like orange or lemon.
Chocolate Cream Cheese Truffles
Ingredients
Method
- Begin by beating the cream cheese in a large bowl, then slowly add the powdered sugar and beat until light and fluffy.
- Melt the chocolate chips in a double boiler over the stove, or the microwave, then add to the cream cheese mixture and mix until smooth.
- If you want different flavours, you can add a teaspoon or two of extract. Or divide the batter and make several flavours.
- Place the bowl in the fridge for 20-30 minutes to allow the filling to firm up so you can roll it.
- Remove the truffle filling from the fridge and roll into balls between 1/2 and 1 inch in size and place on a baking sheet lined with a silicone mat.
- Melt the chocolate candy melts in the microwave or double boiler and then dip the truffle balls in the melted chocolate.
- Move back to the silicone baking sheet to allow the chocolate shell to harden. If you want to decorate with sprinkles, do so before the chocolate sets.
- Once the shell has hardened, move the truffles to an air tight container and store in the refrigerator.