Homemade Frosted Brown Sugar Cinnamon Pop Tarts

- Prep
- 180 min
- Cook
- 25 min
- Total
- 225 min
- Serves
- 9
- Calories
- 250 kcal
On this page12 quick jumps
TOC
12 quick jumps
Introduction
I still remember the small, crinkly foil that kept store-bought pop tarts warm in my lunchbox—those golden rectangles felt like tiny promises of comfort. Years in my kitchen taught me that the memory is only half the magic: when you make them from scratch, with real butter and brown sugar cinnamon filling, the aroma carries you back and then holds you there. I make these on slow weekend mornings when I want that familiar feeling, but made honest and a little better.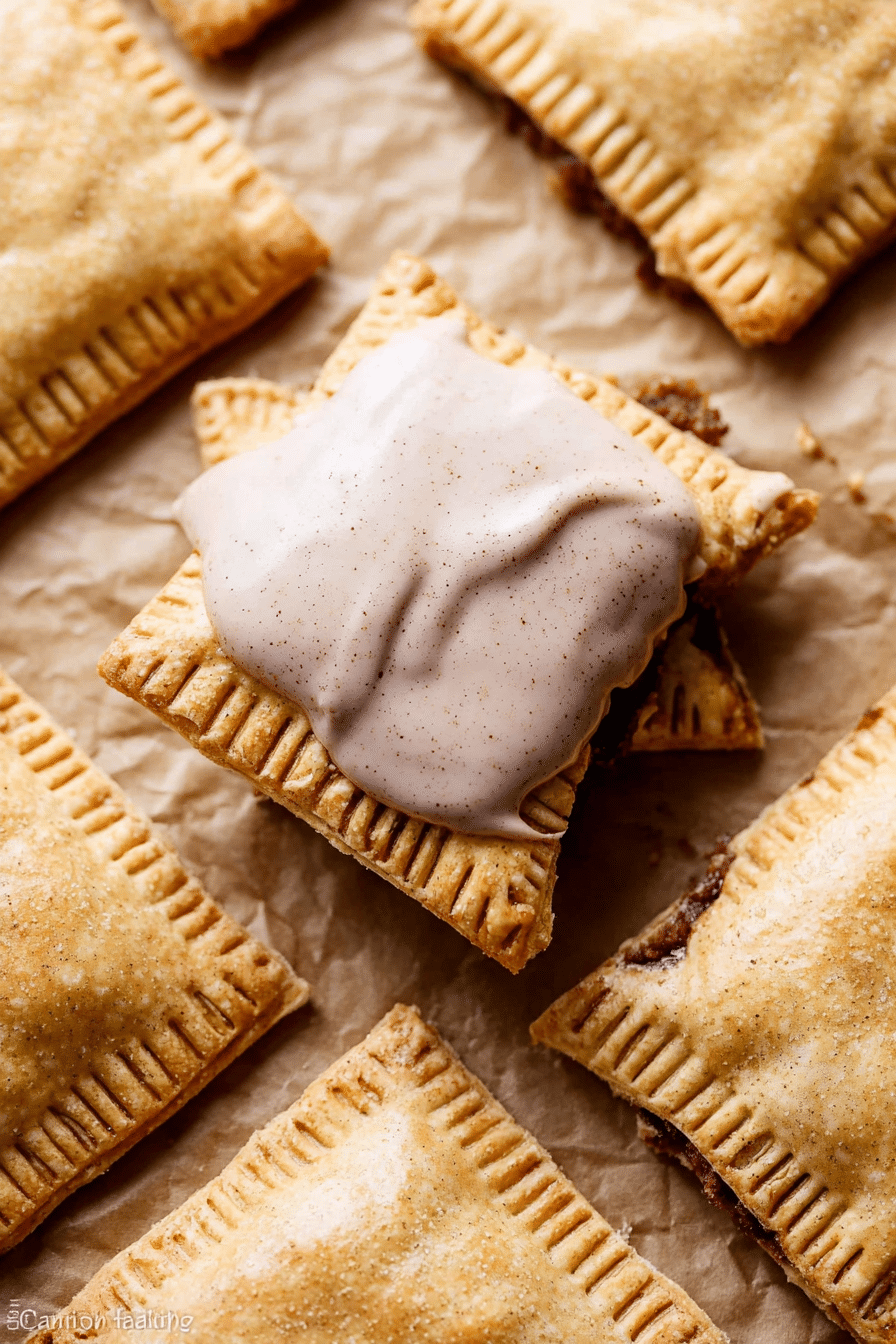
Why These Frosted Brown Sugar Cinnamon Pop Tarts Are Perfect for You
These pop tarts bring together the things I treasure most in old-fashioned baking: real ingredients, an all-butter crust, and a filling that tastes like a childhood memory remade in a grown-up kitchen. The pastry browns to a gentle golden hue and the glaze gives a soft sheen that makes the first bite feel celebratory. Because everything is made from scratch, you control the sweetness, the spice, and the texture—no mystery preservatives, just honest pantry staples. When I think of why these stand out, it’s the contrast: a flaky, buttery crust that yields to a soft, warmly spiced center. That combination is what makes them sing at breakfast, in packed lunches, or warmed up for an afternoon treat. Making them at home turns the ordinary into something worth savoring, and that familiar smell of cinnamon and caramelized brown sugar is as comforting as any family ritual.Everything You Need for Homemade Frosted Brown Sugar Cinnamon Pop Tarts
Below I’ll walk through the core ingredients and the basic equipment you’ll want on hand. I’ve included alternatives for special diets so you can adapt these pop tarts without losing the nostalgic flavor.- All-purpose flour – The structure of the pastry; for gluten-free, use a reliable 1:1 gluten-free flour blend and expect a slightly different texture.
- Unsalted butter (chilled) – The hero for flakiness and flavor; keep it cold so you get lovely layers. For a vegan option, use cold, firm plant-based butter sticks formulated for baking.
- Ice water – Helps bring the dough together without warming the butter; chill is the point here.
- Brown sugar – Gives depth and a caramel note to the filling; dark or light both work but dark is richer.
- Cinnamon – The defining spice; choose a warm, fragrant cinnamon rather than an overly sharp one.
- Confectioners' sugar, milk, vanilla – For the glaze; swap dairy milk for plant-based milk for the vegan version, and adjust to get a spreadable consistency.
- Egg (for egg wash) – Helps the crust brown and glue the seams; if you’re vegan, brush with milk or a milk+oil mix instead.
- Equipment – Rolling pin, ruler (for even rectangles), sharp knife or pizza cutter, fork for crimping, baking sheets lined with parchment or a silicone mat, and a cooling rack.
How to Make Frosted Brown Sugar Cinnamon Pop Tarts (Step-by-Step)
- Prepare a classic all-butter pastry: mix flour, a touch of sugar and salt, then cut chilled butter into the dry ingredients until the pieces are about the size of peas; avoid overworking so the butter stays in chunks.
- Add ice water a little at a time, stirring until the dough just comes together into large clumps; transfer to a floured surface and gently form into two discs without kneading.
- Wrap each disc and chill. Chill the dough for at least two hours; I often make it the night before to let the flavors settle and the butter firm up.
- Roll one chilled disc into a thin rectangle on a floured surface and cut into even rectangles; transfer to a lined baking sheet and refrigerate while you roll the second disc.
- Mix the filling: brown sugar, cinnamon, and a little flour to stabilize—spoon a heaping amount into the center of half the rectangles, leaving a small border around the edges.
- Brush the borders with egg wash (or milk for a non-egg version), top with the second rectangle, press to seal, poke vents in the top, and crimp edges with a fork. Chill the filled pastries for at least 20 minutes before baking so they hold shape.
- Bake until golden brown, rotating pans for even color. Let the pop tarts cool on the pan briefly, then move to a rack to cool completely before glazing.
- Make the glaze: whisk confectioners' sugar with milk, cinnamon, and vanilla until thick but spreadable. Spoon and spread over completely cooled pastries and allow the glaze to set about an hour.
The Secret to a Flaky Pastry Crust
The short version: cold butter and gentle handling. When butter remains in small, chilled pieces within the dough, those pieces steam in the oven and create delicate layers. Keeping everything cold and resisting the urge to overwork the dough is what gives you light, flaky layers rather than a tough, dense crust. If you want to read more on achieving the same flaky texture in other pastries, check out this guide on flaky pie crust.- Troubleshooting (bulleted for scannability):
- If your dough is crumbly: I’ve felt this—dip fingers in cold water and gently bring it together, or add a splash more ice water, a teaspoon at a time.
- If your crust is tough: you likely overworked the dough. Chill it, and use a gentler touch next time; less handling keeps gluten from tightening.
- If butter melts too quickly while rolling: work on a cool surface, keep your hands cool, and chill the dough between steps. I often pop the rolled rectangles back in the fridge for 10–15 minutes before filling.
- If edges won’t seal: press firmly and use an egg wash or milk wash to help glue; chill the sealed pastries so they stay shut while baking.
Why Chilling Dough is Essential for Perfect Pop Tarts
Chilling matters more than patience might suggest. Cold dough keeps butter solid so the pastry holds its shape; when it hits the oven, that solid butter creates steam and layers rather than melting into the flour. A chilled dough also relaxes gluten slightly, which helps prevent shrinkage and toughening when baked. Chilling also gives time for flavors to meld—the brown sugar and cinnamon deepen with a short rest. I always notice that a well-chilled dough rolls more cleanly and feels pleasantly firm to the touch, which makes the whole process calmer and the final pastry more elegant.- Chilling tips: wrap the dough discs tightly to prevent dryness, chill filled pastries briefly before baking so they keep their shape, and for rushed schedules you can freeze discs and thaw just until rollable.
- Interactive idea: if you’re unsure, test one tart first—bake a single pastry to confirm your oven temperature and timing before baking the whole batch.
Pro-Tip for Frosted Brown Sugar Cinnamon Pop Tarts
- Use parchment or a silicone mat for easy removal and cleanup—this helps the underside brown evenly and prevents sticking.
- For deeper flavor, toast the brown sugar lightly in a dry pan for a minute before mixing with cinnamon (watch closely so it doesn’t burn).
- Brush the edges with egg wash first to seal, then again before baking for the best shine and color.
- Try subtle variations: add a pinch of nutmeg to the filling or a splash of maple extract in the glaze for warm complexity.
- Pairing suggestion: serve warm with a simple cup of coffee or milk for an authentic comfort pairing.
Creative Ways to Enjoy Your Pop Tarts
These pop tarts are playful: they’re perfect straight from the oven, but they also lend themselves to a host of creative uses. Try them warm with a dab of butter, or get whimsical and turn them into a dessert plate centerpiece. For breakfast pairings and combo ideas, try a plate that includes a slice of cinnamon donut bread for a truly indulgent morning, or serve small pop tarts alongside lighter fruit-based pastries.- Variations (bulleted for scannability):
- Fruit twist: swap the brown sugar filling for a thin spread of jam or cooked diced apple for a fruity version.
- Chocolate-hazelnut: add a smear of chocolate spread under the brown sugar filling for a richer treat.
- Ice cream sandwich: cool pastries, fill with vanilla ice cream, and freeze briefly for a playful dessert.
- Miniature tarts: cut smaller rectangles for bite-sized treats perfect for brunch trays.
Storage Tips for Made-From-Scratch Pop Tarts
- Room temperature: store in an airtight container for a few days; the crust stays pleasant and the glaze keeps its sheen.
- Refrigeration: for longer life, refrigerate for up to several days—bring to room temperature or warm gently before serving to bring back tenderness.
- Freezing: you can freeze baked or unbaked pop tarts—wrap tightly and freeze for up to three months. Thaw overnight in the refrigerator before reheating.
- Reheating: warm in a moderate oven until heated through to refresh the crust. I find a short oven stint brings back that just-baked flakiness better than microwaving.
Frequently Asked Questions
Can I use a different type of flour for the pastry crust? While all-purpose flour works best for this recipe, you could try using a gluten-free flour blend. Just be aware that the texture may vary. How long do these pop tarts stay fresh? Homemade frosted brown sugar cinnamon pop tarts can be stored in an airtight container at room temperature for up to 3 days or in the refrigerator for up to 5 days. What can I use if I don't have egg wash? If you don’t have an egg wash, you can brush the pastry with milk or a mixture of milk and oil. This helps with browning as well! Are these pop tarts suitable for freezing? Yes! You can freeze the unbaked or baked pop tarts. Just remember to wrap them tightly. They will keep well in the freezer for up to 3 months. Can I customize the filling for these pop tarts? Absolutely! Feel free to experiment with different fillings like fruit jams, chocolate hazelnut spread, or even savory options!Ingredients
- 2 and 1/2 cupsall-purpose flour (plus more as needed)
- 2 teaspoonsgranulated sugar
- 1 teaspoonsalt
- 1 cupunsalted butter (chilled and cubed)
- 1/2 cupice water (plus more as needed)
- 1/2 cuppacked dark or light brown sugar
- 2 teaspoonsground cinnamon
- 1 tablespoonall-purpose flour
- 3/4 cupconfectioners' sugar (sifted)
- 1 tablespoonmilk (plus more as needed)
- 1/2 teaspoonground cinnamon
- 1/4 teaspoonpure vanilla extract
Instructions
- 1
In a large bowl, whisk together the flour, sugar, and salt. Cut in the butter until the mixture resembles coarse meal.
- 2
Drizzle the ice water over the mixture and stir until it forms large clumps. Gather into a ball, flatten into discs, wrap in plastic, and refrigerate.
- 3
Roll out one disc of pastry and cut into rectangles, place on a baking sheet, and refrigerate.
- 4
Repeat with the second disc of pastry. Fill half with the cinnamon-brown sugar mixture, then top with another pastry rectangle and seal.
- 5
Poke holes in the tops for steam, brush with egg wash, refrigerate again, and then bake until golden.
- 6
Whisk together the icing ingredients and drizzle over cooled pop tarts.
Recipe Card
Homemade Frosted Brown Sugar Cinnamon Pop Tarts
Keep it handy for later, send it to someone cooking with you, or open the clean print view.
- Prep
- 180 min
- Total
- 225 min
- Serves
- 9
You might also like
The Blueberry Latte I Make Every Morning — Ready in 10 Minutes
May 18, 2026
How I Finally Nailed Rosemary Cherry Focaccia with Sea Salt
May 18, 2026
The Probiotic Gummies I Make Almost Every Week
May 17, 2026
How I Make a Mint Matcha Latte in 5 Minutes
May 17, 2026
Reviews
Be the first to review this.