I’ve made more lemon bars than I can count, and the version I turn to on busy weeknights and last-minute get-togethers is reliable and bright. In my kitchen this recipe became my go-to because the hands-on time is short and the results are consistently bright and just-tangy enough. I’ll tell you exactly what to watch for so your bars come out smooth, not rubbery.
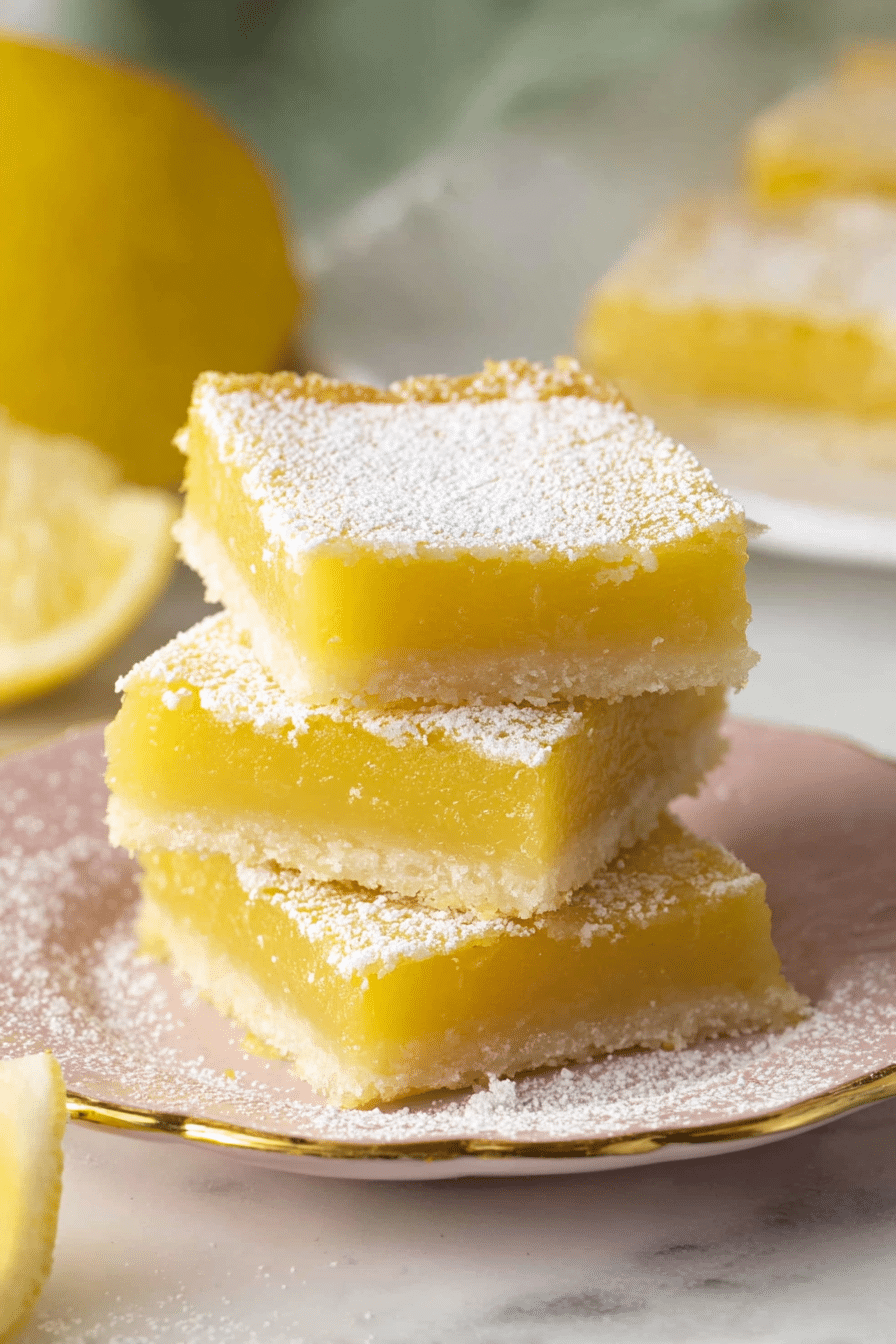
I learned the hard way that a great crust and a silky filling are more about technique than fancy ingredients. A light press for the crust, a pulse of lemon zest into the sugar, and careful attention to bake time are all you need. The result is a golden shortbread base with a silky, slightly set lemon layer that tastes like sunshine.
I keep this recipe in heavy rotation because you can make it ahead and it travels well to potlucks. If you want another lemon-forward treat for company, try this:
If you’re in love with lemony desserts, try our Lemon Blueberry Cake for a delightful twist.
Why These Lemon Bars Are Perfect for Busy Home Cooks
These bars require minimal active time and common pantry ingredients, so you can have dessert ready without tying up your afternoon. The crust is quick to mix and press, and while the filling needs a short bake and chill, most of that time is hands-off. The bright lemon flavor reads fresh and impressive, so even a simple plating looks intentional.
Picture the bright yellow filling, the clean lemon scent as you zest, and the contrast of the buttery crust under a powdered-sugar blanket. That sensory combo makes a small effort feel like a big payoff.
Everything You Need for Lemon Bars
Get your workspace organized before you start: a 9×13 baking dish lined with parchment, a mixing bowl for the crust, another for the filling, a food processor or small blender for pulsing the zest into the sugar, and a sharp knife for cutting. Room-temperature eggs help the filling emulsify into a silkier texture, so set them out early.
- Equipment essentials – 9×13 pan lined with parchment, mixing bowls, spatula, whisk, food processor (or a small blender) for zesting, and a sharp knife.
- Why room-temperature eggs – they blend more evenly into the filling, giving you a smoother texture and fewer air pockets.
- Fresh lemons – the zest and juice from fresh fruit are key to a bright flavor; bottled juice lacks essential aromatic oils.
Ingredient discussion (conversational):
- All-purpose flour – forms the structure of the crust and helps set the filling; you can substitute almond flour for a gluten-free crust option.
- Powdered sugar – lightens the shortbread and provides a clean surface for dusting.
- Butter – gives the crust its rich, tender texture; for vegan swaps use a firm plant-based butter.
- Lemons (zest & juice) – zest provides essential oils and aroma while juice gives tartness and body to the filling.
- Sugar – balances the acidity and helps the filling set smoothly when baked.
- Eggs – the emulsifiers that create the filling’s silky texture; use room temperature for best results.
The Secret to a Tender, Yet Firm Lemon Filling
The filling relies on a precise balance: enough sugar to temper the lemon’s acidity, enough eggs to set, and careful baking so it firms without becoming rubbery. Mixing fully until smooth helps prevent curdling and gives a glossy pourable texture.
Baking time controls firmness — edges should look set while the center retains a slight jiggle. The center will finish setting as it cools and chills. If you need a gluten-free option for the base, almond flour works well for structure and flavor; I often recommend it if guests need gluten-free treats.
Achieving the Perfect Shortbread Crust
Texture in the crust comes down to how you handle the butter and how evenly you press the dough. Cold butter produces a flakier, more layered shortbread when grated in, while melted butter gives a denser, more cookie-like base. For a classic tender shortbread that still holds under the filling, I prefer cutting the butter in briefly so small bits remain — but if you’re short on time, melted butter is an acceptable shortcut.
Press the crust firmly and evenly into the pan so the filling bakes on a level surface. Look for a light golden color at the edges and across the top to know the crust is baked through but not overdone.
Why Fresh Lemon Juice Matters for Bright Flavor
Fresh lemon juice contains aromatic compounds and a liveliness that bottled juice lacks. Those volatile oils in the zest and the acidity in fresh juice give a bright, clean flavor. Bottled juice can taste flat or slightly bitter due to processing and preservatives.
Zesting whole lemons right before mixing releases the essential oils that make the filling smell and taste vibrant. That quick pulse of zest into sugar also infuses the sugar with lemon oils for an extra fragrant lift.
How to Make Lemon Bars (Step-by-Step)
- Preheat the oven and line your baking pan with parchment so you can lift the bars out easily once chilled.
- Mix the crust components until the dough comes together; press evenly into the pan and bake until it’s a light, even golden color.
- While the crust bakes, pulse the granulated sugar with lemon zest in a food processor until the sugar is pale and aromatic.
- Whisk the sugar-zest mixture with the remaining dry ingredient, then add the lemon juice and eggs and mix until completely combined and smooth.
- Pour the filling over the warm crust and return to the oven. Bake until the edges are set and the center still has a slight jiggle; rotate the pan halfway through for even baking.
- Let the pan cool at room temperature, then chill until fully firm before lifting out on the parchment and dusting with powdered sugar.
- For clean slices, use a sharp, damp knife and wipe between cuts to keep edges crisp.
For an easy guide to prepare delicious lemon bars, check out our How to Make Lemon Bars.
Pro Tip for Lemon Bars: Pulse Lemon Zest into the Sugar for Brighter Flavor
Note to writers: present the ‘Pro-Tips,’ ‘Troubleshooting,’ and ‘Variations’ sections as bulleted lists for easy scanning.
- I always pulse zest with sugar first — it releases oils that lift the whole bar.
- If your kitchen is humid, chill the crust briefly before filling to reduce sogginess.
- Try folding a small amount of finely grated lemon peel into the filling for an extra bright pop.
- Alternate flavor idea: add a touch of dried lavender or hibiscus to the sugar before pulsing for a floral twist.
- For a lower-sugar version, reduce the filling sugar modestly and offset with a touch more zest — but taste as you go.
For another delicious lemon treat, try our Lemon Poppy Seed Cheesecake Cookies that can complement your lemon bars perfectly.
Troubleshooting
- If the filling is rubbery, I likely overbaked it — aim for set edges and a slightly jiggly center.
- If the crust is too dense, I probably used melted butter exclusively; next time I’ll keep some butter cold or grate it in for texture.
- If you get a metallic aftertaste, check your pan type — acidic lemon reacts with some metals, so I avoid reactive pans.
- If cuts are messy, chill the bars completely and use a hot, damp knife for cleaner edges.
How to Store, Chill, and Make-Ahead Lemon Bars (Plus Variations)
Store lemon bars in the refrigerator once cooled — they keep well for several days tightly wrapped or in an airtight container. They also freeze beautifully: slice them, layer with parchment, and freeze; thaw in the refrigerator before serving.
Don’t forget to check out our Lemon Pound Cake for a perfect make-ahead dessert option.
- Make-ahead – Bake, cool, and chill overnight; dust with powdered sugar just before serving.
- Freezing – Freeze sliced bars between parchment layers and thaw in the fridge.
- Gluten-free variation – Use almond flour in the crust and a touch more butter or binder for structure.
- Vegan variation – Replace butter with firm plant butter and swap eggs with a silken tofu or commercial egg replacer adjusted for texture.
- Flavor swaps – Stir a pinch of lavender with the sugar-zest or infuse some citrus olive oil into the crust for a subtle twist.
Frequently Asked Questions
Why can’t I use a metal pan for lemon bars?
It’s best to use a glass or ceramic pan for lemon bars because the acid in the lemon juice can react with metal, resulting in a slight metallic taste. Plus, a non-metal pan helps ensure even cooking.
What can I substitute for fresh lemon juice?
While fresh lemon juice is recommended for the best flavor, you can use bottled lemon juice as a substitute in a pinch. However, the taste won’t be as bright and vibrant.
How do I prevent my lemon bars from getting a rubbery texture?
To avoid a rubbery texture, be careful not to overcook the filling. Bake until the edges are set but the center is still slightly jiggly; it will firm up as it cools.
Can I make lemon bars ahead of time?
Yes! Lemon bars can be made ahead of time. Simply store them in the refrigerator once they’ve cooled completely, and they’ll stay fresh for a few days.
How do I cut lemon bars cleanly?
For clean cuts, use a sharp, damp knife to cut through the lemon bars. Wipe the knife clean between cuts to maintain crisp edges.
Lemon Bars
Ingredients
Method
- Heat oven to 350F and line a 9x13 baking dish with parchment paper.
- Whisk together 2 1/2 cups of flour with powdered sugar and salt, then pour in the melted butter and mix until combined.
- Sprinkle the dough into your lined pan and press down into a flat layer. Bake at 350F for about 20 minutes or until a light golden color.
- In a food processor, pulse the sugar with the lemon zest until fully incorporated and the sugar is light yellow.
- In a large bowl, mix the sugar and remaining half cup of flour.
- Pour in the lemon juice and add the eggs then mix very well until completely combined.
- Pour the filling onto the warm crust then transfer to oven and bake for about 25 minutes, turning halfway through the bake.
- Remove from oven and allow to cool for an hour before chilling in the refrigerator for two hours.
- Dust with powdered sugar and cut into bars using a clean, sharp, damp knife.