I started making these marbled banana muffins on chaotic weekday mornings when my kids needed something handheld, chocolatey, and not too fussy. Over the years I’ve learned which small steps keep the muffins tender and give you that gorgeous chocolate swirl kids always point at first. I’ll share the tiny mistakes I made (too much stirring, the batter gone gray) so you don’t repeat them.
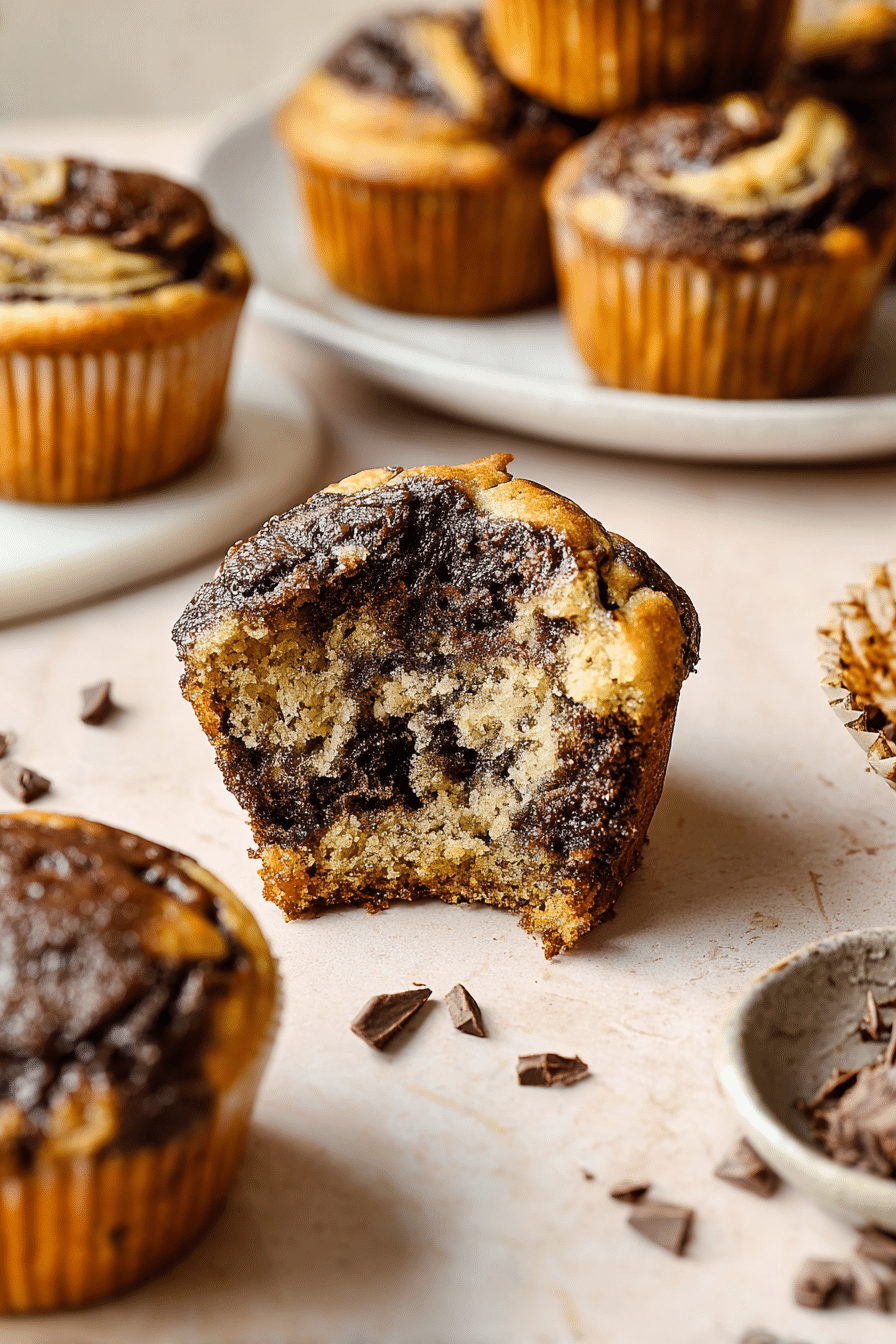
I remember my kitchen filling with the warm, sweet smell of bananas the first time I tested this recipe; the chocolate streaks stay glossy and the chips melt into tiny pools kids love. These are the kind of muffins that look special but don’t take all morning — I get a batch ready in about 40 minutes from start to finish.
If you’re juggling lunches, after-school snacks, or an easy weekend baking project, these marbled banana muffins are forgiving and flexible. I’ll also tell you how to scale the recipe up for bigger batches and how to sneak in some healthier swaps without losing that melty chocolate fun.
Why These Marbled Banana Muffins Are Perfect for Busy Families
These marbled banana muffins hit the sweet spot families ask for: quick to make, kid-friendly flavors, and portion-size control. The whole recipe takes about 40 minutes so you can bake before school or on a lazy weekend while kids help with the swirls. The classic combo of banana and chocolate is a hit with most kids — it’s familiar but playful when you ripple in the chocolate batter.
Because they’re muffins, they’re portable and lunchbox-ready, and you can easily double the batch if you want extras for the week or for a playdate. Picture warm muffins out of the oven with the chocolate chips glistening on top — that shine is what gets kids excited to try them.
If you like quick banana treats, try our no-bake banana pudding dessert for another easy family-friendly option.
Everything You Need for Marbled Banana Muffins
Below I walk through the role of each ingredient and simple swaps so you can pick what fits your pantry and dietary needs. I kept this conversational so you can grab what you need without hunting for exact amounts here — the precise measurements are in the recipe card handled separately.
- Bananas – Use very ripe, spotty bananas for natural sweetness and moisture; they create a soft crumb kids like.
- Brown sugar or a soft sugar – Adds warmth and helps with tenderness; swap to coconut sugar for a slightly nuttier note.
- Eggs – Bind the batter and add structure; room-temperature eggs mix more evenly into the batter.
- Milk (dairy or plant) – A little liquid keeps the batter tender; almond or oat milk works if you need a dairy-free option.
- Vanilla – Brings out the banana flavor and complements the chocolate without stealing the show.
- All-purpose or white whole wheat flour – The base for structure; for gluten-free, see the swaps below.
- Cocoa powder – The backbone of the chocolate swirl; use unsweetened cocoa for a deep chocolate color without extra sweetness.
- Baking powder & baking soda – Leavening agents that help the muffins rise and keep them light.
- Cinnamon – A cozy, kid-friendly note that warms the banana flavor.
- Salt – Small amounts make the sweet flavors pop; flaky sea salt is great on top for a little contrast.
- Melted coconut oil or butter – Adds moisture and tenderness; coconut oil makes the recipe dairy-free if you need that option.
- Chocolate chips – For melty pockets of chocolate kids love; reserve a few for the tops so they look irresistible fresh from the oven.
For a nutritious snack option that also uses ripe bananas, consider our banana oatmeal bars — another good way to use up extra bananas.
How Ripe Bananas and Temperature Affect Texture
Ripe bananas are the secret to tender, flavorful muffins. As bananas ripen, their starches break down into sugars — that extra sweetness helps keep the crumb moist and soft without needing to add more sugar. Using underripe bananas will make the muffins drier and less flavorful.
Room temperature eggs and melted-but-cooled oil give you a smoother batter. If the melted oil is too hot when it hits the eggs, it can affect the batter’s texture; letting it cool slightly before folding it in helps the batter behave and bake evenly. When you mix everything just until combined, the batter should feel slightly thick but smooth — you’ll be able to smell the sweet bananas and see the batter’s glossy sheen before you divide it.
The Secret to a Bold Chocolate Swirl (No Overmixing!)
Getting a dramatic chocolate swirl is mostly about patience and restraint. Overmixing thins the batter, dulls the contrast between the banana and chocolate batters, and can make the muffins tough. Use this simple layering rule: keep the batters separate until assembly, add them in alternating spoonfuls, then swirl just a couple of times with a knife.
A thin paring knife or butter knife works best — don’t plunge or stir, just drag a few gentle S-shaped strokes through the batter so the colors trail into each other. Fewer, deliberate strokes give you that kid-worthy marble without turning everything brown. You’ll see the contrast clearly while you work; that visual cue helps you stop at the right moment.
Speaking of chocolate, check out these fun chocolate covered banana pops for another treat idea!
Swirl Technique: Get a Kid-Worthy Marble Every Time
- Fill each muffin liner first with a spoonful of the plain banana batter, then add a spoonful of the chocolate batter on top — alternate layers so each cup has both colors.
- Use a thin knife and insert it into the batter vertically; make 1–2 gentle back-and-forth S-strokes through each cup to create a marbled pattern. Don’t rotate the knife or overwork it.
- If you want a pronounced marble, add slightly larger dollops of each batter so there’s more color to contrast when you swirl.
- For a subtler swirl, use smaller dollops and only one light stroke per cup.
- Get kids involved: let them place dollops and make one slow sweep with the knife while you hold the pan steady. It’s a fun, safe way to teach them about gentle mixing.
- Consider filming a short phone video of one cup being swirled to show kids the motion step-by-step; visuals help them copy the movement without overdoing it.
How to Make Marbled Banana Muffins (Step-by-Step)
- Preheat the oven to a moderate temperature so your muffins rise evenly and set the timer — this entire process typically fits into a 40-minute window including bake and short cool time.
- Line a 12-cup muffin tin and give the liners a quick spray or light oil to prevent sticking so the bottoms come out clean for little hands.
- In one bowl, mash the ripe bananas and whisk together the softer wet ingredients until smooth; in another bowl, whisk the dry ingredients so leaveners distribute evenly.
- Fold the dry into the wet just until combined — a few streaks are fine; then stir in the cooled melted oil until the batter looks cohesive but not overworked.
- Scoop roughly half the batter into a separate bowl and stir in the cocoa powder and some chocolate chips for the chocolate batter.
- Spoon alternating dollops of plain and chocolate batter into the muffin liners, then swirl each cup with a knife about 1–2 times to form the marble.
- Top each muffin with a few extra chocolate chips so they look and taste irresistible as soon as they come out of the oven.
- Bake until a tester comes out clean or with a few moist crumbs — most ovens take around 18–25 minutes; cool the muffins in the pan briefly (about 10 minutes) before transferring to a rack to finish cooling so they set without sweating.
Pro Tip for marbled banana muffins: Easy Gluten-Free & Lower-Sugar Swaps
Below are short, scannable tips for swapping ingredients without losing that soft, chocolatey charm. I’ve tested many of these swaps in my kitchen and share what worked best.
Pro-Tips:
- For gluten-free: use a reliable 1-to-1 gluten-free flour blend that contains xanthan gum; it will mimic the structure of all-purpose flour and keep the muffins tender.
- For lower sugar: try cutting the brown sugar amount or replace part of it with unsweetened applesauce; this keeps moisture while reducing sugar.
- For dairy-free: melted coconut oil or a neutral-flavored vegan butter keeps the texture rich and moist.
- If you use a sugar substitute, pick one that measures like sugar and keep an eye on baking time — lower-sugar muffins can brown faster.
- I sometimes add a splash more milk if batter feels too thick after swaps; small texture tweaks save a lot of disappointment.
Troubleshooting (short, practical fixes):
- If muffins are dense: I’ve seen this when the bananas weren’t ripe enough or the batter was overmixed — use riper bananas and fold gently.
- If the swirl disappears: you probably overmixed; next time drag the knife only once or twice through each cup.
- If tops brown too fast: tent with foil during the last few minutes of baking or reduce oven temperature a touch.
- If the center sinks: check that your leavening is fresh and don’t open the oven during the early rise period.
Variations (quick ideas kids love):
- Add a sprinkle of chopped nuts to half the batter for a textural contrast if no nut allergies are present.
- Fold in mini white chocolate chips for a cookies-and-cream feel that’s fun for kids.
- Stir in a spoonful of peanut butter to the plain batter for a banana-peanut swirl variation.
- Top with a pinch of flaky sea salt for older kids and adults who enjoy a sweet-salty balance.
How to Store, Freeze, and Reheat These Muffins
- Short-term storage: keep cooled muffins in an airtight container at room temperature for up to three days; place a paper towel under and over them to absorb excess moisture and keep tops from getting soggy.
- Long-term storage: freeze muffins individually wrapped in plastic wrap and then in a freezer bag; they’ll keep well for several months and are great for quick breakfasts.
- To reheat: thaw at room temperature or microwave for short bursts (10–20 seconds) to warm the center and revive the melty chocolate chips — they’ll smell freshly baked again.
- Make-ahead tip: freeze half the batch right after baking so you always have a snack on hand; for a fun pairing, keep 3-ingredient frozen candied grapes in the freezer for a quick fruit side.
These marbled banana muffins are one of those recipes that feels special but fits a busy life. I’ve baked them for school mornings, snack swaps, and casual weekend baking sessions — they always travel well and the chocolate swirl makes them feel extra fun. If you try any swaps or let your kids help with the swirls, I’d suggest watching the first few pans so you can fine-tune the swirl pressure and stopping point.
Frequently Asked Questions
Can I use frozen bananas for this recipe?
Yes! Just make sure to thaw and mash them well before adding to the batter. They should be very ripe for the best flavor.
What can I substitute for coconut oil?
You can use melted butter or vegan butter as a substitute for coconut oil in this recipe.
How can I make these muffins gluten-free?
To make gluten-free marbled banana muffins, simply substitute the all-purpose flour with a gluten-free flour blend.
How do I store leftover muffins?
Store the muffins in an airtight container at room temperature for up to 3 days, or in the refrigerator for up to a week. You can also freeze them for longer storage!
How can I reduce the sugar content in the recipe?
You can lower the sugar by using less brown sugar or substituting with a sugar-free sweetener that measures like sugar.
Marbled Banana Muffins
Ingredients
Method
- Preheat the oven to 350°F. Line a muffin tin with liners and spray the inside with nonstick cooking spray.
- In a large bowl, mix together mashed bananas, brown sugar (or coconut sugar), eggs, almond milk, and vanilla extract.
- In a separate bowl, whisk together the flour, baking powder, baking soda, cinnamon, and salt.
- Combine dry ingredients with wet ingredients and stir in melted coconut oil until just combined.
- Divide batter; stir cocoa powder and ½ cup chocolate chips into half of the batter.
- Spoon batters into muffin liners, alternating between banana and chocolate batter, and swirl together lightly.
- Top with additional chocolate chips and bake for 18-25 minutes or until a tester comes out clean.
- Cool in pan for 10 minutes before transferring to a wire rack. Sprinkle with flaky sea salt before serving.