I’ve made these mini chocolate tarts countless times in my kitchen, and they’re one of those small bakes that always gets big reactions. They’re simple to assemble, travel well, and the contrast between the crisp shell and the glossy ganache is exactly the kind of dessert I reach for when I want something impressive without hours of fiddly work.
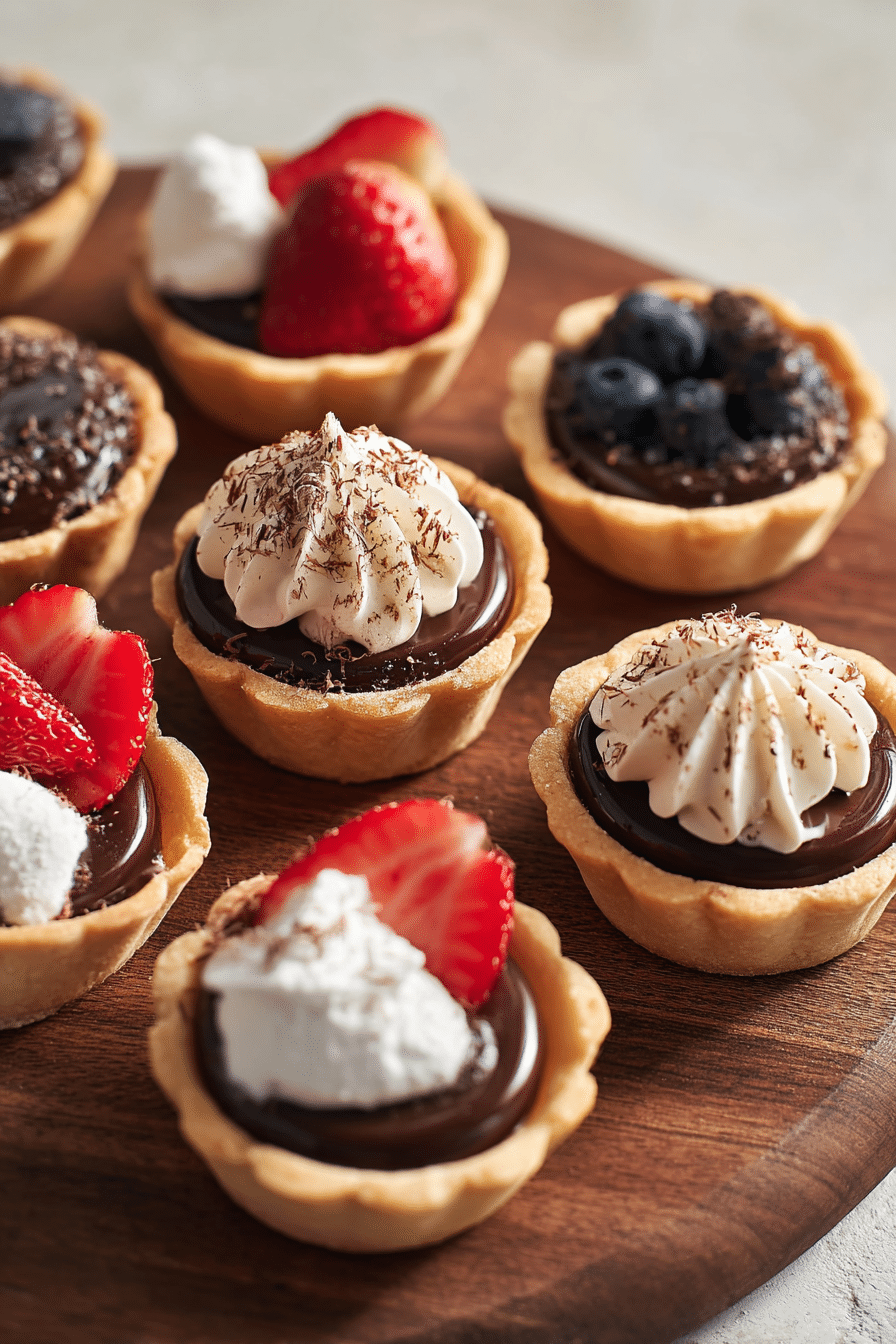
When I serve a tray of these, people immediately gravitate to the ones topped with a single bright strawberry or a flake of salt. Portion control is so much easier with minis — every guest can have a perfect, plated tart without committing to a whole cake. I like that you can tailor the toppings for seasons: late-summer berries, winter citrus, or a sprinkling of toasted nuts.
If you need a shortcut, you can use pre-made tart shells to save time; just fill them with the chocolate ganache as directed. I’ll walk you through how I get consistent shells, a silky ganache, and quick finishing touches that make each mini tart look bakery-level with minimal fuss.
Note to writer: Present the Pro-Tips, Troubleshooting, and Variations sections as bulleted lists for high scannability.
Why Mini Chocolate Tarts Are Perfect for You
Mini chocolate tarts give you controlled portions with maximum impact — plate a variety of toppings and you’ve got a colorful, elegant dessert board that’s ideal for gatherings and casual get-togethers. Because each tart is small, guests can sample different flavor combinations without feeling overstuffed. The shortcrust gives a tender, slightly crumbly bite while the chocolate ganache provides a rich, glossy center.
They’re also highly customizable: top some with whipped cream and a strawberry, finish others with a sprinkle of flaky salt, or add chopped nuts for crunch. If you’re short on time, you can use pre-made tart shells and still get beautiful results; just fill them with warm ganache and chill until set. Visually, imagine a scattering of dark chocolate discs set with shiny cream and dotted with vivid red berries — that contrast is what makes these mini chocolate tarts so appealing.
Everything You Need for Mini Chocolate Tarts
Here’s a conversational breakdown of the ingredients and tools that matter most and why each one plays an important role.
- Unsalted butter – Provides rich flavor and helps create a tender, flaky tart crust; use room temperature butter when the method calls for creaming, or cold butter if you’re aiming for a flakier, laminated-style crust.
- Powdered sugar – Smooths into the dough without graininess and yields a tender crumb; can be swapped for superfine sugar if needed.
- Egg – Binds the dough and contributes to structure and a bit of richness.
- All-purpose flour – The backbone of the crust; using only what the recipe needs and handling it minimally will keep gluten development in check.
- Salt – Balances sweetness and heightens chocolate flavor; finishing with flaky salt on some tarts is a simple flourish.
- Dark or semi-sweet chocolate – The base of the ganache; darker chocolate gives a richer, less sweet ganache while semi-sweet is slightly sweeter and creamier.
- Heavy cream – Creates the smooth, glossy ganache when warmed and combined with chocolate; higher fat cream yields a silkier texture.
- Powdered sugar (for whipped cream) – Stabilizes and sweetens whipped cream without adding grittiness.
- Vanilla extract – Adds a fragrant lift to whipped cream and can be added sparingly to ganache for depth.
- Fresh fruit and flaky salt – Fresh strawberries or other fruits add brightness and color; flaky salt adds a crunchy contrast that is visually striking and flavorful.
- Essential tools – Muffin pan for shaping shells, rolling pin, round scalloped cutter for consistent rounds, piping bags for filling and decorating, and baking weights or rice for blind baking.
How to Make Mini Chocolate Tarts (Step-by-Step)
These instructions focus on clear, practical actions you can follow in your kitchen. Pay attention to temperature and handling — they make the difference between a crumbly mess and tidy, bakery-style minis.
- Mix dry ingredients: Combine the flour and salt so they’re evenly distributed before adding to the butter.
- Cream butter and sugar: In a large bowl, beat the butter until creamy, then add powdered sugar and beat on low to start, increasing speed until light and fluffy; this sets the tone for a tender crust.
- Add the egg: Beat in the egg until the dough binds and looks cohesive.
- Add flour: Add the flour mixture on low speed just until you have a soft, crumbly dough — avoid overmixing to limit gluten development.
- Press and chill: Press the dough together into a flattened disc, wrap, and chill; a well-chilled dough rolls more evenly and is less sticky.
- Roll out and cut rounds: On a lightly floured surface, roll the dough to an even thickness and use a scalloped cutter for uniform rounds.
- Form shells in the muffin pan: Gently press each round into a muffin well until the dough slips down to form a shell; patch any tears with small bits of excess dough.
- Chill again: Pop the entire pan in the fridge for about 30 minutes before baking to reduce shrinkage.
- Blind-bake: Line each well with a liner and fill with baking weights or uncooked rice; bake until the edges just turn golden brown and the crust has a slight crunch.
- Cool shells: Remove liners and weights, let shells rest in the pan briefly, then transfer to a wire rack to cool completely.
- Make ganache: Place chopped chocolate in a heat-proof bowl. Heat cream until it just starts to simmer, pour over chocolate, let sit undisturbed for a few minutes, then stir to a smooth ganache.
- Fill shells: Let ganache cool slightly until thickened but still pourable, then pipe into shells about three-quarters full; chill until set if you prefer firmer centers.
- Finish with whipped cream or toppings: Whip cream with powdered sugar and vanilla to firm peaks and pipe a small rosette on selected tarts; top others with fruit or a sprinkle of flaky salt.
- Account for ovens: If your oven runs hot, reduce baking time slightly and check early; if it runs cool, you may need a few extra minutes. Position pans in the center of the oven for even browning.
Troubleshooting
I include a few common problems I’ve encountered and how I fixed them — seeing these early will save you time and frustration.
- I noticed my shells shrinking in the oven — chilling the formed shells well before baking helped prevent that shrinkage.
- If the crust is soggy, make sure you blind-bake long enough for the edge to color and become crisp; also avoid overfilling with warm ganache.
- If ganache splits or looks grainy, warm it gently and stir slowly; if it’s too cool to melt the chocolate fully, place the bowl over a warm water bath and stir until glossy.
- Whipped cream turning runny? Chill the bowl and beaters briefly before whipping, and use powdered sugar to help stabilize the cream.
- If dough feels too sticky to work with, chill it longer — slightly firmer dough is much easier to roll and shape.
Perfecting the Flaky Tart Crust
When I aim for a flaky tart crust, I focus on limiting gluten development and keeping fat distributed in small pieces throughout the dough. Using cold butter (or combining cold and softened butter depending on method) helps create pockets of fat that melt during baking, giving light layers. Handle the dough as little as possible: gently press and patch rather than knead.
Gluten forms when flour is mixed with liquid and agitated. The more you work the dough, the tougher it gets, so mix only until just combined. Visually, a perfect flaky tart crust will be evenly golden with a slightly layered edge, and texturally it should flake when you bite into it rather than crumble into dry crumbs.
Creating a Luxurious Chocolate Ganache
Ganache is deceptively simple but precise. Use high-quality chocolate for the cleanest flavor and a smooth texture. The basic idea is warmed cream poured over chopped chocolate, left to sit, then stirred until glossy. You can adjust the cream-to-chocolate ratio to change texture: more cream for a softer, pourable ganache, less cream for a thicker, sliceable filling.
- Chop chocolate finely so it melts evenly when combined with hot cream.
- Heat the cream until it just begins to simmer (small bubbles at the edge), then pour over the chocolate and let it rest for a few minutes without stirring — this helps the chocolate begin to melt gently.
- Stir slowly from the center outward until the mixture is completely smooth and glossy.
- For flavor variations, gently fold in a splash of espresso, a small amount of liqueur, or a pinch of flaky sea salt after the ganache is smooth.
Pro-Tips for Mini Chocolate Tarts: Customizing Your Toppings
- I like to pipe ganache slightly under 3/4 full and finish extra tarts with a small rosette of whipped cream and a halved strawberry for contrast.
- Seasonal fruits: top with raspberries in summer and thin orange segments in winter for bright acidity.
- Nuts and crunch: sprinkle toasted chopped hazelnuts or pistachios for texture and color contrast.
- Sweet-salty: a light sprinkle of flaky salt on a few tarts makes the chocolate taste even deeper.
- Flavor twists: fold a teaspoon of espresso powder or a splash of orange liqueur into the ganache for adult-friendly variations.
Storage Tips for Keeping Your Tarts Fresh
Store leftover mini chocolate tarts in an airtight container in the refrigerator; they should stay fresh for up to 3 days. If you’ve topped tarts with whipped cream, store those separately or plan to pipe fresh cream before serving for the best texture. For longer storage, keep just the shells in an airtight container at room temperature for a couple of days, and fill them with chilled ganache when you’re ready to serve.
If you used pre-made tart shells, you can fill them with ganache the same way — just be mindful of refrigeration times once filled. This recipe is flexible: pre-made shells make assembly faster, while homemade shells give you control over texture and flavor.
Variations to Try with Your Mini Chocolate Tarts
- Milk chocolate ganache — swap dark for milk chocolate for a sweeter, creamier filling and top with sliced banana or toffee crumbs.
- Salted caramel center — add a thin layer of caramel in the bottom of shells before piping ganache for a gooey surprise.
- Espresso-chocolate — stir a bit of espresso into the ganache for a mocha note and top with a dusting of cocoa powder.
- Orange or liqueur-flavored ganache — fold a little orange zest or a splash of liqueur into finished ganache for an adult variation.
- Nutty crust — press finely ground toasted nuts into the crust dough for added aroma and texture.
Frequently Asked Questions
Can I use pre-made tart shells for this recipe?
Yes, you can certainly use pre-made tart shells to save time! Just fill them with the chocolate ganache as directed.
How can I make my tart crust extra flaky?
To achieve a flaky crust, make sure to handle the dough gently and avoid overworking it. Chilling the dough before rolling it out also helps!
What type of chocolate is best for the ganache?
Dark or semi-sweet chocolate works best for a rich flavor. Feel free to use milk chocolate for a sweeter, creamier ganache.
How do I store leftover mini chocolate tarts?
Store leftover tarts in an airtight container in the refrigerator. They should stay fresh for up to 3 days.
Can I customize the toppings for these tarts?
Absolutely! Fresh fruits, nuts, or even a sprinkle of flaky salt can add amazing flavors. Get creative with your toppings!
Mini Chocolate Tarts
Ingredients
Equipment
Method
- In a medium bowl, stir together flour and salt. Set aside.
- In a large mixing bowl, use an electric mixer to beat the softened butter on medium speed until creamy. Add the powdered sugar and beat until fluffy.120 g powdered sugar, 1 large egg
- Add the egg and beat until combined.
- Add the flour mixture and beat on low speed until it forms a soft, crumbly dough.
- Dump the dough out onto a sheet of plastic wrap. Use your hands to press the dough together into a flattened disc shape. Wrap the dough and chill in the fridge for at least 2 hours.
- On a floured surface, roll out the dough to about 1/8" thick. Use a round scalloped cookie cutter to cut rounds out of the dough.
- Place a dough round on top of an opening on your muffin pan. Press down gently to fill the cup. Repeat until all cups are filled.
- Chill the muffin pan for about 30 minutes while preheating the oven to 350°F.
- Place muffin liners in each well of the pan filled with baking weights. Bake for 18-20 minutes until golden brown.
- Let the tart shells cool before preparing the ganache.
- In a heat-safe bowl, add chopped chocolate.
- Heat the heavy cream until small bubbles appear and pour over chocolate. Let sit for 3 minutes.
- Stir until smooth to make ganache.
- Once ganache thickens but is still pourable, transfer to a piping bag and fill tarts until 3/4 full.
- Make whipped cream with remaining heavy cream, powdered sugar, and vanilla. Pipe on top of tarts.
- Top with fresh fruits or flaky salt as desired.