Butter tarts are one of those desserts that smell like home before you even see them — warm butter, brown sugar caramelizing at the edge of a tiny pastry shell, and a hint of vanilla in the air. Growing up in a house where Sunday baking was a ritual, my mom’s old fashioned butter tarts were the dessert everyone quietly circled back to. They feel like Canadian culinary shorthand for ‘comfort’ — a small, sticky-sweet parcel that carries a memory with every bite.
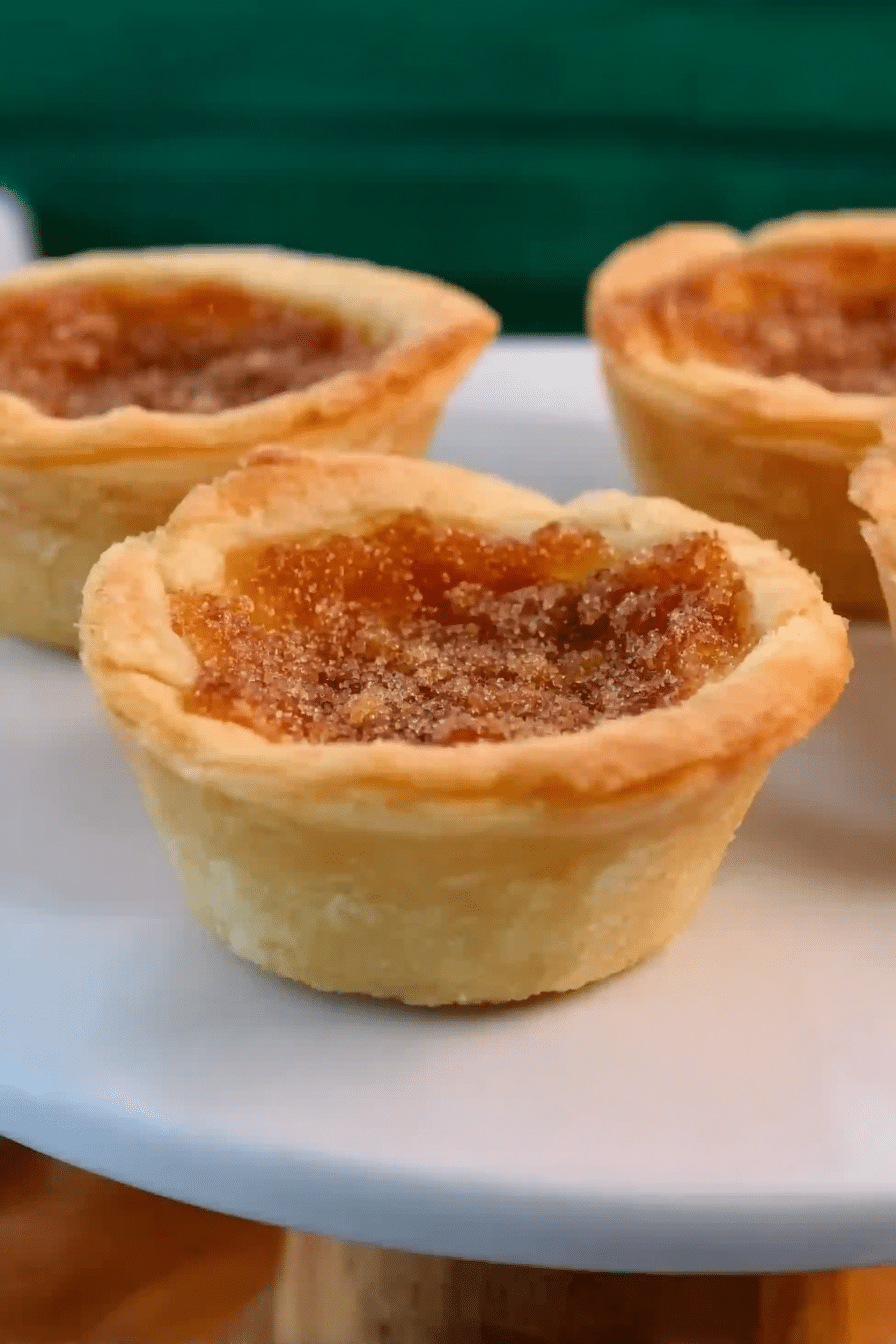
Historically, butter tarts anchor themselves in Canadian kitchens — a simple pastry shell cradling a lusciously sweet filling made from butter, sugar, syrup, and eggs. They’ve been contested as a national treat and turn up at potlucks, church socials, and family tables across the country. I’ve made dozens of batches over the years and can tell you: the aroma when they come out of the oven reliably quiets a room. The little crackle of the caramelized top, the thin crisp edge of pastry against a soft, gooey center — that’s the magic.
Ingredients You’ll Need
Below is the ingredient breakdown for both the tart shell and the classic butter tart filling. I include the standard kitchen measures I use, plus notes on swaps if you need gluten-free or vegan options. Read each line before you start so you’re not scrambling for chilled butter mid-rollout.
- All-purpose flour – the structure for the tart shell; use a spoon-and-level method for accuracy (about 2 2/3 cups in my batch).
- White sugar – a touch in the dough for balance and some in the filling for caramel sweetness.
- Salt – enhances flavor and cuts through the sweetness; a little in both dough and filling.
- Unsalted butter (chilled) – the key to a flaky shell; cut into cubes and keep cold. (You’ll also use softened butter in the filling.)
- Cold water – to bring the dough together without warming the butter; add slowly until the dough holds.
- Unsalted butter (softened) – for the filling, creamed with sugar to create that glossy, caramel texture.
- Light brown sugar – gives the filling a deeper, molasses-like flavor and lovely color.
- Corn syrup – the classic binder in the filling that helps it set but remain gooey; you can substitute maple syrup for a different flavor (texture will vary).
- Eggs – they set the filling and add richness; beat before adding for an even texture.
- Vanilla extract – a little goes a long way to lift the buttery filling.
- Raisins (optional) – traditional for many families; add sparingly so they don’t weigh down the filling.
Step-by-Step Instructions for Making Perfect Pastry
Making the tart shells from scratch is where you can make a batch taste lovingly homemade. I follow a straightforward method, and a few technique points below will help even a nervous baker succeed.
- In a mixing bowl, sift together the flour, salt, and sugar. I like to toss them with a whisk so everything is evenly distributed — no pockets of salt later.
- Using a pastry blender or your fingertips, cut the chilled, cubed butter into the flour until the mixture looks like coarse meal with pea-sized bits of butter remaining. Those little lumps are what create flaky pockets as the butter melts in the oven.
- Add the cold water a tablespoon at a time and gently toss the dough until it just starts to hold together. You want it moist enough to form a ball but not wet. Overworking warms the butter and makes the pastry tough.
- Press the dough together into a disk, wrap it tightly in plastic, and refrigerate for at least 30 minutes. Chilling firms the butter back up and relaxes the gluten so the crust will roll out more easily.
- When chilled, roll the dough to about 1/8 inch thick on a lightly floured surface. Cut 4-inch circles and press them gently into greased muffin cups. Pressing gently (don’t stretch) keeps the pastry from shrinking when it bakes — I learned this the hard way the first time my tart rims disappeared into the muffin tin.
- Preheat the oven to 400°F (200°C). Keep the oven temperature steady; the high heat helps the filling set while the crust crisps at the edges.
- For the filling: in a large bowl, cream the softened butter with the brown sugar and corn syrup until glossy and the sugar begins to dissolve. Add the beaten eggs, vanilla, and a pinch of salt; mix until combined. Stir in raisins now if using.
- Fill each prepared shell with about 1 tablespoon of filling — careful not to overfill (the filling rises and can bubble over). I use a tablespoon measure so every tart bakes evenly.
- Bake for 15–20 minutes. Look for a lightly browned, slightly domed top that’s still bubbling. The centers will wobble a bit but should not be liquid enough to pour out.
- Let the tarts cool in the pan for 10 minutes so the filling firms, then transfer to a rack to cool completely. They continue to set as they cool.
For a reliably flaky tart shell, follow our all-butter flaky pie crust recipe and tips.
Tips for the Best Butter Tart Filling
I’ve made these with runny centers and with a firmer, sliceable set — both can be right depending on what you want. Here’s how to control the texture and avoid the pitfalls I’ve learned through testing.
- Control runniness – the filling firms as it cools. If your tarts are consistently too loose, reduce the corn syrup slightly or add an extra egg yolk to help set.
- Don’t boil the filling – you only need the oven heat to set it. If you try to caramelize the filling on the stovetop, it can overcook and become granular.
- Use fresh eggs and real butter – flavor and texture are noticeably better. I avoid margarine here; it changes the mouthfeel.
- Sugar balance – if the filling tastes flat, it usually needs a pinch more salt rather than sugar. Salt brightens the sweetness.
- Mix-ins and distribution – add raisins, chopped nuts, or chocolate chips sparingly and fold them in so they’re evenly distributed. Too many add-ins can prevent the center from setting properly.
- Watch the oven color – you want a light golden top and bubbling centers; if the edges brown too quickly, your oven may run hot or the tarts may be too close to the heating element.
Creative Variations: Raisins, Nuts, and More
One of the things I love about butter tarts is how forgiving they are to experimentation. Over the years I’ve kept a running list of substitutes and flavor twists that work well without straying too far from the classic profile.
- Classic Raisins – the traditional choice; plump them by soaking in hot water or rum for 10 minutes if they seem dry.
- Pecans or Walnuts – add toasted nuts for crunch and a toasty nuttiness. Chop them coarsely so they mingle with the filling.
- Chocolate – mini chips or a shave of dark chocolate folded in just before filling adds richness and tames the sweetness.
- Maple Twist – swap some or all of the corn syrup for pure maple syrup for an authentically Canadian spin; reduce slightly if you want a firmer set.
- Salted Caramel – sprinkle flaky sea salt on top as they come out of the oven for a modern finish that cuts the sweetness.
- Vegan/GF Options – for gluten-free, use a 1:1 gluten-free flour blend and keep the dough chilled. For vegan: use vegan butter, a flax or chia egg (1 tbsp ground seed + 3 tbsp water for each egg), and swap corn syrup for maple syrup or a vegan corn syrup; expect texture differences.
For a lighter, make-ahead twist or nut-forward inspiration, consider a flavor idea like our peanut butter yogurt bark.
Serving Suggestions for Special Occasions
Butter tarts are tiny but versatile — I serve them in many ways depending on the event. At family gatherings I plate them on a simple cake stand; at potlucks they travel well in a shallow box lined with parchment.
- Holiday platter – arrange with other mini treats and fresh berries for color. They pair beautifully with strong coffee or a nutty dessert wine.
- Party bites – warm them slightly and top with a small dollop of lightly whipped cream or mascarpone for an elevated look.
- Decadent pairing – a late-afternoon tea with black tea or espresso complements the buttery-sweet notes.
- For potlucks – keep them whole and chilled; people can pop them into their mouths and go back for seconds.
Build a dessert spread with bite-sized treats like our mini cannoli cups alongside butter tarts for variety and visual appeal.
Pair butter tarts with a crunchy option such as our harvest caramel corn for fall gatherings or potlucks.
Storage Tips and How to Keep Them Fresh
I often make these a day ahead for parties. They hold up well and sometimes taste even better after the flavors have had time to rest.
- Short-term storage – cool completely, then keep in an airtight container at room temperature for 1–2 days. If your kitchen is warm, store them in the fridge.
- Refrigeration – refrigerate for up to 3 days; the filling will firm further and the pastry may lose a little crispness at the edges.
- Freezing – baked tarts freeze well for up to 2 months in an airtight container (thaw overnight in the fridge). You can also freeze unbaked dough wrapped tightly for up to 1 month; thaw in the fridge before rolling and filling.
- Reheating – warm briefly at 300°F (150°C) for 5–8 minutes if you want the filling rejuvenated. Avoid microwave reheating as it can make the filling overly soft.
Frequently Asked Questions about Butter Tarts
Below are the common questions I see in my kitchen and at bake sales, with straightforward answers from repeated testing.
- Can I freeze the butter tarts or the dough? Yes. Baked tarts freeze well for up to 2 months in an airtight container (thaw overnight in the fridge). You can also freeze the unbaked dough wrapped tightly for up to 1 month; thaw in the fridge before rolling and filling.
- How do I prevent the filling from being too runny? Don’t overfill (about 1 tablespoon per tart) and bake at 400°F for 15–20 minutes until the filling is lightly browned and bubbling—the filling firms as it cools. For a firmer set, reduce corn syrup slightly or add an extra egg yolk.
- Can I omit the raisins or add other mix-ins? Absolutely. Raisins are optional. Try pecans, walnuts, chocolate chips, or a splash of maple syrup for variation. Add-ins should be stirred into the filling sparingly so they don’t prevent the filling from setting.
- How can I make these gluten-free or vegan? For gluten-free, use a 1:1 gluten-free all-purpose flour blend and keep the dough chilled. For vegan, use vegan butter, a flax or chia egg (1 tbsp ground seed + 3 tbsp water = 1 egg), and swap corn syrup for maple syrup or a vegan corn syrup; texture will vary slightly.
- What pan size and yield does this recipe make? This recipe uses a greased muffin tin with 4-inch circles of dough pressed into each cup. It yields about 16 tarts, with each shell holding roughly 1 tablespoon of filling.
Conclusion: Why You’ll Love This Classic Recipe
These are the kind of tarts that bring people together. They’re not fancy in a plated-restaurant sense, but they carry warmth: butter, brown sugar, a whisper of vanilla, and that nostalgic wobble in the center. I come back to this version because it’s forgiving, adaptable, and reliably delicious — a pan of them can rescue a weekday supper or star at a holiday gathering.
Try the recipe as written the first time, then play: add toasted pecans, a drizzle of maple, or swap in chocolate. Keep notes on what you like best — that’s how family recipes evolve. And if you make a batch, let them cool enough to handle but not so long they stiffen; the ideal moment to eat one is when the filling is warm and the pastry still gives a tiny crack under your teeth.
Happy baking. If you want to make the pastry extra flaky, remember: cold butter, minimal handling, and a short chill before rolling — those are the small habits that make a big difference.
Mom's Old Fashioned Butter Tarts
Ingredients
Equipment
Method
- In a mixing bowl, sift the flour, salt and sugar together.
- Using a pastry blender or your hands, cut the butter into the flour mixture until it resembles coarse meal. Add the cold water a bit at a time until the dough just starts to hold together.
- Press the dough together and shape it into a disk. Wrap the dough in plastic wrap and refrigerate for at least 30 minutes.
- Roll out the dough to about 1/8 inch thick and cut 4-inch circles. Press dough in greased muffin cups trying not to stretch the dough too much.
- Preheat the oven to 400°F.
- In a large bowl, mix together the butter, brown sugar and corn syrup. Stir until butter is creamed and sugar is dissolved.
- Add the eggs, vanilla extract and salt. Optionally add raisins. Mix well.
- Fill each tart shell with the butter filling. Each tart should hold about 1 tablespoon of filling, be careful not to overfill!
- Bake for 15-20 minutes. The filling should be lightly browned and still bubbling.
- Let the tarts cool in the pan for about 10 minutes before transferring them to a cooling rack.