I remember the first time I made strawberry rhubarb jam in my kitchen: the scent of tart rhubarb rising off the stove, the bright sweetness of strawberries cutting through, and the pleasing hiss of jars in the warm canning water. I was nervous about canning, but the recipe itself is forgiving — and that’s what I want to pass on to you. I tested this version several times until the texture and flavor felt right in my hands.
I like that this jam uses fresh, seasonal fruit and very basic pantry staples; you don’t need a lot of special gear to get a beautiful result. In my kitchen I keep the process simple: good fruit, the right pot, and careful attention to timing. That approach keeps the flavor bright and the texture pleasantly spreadable.
I know beginner canners worry about safety and whether jars will seal — I did too. With a few clear steps for sterilizing jars, checking seals, and a calm approach to boiling, you’ll come away with jars you can trust and a sense of real accomplishment.
Why This Strawberry Rhubarb Jam Is Perfect for Beginner Canners
This recipe is straightforward and hard to overcomplicate. It relies on gentle stove-top cooking rather than precise candy thermometers or special additives, so you can focus on the fruit. Expect to smell bright strawberry notes and the clean tartness of rhubarb while you cook — those aromas tell you everything’s progressing well.
- Ease of preparation: simple stovetop method with only a few steps.
- Fresh seasonal flavor: using ripe strawberries and crisp rhubarb makes the jam lively and balanced.
- Satisfying outcome: you’ll leave the kitchen with jars that look and taste homemade, which is a confidence booster for first-time canners.
Everything You Need for Strawberry Rhubarb Jam
Get your workspace organized before you start; a tidy prep area prevents mistakes and speeds things up. Below I break down the essential ingredients and tools, their purpose, and simple swaps you can make if needed.
- Rhubarb – Provides natural acidity, tartness, and contributes pectin-like structure when cooked.
- Strawberries – Add sweetness, natural pectin, and bright color; ripe berries work best.
- Sugar – Balances tartness and helps with setting; you can reduce or swap it but expect texture changes.
- Lemon juice – Adds acidity to help the jam set and lifts the flavor.
- Glass mason jars with lids and bands – Needed for canning or refrigerated storage; clean, undamaged jars are essential for a proper seal.
- Medium to large saucepan – A wide heavy-bottomed pot helps the jam reduce evenly and prevents scorching.
- Ladle and jar funnel – Makes filling hot jars safer and cleaner.
- Large pot for water bath – For processing sealed jars; proper water coverage keeps jars safe during boiling.
Sterilization matters for food safety: clean jars, lids, and bands thoroughly and heat them before filling. That small bit of extra time keeps your jam shelf-stable when you choose to can.
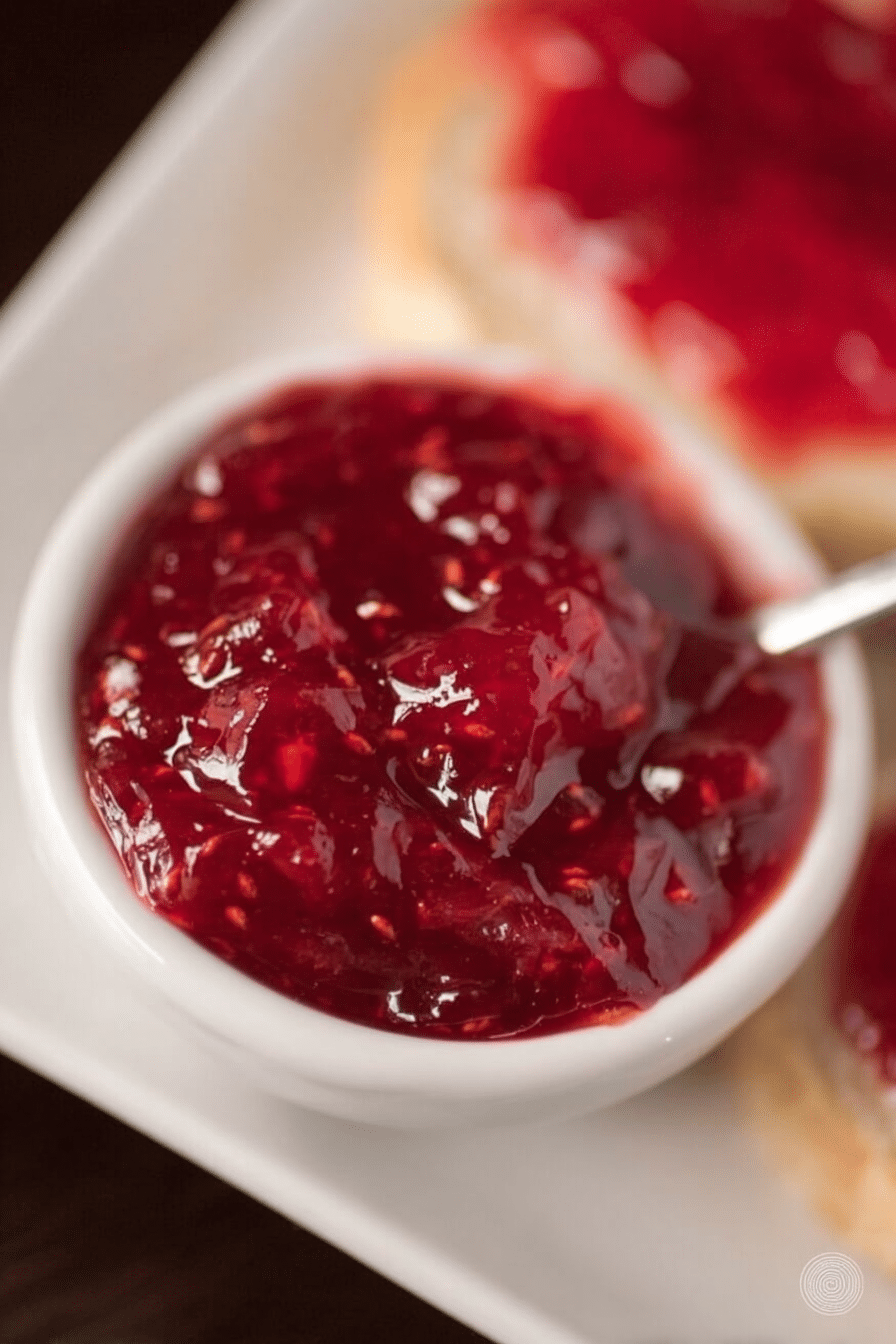
The Secret to the Perfect Texture
Texture comes from reducing the fruit mixture until it concentrates and the sugar does its job. Watch for visual cues more than exact times; the jam will change noticeably as it cooks.
- Look for steady, full-bodied bubbling that moves across the surface — this means the mixture is reducing evenly.
- Color deepens as water evaporates and sugars concentrate; the jam should glisten but not look watery.
- Test on a chilled plate: a small spoonful will thicken as it cools; if it runs, continue simmering and test again in a few minutes.
- If you prefer a looser jam, remove it from heat earlier; for a thicker set, reduce a bit longer but stir to avoid burning.
Note on sweeteners: I experimented with alternative sweeteners and found they change both flavor and set. If you use honey, maple, or agave, expect a softer set and slightly different taste profile — adjust your reducing time accordingly.
Why Temperature Matters When Making Jam
Heat controls the breakdown of fruit cell walls and the concentration of natural pectin and sugars. Too gentle, and the jam won’t reduce; too hot, and you risk caramelization or a scorched flavor. Keep the pot at a controlled, steady boil when reducing.
- Higher heat speeds evaporation but increases the chance of scorching on the bottom — stir frequently and use a heavy-bottomed pan.
- Moderate, steady simmering helps pectin chains form the gel network without overcooking the fruit.
- Proper heating reduces the risk of spoilage by ensuring the jars and contents reach temperatures needed for safe water-bath processing.
- For vegan-friendly preparation: the standard heat steps are the same, but be cautious if swapping sugars that may be processed with bone char — choose labeled vegan sugars if that matters to you.
Why No Pectin Works in This Recipe
Rhubarb and strawberries both contribute natural gelling properties when cooked together. Rhubarb’s fibrous structure and the strawberry’s pectin are enough to thicken this jam without added pectin. I like the cleaner fruit flavor this produces — it tastes like the fruit, not an added ingredient.
- Natural thickening: the fruit’s own pectin concentrates as water evaporates, creating a pleasant, slightly rustic set.
- Flavor-first approach: without commercial pectin, the fruit flavor remains the star and isn’t masked by a gelatinous texture.
- Texture note: expect a softer, spoonable jam compared with jars made with powdered pectin; if you want a firmer set, reduce longer or add a small amount of lemon juice to help the pectin work.
- Nutritional benefits: strawberries bring vitamin C and antioxidants; rhubarb adds fiber and vitamin K — together they make a flavorful spread with some nutritive value compared to processed alternatives.
How to Make Strawberry Rhubarb Jam (Step-by-Step)
- Prepare fruit: hull and halve the strawberries and chop the rhubarb into even pieces so they cook evenly.
- Combine fruit, sugar, and lemon juice in a wide, heavy-bottomed saucepan over medium heat so the mixture warms evenly.
- Bring the mixture to a gentle boil, then reduce to a steady simmer; stir occasionally to prevent sticking and to help the fruit break down.
- As the jam reduces, watch for thickening and color deepening; periodically skim foam if desired for clarity.
- Test for set by placing a small spoonful on a chilled plate — if it firms as it cools, it’s ready. If it’s too runny, simmer a bit longer and test again.
- When you’re satisfied with texture, remove from heat and ladle into hot, sterilized jars, leaving a small headspace for safe sealing.
- Wipe jar rims clean, apply lids and bands, then process jars in a boiling water bath for the recommended time for your jar size and altitude.
- After processing, transfer jars to a towel-lined surface and let them cool undisturbed for 24 hours before checking seals.
Pro Tip for Strawberry Rhubarb Jam: Canning Timing and Seal Checks
- I always sterilize jars while the jam is cooking so everything is hot and ready when the jam is done.
- Process jars in a gently boiling water bath for about ten minutes; that timing gives you a reliable seal for standard one-cup jars.
- After cooling, press the center of each lid — a sealed jar will have a concave lid that does not flex up and down.
- If any jar didn’t seal, refrigerate and use within two weeks or reprocess with a fresh lid following the same hot-fill and bath steps.
- Keep a dish towel handy when removing jars from the water bath to set them on; it cushions the jars while they cool and helps prevent cracks.
How to Store, Freeze, and Use Your Strawberry Rhubarb Jam
Sealed jars store best in a cool, dark place for up to a year; once opened, refrigerate and enjoy within a couple of weeks. If you prefer freezing, leave ample headroom in the jar to allow for expansion and avoid breakage.
You can use your jam in desserts like strawberry cheesecake lasagna for a delightful treat, or make an easy strawberry cold foam to top iced coffee and drinks.
- Sealed jars: cool, dark pantry for up to a year.
- Opened jars: refrigerate and use within about two weeks.
- Freezing: leave headspace in jars to accommodate expansion; thaw in the fridge before using.
- Troubleshooting storage: if a jar smells off or shows signs of mold, discard immediately — safety first.
- Serving suggestions: spread on toast, swirl into yogurt, spoon over ice cream, or use as a filling in desserts.
Variations and Dietary Swaps
- Add fresh herbs: stir in chopped basil or thyme near the end of cooking for a subtle herbal note; I like basil with this jam when strawberries are very sweet.
- Warm spices: a pinch of cinnamon or a strip of lemon peel can deepen the flavor profile without overpowering the fruit.
- Lower-sugar swaps: use natural sweeteners like honey or agave, but expect a softer set and adjust reduction time; these are great if you want less refined sugar in your preserves.
- Vegan and refined-sugar-free options: choose labeled vegan sugars or use maple syrup; remember the texture will differ from the classic version.
- Creative uses: If you’re looking for more ways to enjoy rhubarb, try our delicious rhubarb cookies for a sweet twist! For a fun summer dessert, try using your homemade jam in a strawberry dole whip.
Making jam is a small act of preservation that rewards patience. I hope these clear steps and tips give you the confidence to make your first batch and to customize it to your taste.
Frequently Asked Questions
Do I need to use pectin for this strawberry rhubarb jam?
No, this recipe doesn’t require pectin! The natural sugars in the strawberries and rhubarb help create a thick texture as they cook.
How should I store the jam once it’s made?
For the best freshness, store sealed jars in a cool, dark place for up to a year. If you refrigerate it, enjoy your jam within 2 weeks.
What equipment do I need to make strawberry rhubarb jam?
You’ll need a medium to large saucepan, glass mason jars, and a large pot for boiling the jars, along with basic kitchen tools like a spoon and measuring cups.
How can I tell if my jam has set properly?
When cooking, the jam should thicken as it bubbles. You can test it by placing a small amount on a cold plate and checking its consistency after it cools.
Can I freeze strawberry rhubarb jam?
Absolutely! Make sure to leave enough space at the top of the jar for expansion when freezing.
Strawberry Rhubarb Jam
Ingredients
Method
- Combine all ingredients in a medium to large saucepan over medium heat. Once mixture starts to bubble, reduce heat to medium low. Continue to cook, stirring occasionally, until the jam has thickened.
- Transfer jam to clean glass mason jars. If jam is refrigerated, it's best if used within 2 weeks. If frozen, be sure to allow enough head room in the jar for expansion.
- While the jam is cooking, sterilize four 1-cup jelly glass jars plus their rings and lids.
- Transfer sterilized jars, lids, and bands to a clean dish towel.
- Have a very large covered pot of boiling water ready.
- Fill each jar with hot jam, leaving at least 1⁄4" of space at the top. Place lids on jars, and secure ring bands.
- Transfer filled jars to pot of gently boiling water and let boil for 10 minutes. Transfer jars to a dish towel and let cool, undisturbed, for 24 hours.
- If any jar is not fully sealed, or you chose to skip the canning process, jam should be refrigerated and used within 2 weeks.
- Sealed jars will keep, in a cool, dark place, for up to a year.