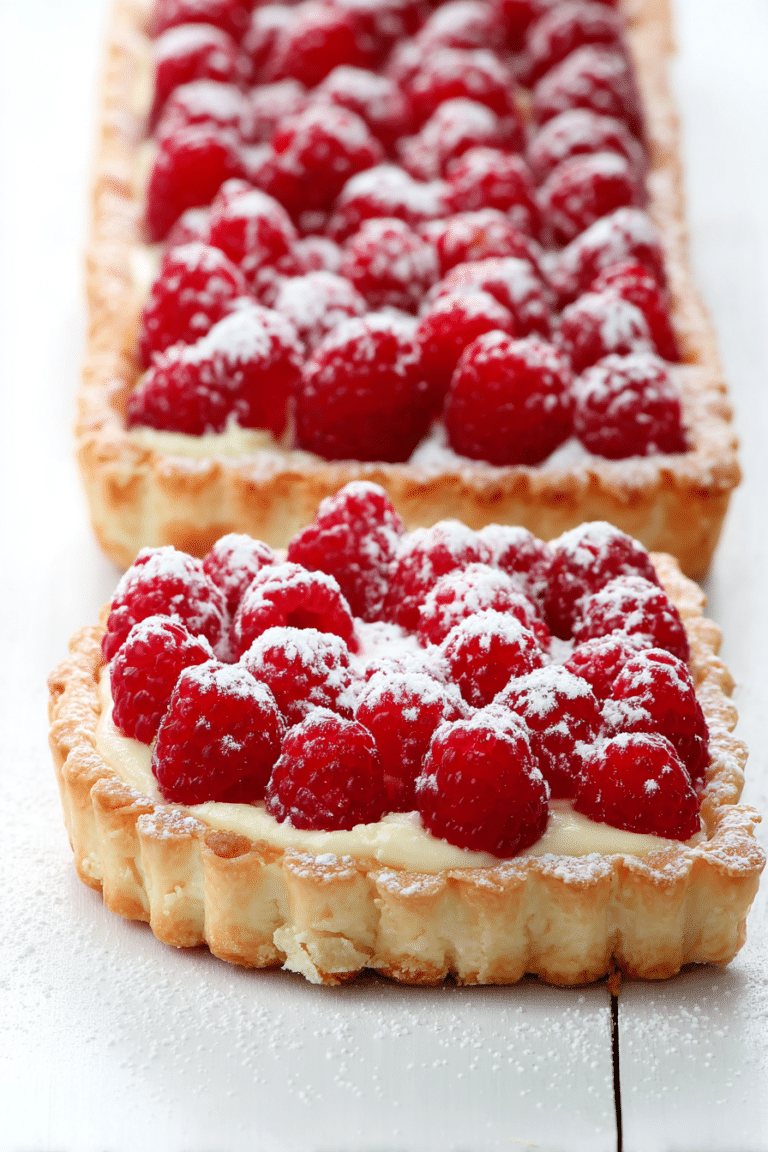
I fell into making this strawberry tart the way many party desserts are born: out of a last-minute need to impress a tableful of friends. I learned early that a glossy ring of fresh strawberries does more than taste wonderful — it stops conversations and changes the mood of a table. Over the years I’ve refined the steps so the tart looks intentionally effortless on a platter, even when the kitchen felt anything but calm.
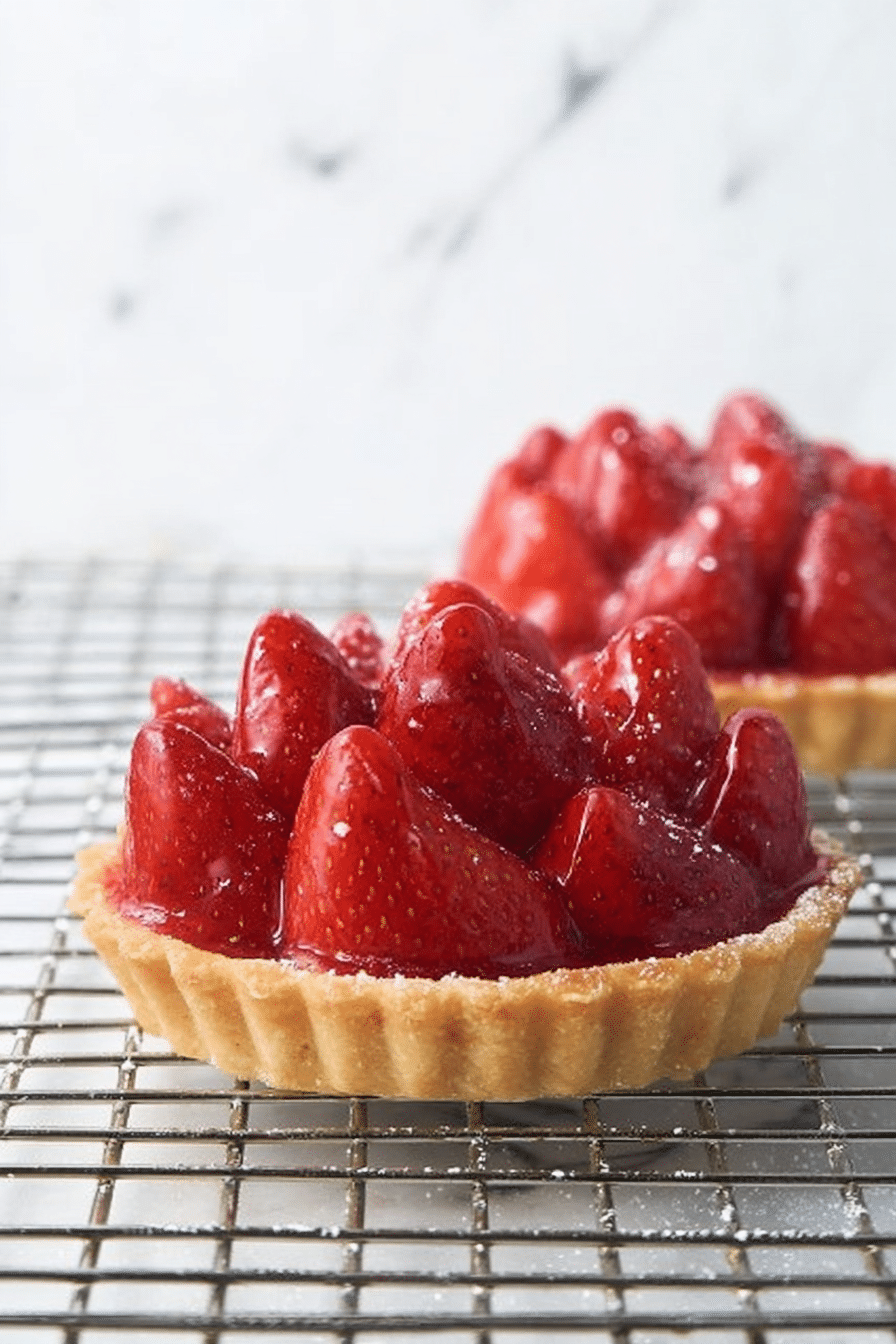
I choose this tart for parties because it marries visual drama with easy service: you can slice it ahead, chill it, and bring it out as a composed centerpiece. If you love this strawberry tart, you might also enjoy our strawberries and cream swiss roll as another show-stopping dessert. In my kitchen I focus on the details that guests notice — the shine of the glaze, a crust that flakes instead of crumbles into the filling, and a filling that is silky rather than grainy.
I’ve made every mistake — overworked dough, lumpy cream cheese, and a sad, soggy bottom. Those missteps taught me the practical tricks I rely on now: keep things cold for flakiness, warm the filling ingredients gently so they blend smoothly, and glaze the berries just before serving to preserve their color and shine. The result is a dessert that feels elegant, but remains perfectly approachable for a home baker.
Everything You Need for Strawberry Tart
Before you start, line up your tools and pick the best berries you can find. A food processor speeds the crust, but you can work by hand if needed. A removable-bottom tart pan makes plating simple, and a small saucepan is all you need for the glaze. You might also find inspiration in our lemon blueberry tart which calls for a similar setup of ingredients and techniques.
- All-purpose flour – Provides structure for the crust; swap for a gluten-free blend that contains a binding agent for GF versions.
- Butter – Creates flakiness and flavor; keep it very cold so pockets of steam make the crust flaky.
- Sugar – Sweetens the crust and filling; you can use alternative sweeteners but expect slight texture changes.
- Ice water – Brings the dough together without warming the butter; add slowly so you don’t overhydrate.
- Cream cheese – The base of the filling; room temperature cream cheese blends smoothest. For vegan versions, use a firm vegan cream cheese substitute.
- Sour cream – Adds tang and silkiness; a dairy-free yogurt can be used in vegan swaps.
- Egg yolk – Helps set the filling and adds richness; aquafaba or a commercial egg replacer can be used in vegan versions, though texture will be slightly different.
- Vanilla & lemon zest – Brightens and rounds the filling; zest is small but essential for aroma.
- Fresh strawberries – The showpiece; choose firm, ripe berries that are similar in size for the cleanest presentation.
- Jam (red currant, apricot, or seedless strawberry) – Thinned slightly and warmed to glaze the fruit for shine and preservation.
How to Arrange Strawberries for a Glossy, Professional Look
Presentation is the moment your guests notice first — a neat, glossy arrangement reads as intentional and elegant. I prefer to use berries that are uniform in size so each slice looks balanced, and I always keep the glaze warm and loose when I brush it on to avoid a tacky finish.
- Start with halving or slicing your berries so cut sides face down for maximum sheen and a neat edge.
- Place one berry in the center (or a small pile if using a ring tart) and work outward in concentric circles for a classic look; alternate whole and sliced berries for depth.
- For a layered look, overlap slices slightly so the pattern reads as a repeated scale — this catches light beautifully.
- Warm your jam with a splash of water so it becomes brushable, then skim off any foam and strain if needed to avoid lumps.
- Brush the glaze lightly and quickly; if you over-brush one spot the syrup will pool and dull the shine.
- Finish just before serving to keep berries vibrant; chilled glaze can dull the color, and too-warm glaze can soften fruit.
The Secret to a Silky Cream Cheese Filling
The filling’s silk comes down to temperature and technique. I always bring the cream cheese to a gentle room temperature so it mixes without lumps, then add the sour cream for tang and loosen the texture. A low-speed mix and occasional scraping prevent over-aeration and keep the texture dense and creamy rather than foamy.
- Start with cream cheese that is pliable but not melted — it should give under your finger but still hold shape.
- Add sour cream to introduce acidity and a softer mouthfeel; it also helps the filling set without becoming rubbery.
- Mix on low and scrape the bowl frequently; this reduces lumps and keeps overworking to a minimum.
- Fold in zest and vanilla last so their oils remain bright and aromatic.
- Troubleshooting
- – If the filling is lumpy, warm the bowl briefly over a pan of hot water and re-whisk gently until smooth.
- – If the filling becomes too loose, chill it briefly before adding to the crust so it holds shape when baked.
Why Temperature Matters for a Flaky, Buttery Crust
Temperature is the simplest way to control texture. Cold butter melts during baking and creates steam pockets that become flaky layers; warm butter simply blends and produces a denser, mealy crust. I keep everything cold and resist the urge to keep reworking sticky dough — the less you handle it, the better the flake.
- Keep butter and water chilled until the final pulses; if your kitchen is warm, pop the bowl in the fridge between steps.
- Work the dough briefly — you want visible pea-sized pieces of butter, not a uniform paste.
- Chill the formed dough before rolling; this relaxes gluten and improves handling so the crust doesn’t shrink in the oven.
- Blind bake when necessary (dock the bottom or use pie weights) to avoid a soggy bottom under wet fillings.
- Troubleshooting
- – Dough too sticky: chill it and add a dusting of flour when rolling, or rest it in the fridge to firm up the butter.
- – Crust shrunk in the oven: avoid stretching the dough into the pan and always chill the tart shell before baking.
- – Soggy bottom: blind bake longer or use a thin egg wash to seal the crust before adding wet filling.
How to Make Strawberry Tart (Step-by-Step)
- Preheat the oven so it’s fully at temperature before the tart goes in — this ensures even browning.
- Combine the dry crust ingredients, then cut in very cold butter until the mixture resembles coarse crumbs with pea-sized pieces remaining.
- Add ice water slowly, a little at a time, until the dough just holds together when pinched; stop before it gets wet or sticky.
- Form into a disk, wrap, and chill the dough for at least 30 minutes so it relaxes and firms up for rolling.
- Roll the dough to an even thickness and fit it gently into a removable-bottom tart pan; trim the excess so the edge is even with the rim.
- Dock the bottom with a fork and blind bake (with weights or dried beans) until the crust is set and starting to color; this prevents a soggy bottom when you add the filling.
- While the crust cools slightly, beat the room-temperature cream cheese with sour cream, sugar, egg yolk, vanilla, salt, and lemon zest until smooth and glossy.
- Fill the prebaked crust with the cream cheese mixture so it’s level and not overflowing; return to the oven briefly until the filling is set but still slightly soft in the center.
- Allow the tart to cool fully before arranging the strawberries so the fruit sits neatly on the filling rather than slipping into it.
- Arrange the strawberries in your chosen pattern and warm your jam with a little water; strain if needed and brush lightly over the berries for a glossy finish.
- Chill the tart until serving time so slices hold cleanly; if you’re making gluten-free or vegan swaps, follow the same sequence but use the appropriate substitutions noted earlier in this guide.
Pro Tip for strawberry tart: Gluten-Free & Vegan Swaps That Still Shine
- Gluten-free crust: Use a high-quality all-purpose gluten-free blend that contains a binder like xanthan gum; keep the dough cold and handle gently to mimic a wheat crust’s texture.
- Vegan crust: Replace butter with a solid plant-based shortening or vegan butter that stays firm when cold; chilling is even more important here.
- Vegan filling: Choose a firm vegan cream cheese and a plant-based sour cream or coconut cream; stabilize with a little cornstarch if needed to help the filling set.
- Egg replacers: For the yolk’s richness, try a thickened plant milk or a small amount of mashed silken tofu blended until smooth — texture will differ but flavor remains bright.
- Sweetener swaps: Use coconut sugar, maple syrup, or other liquid sweeteners with the understanding they will slightly alter color and firmness of the filling.
- Variations
- – Mix raspberries and strawberries for a two-berry presentation that contrasts color and texture.
- – Add a thin layer of lemon curd under the filling for a tangy lift.
- – Finish with toasted almond slices around the edge for crunch and a nutty aroma.
- For a lighter alternative, consider our rich strawberry mousse that can be made vegan!
How to Store, Make-Ahead, and Serve Strawberry Tart
You can make parts of this tart in advance without sacrificing quality. Blind-baked crusts and the cream cheese filling freeze well separately; assemble and top with fresh berries the day you plan to serve. Keep the finished tart refrigerated and bring it out 10–15 minutes before serving for the flavors to bloom and the texture to soften slightly. For a delightful drink to pair with your tart, try making our easy strawberry cold foam.
- Make-ahead: Blind bake the crust and refrigerate for up to a few days before filling; you can also prepare the filling and chill it tightly covered.
- Assembly day: Fill and bake the tart, cool, arrange berries, and glaze just before serving to keep the fruit bright.
- Storage: Keep the tart refrigerated and covered for up to 2 days; slices will cut cleaner if slightly chilled but not rock-cold.
- Freezing: Avoid freezing a fully assembled tart with fresh berries; instead freeze the unbaked crust or the filling and finish fresh.
Frequently Asked Questions
What can I use instead of fresh strawberries? If fresh strawberries aren’t available, you can use other berries like raspberries, blueberries, or even sliced peaches. Just make sure they’re ripe and flavorful to complement the tart!
Can I make the tart crust ahead of time? Absolutely! You can prepare the tart crust in advance, wrap it tightly in plastic wrap, and refrigerate it for up to a few days. Just make sure to let it come to room temperature before rolling it out.
Is there a gluten-free option for this strawberry tart? Yes! You can substitute the all-purpose flour with a gluten-free all-purpose flour blend. Just ensure that the blend contains xanthan gum or another binding agent to help achieve the right texture.
How long can I store the strawberry tart? The strawberry tart can be stored in the refrigerator for up to 2 days. Just keep it covered to maintain freshness. For the best taste, it’s recommended to enjoy it within the first day.
Can I freeze the strawberry tart? It’s not ideal to freeze the completed tart, especially with the fresh strawberries on top. However, you can freeze the unbaked crust or the cream cheese filling separately, then assemble and top with berries just before serving!
Strawberry Tart
Ingredients
Method
- Preheat oven to 375 degrees F.
- Combine all ingredients except water in a food processor. Pulse together until crumbs are formed.
- Gradually, a tablespoon at a time, pour in water while pulsing. Pulse until dough turns light yellow and begins to form a clump.
- Form mixture into a ball and flatten it. Wrap in plastic wrap and refrigerate for at least 30 minutes.
- Roll dough out to about 1/8 inch thick, into a circle about 1 1/2 inches bigger than your tart pan.
- Place dough into a removable bottom tart pan and press into bottom and up the sides. Remove excess dough.
- Use a fork to prick the bottom of the dough. Bake for 15-20 minutes or until golden brown. Allow to cool.
- Place cream filling ingredients into a bowl and mix until smooth and creamy.
- Add cream cheese filling to tart pan, mixture should be about 1/2 inch thick. Bake for another 12-15 minutes until set.
- Add berries to cream cheese layer, starting in the middle and working around in a circle.
- Heat jam and water in a saucepan, cool slightly and then brush over the fruit.
- Remove from tart pans and keep refrigerated until ready to serve.