I make vegetable spring rolls whenever I want a fuss-free crowd-pleaser: they look elegant on a platter, travel well to potlucks, and disappear in minutes. Over the years I’ve learned that the difference between a limp roll and a showstopper comes down to three things — drying the filling, the wrapper you choose, and the way you fry.
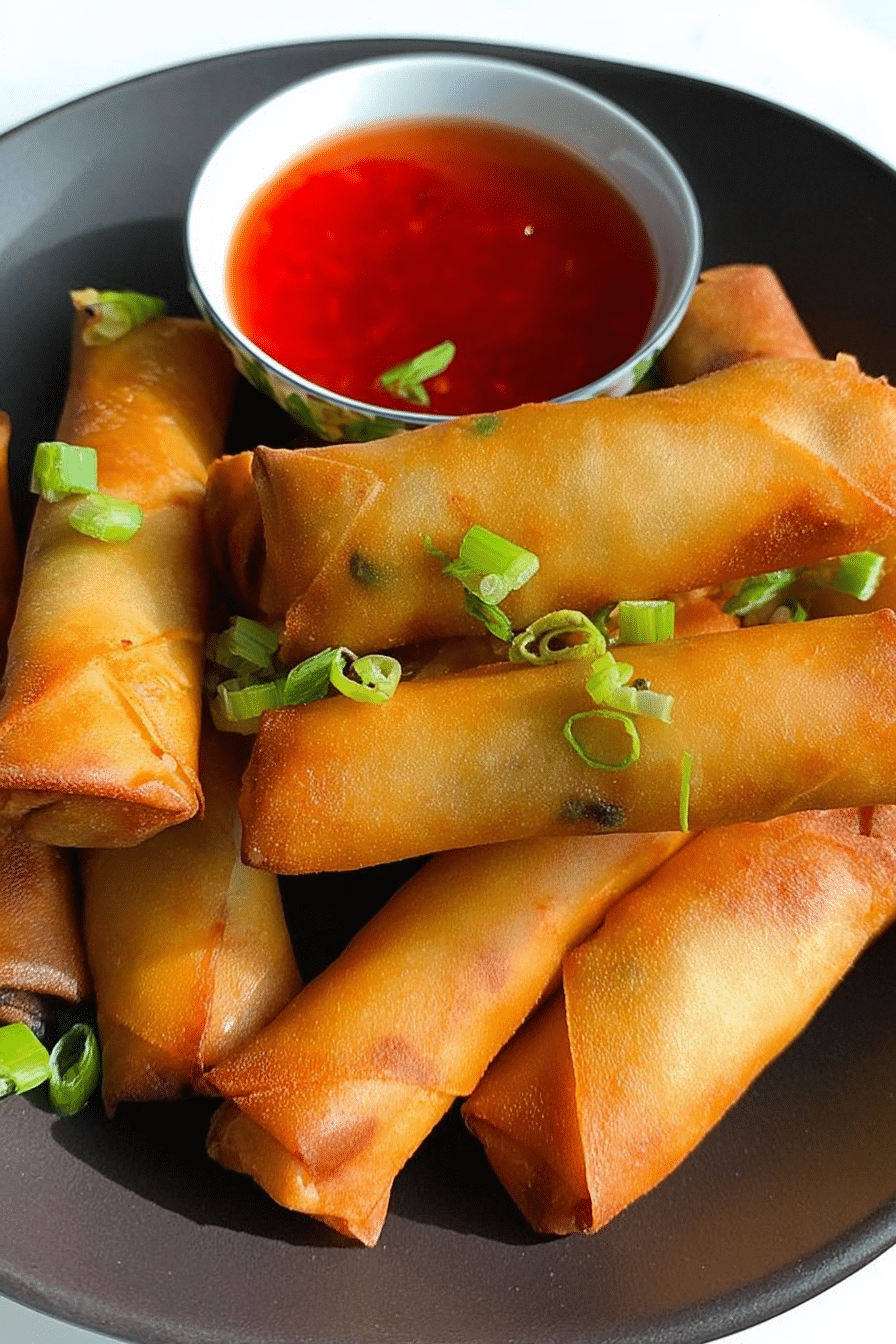
When I’m prepping for a party I focus on bright colors and contrasting textures — thin orange ribbons of carrot, crisp green beans, and the pale crunch of cabbage. The visual contrast makes the platter pop, and when you bite through that golden shell you get a satisfying crack followed by a burst of fresh, lightly seasoned veg.
I like recipes that can be made ahead without losing quality. You can prepare the filling and even wrap the rolls in advance; fry them right before guests arrive to restore that fresh crisp. If you enjoy these vegetable spring rolls, you might also like our Chinese spring rolls for another delicious appetizer option.
Why these Vegetable Spring Rolls are perfect for parties and busy nights
These spring rolls are ideal for entertaining because they’re flexible, easy to eat, and scale beautifully. You can assemble a big batch while watching a show, freeze any extras, and fry just what you need later. The appeal is practical and sensory: bright, crunchy fillings wrapped in a nut-brown shell that snaps when you bite it.
Practical benefits to keep in mind:
- They travel well: make them, chill them, and finish frying at your destination if needed.
- Serve-as-you-go: they’re perfect finger food for mingling guests and pair with a variety of dips so everyone can pick their favorite.
- Prep ahead: the filling can be cooked and refrigerated; wrappers can be assembled a few hours before and fried when guests arrive to ensure peak crispness.
Everything You Need for Vegetable Spring Rolls
Before you begin, set up a small production line — chopping board, bowls for the filling, a shallow dish for the wrapper water (if using rice paper), and a wide pan or deep fryer. The right tools make assembly efficient and enjoyable.
- Spring roll sheets (wheat or rice) – Choose thin, flexible wrappers for fast frying; rice paper is a great gluten-free option.
- Cabbage – Adds bulk and crunch; shred finely so it cooks quickly and releases less water.
- Carrot – Julienne for color and a slight sweetness that balances savory seasonings.
- Capsicum / bell pepper – Adds color and a fresh pop; slice thinly to keep bite-sized texture.
- Spring onions – Use both white and green parts; whites give aromatics while greens finish the rolls.
- Green beans or other firm veg – Keep them crisp-tender to create textural contrast.
- Aromatic base (garlic, ginger) – Use sparingly to flavor the filling without overpowering.
- Soy or tamari – For seasoning; tamari is the easy gluten-free swap.
- Neutral oil for frying – Pick a high smoke point oil so the wrappers brown quickly without tasting greasy.
- Essential tools – Sharp knife, mandoline or peeler for uniform cuts, kitchen paper for draining, tongs for frying, and a wide pan or deep fryer for even cooking.
The Secret to a Super-Crispy Spring Roll Shell
- Control moisture: press the cooked filling between layers of kitchen paper and let it cool; excess liquid is the main cause of soggy shells.
- Wrap tightly with layered overlap: tuck the ends and roll snugly so the wrapper stays sealed and fries evenly; an extra little brush of a flour-water slurry on the edge seals better than water alone.
- Use the right oil temperature: heat oil until it’s hot enough to sizzle briefly when a corner of wrapper touches it — not smoking, but definitely hot. A small test fry will confirm readiness.
- Fry in small batches: overcrowding drops oil temperature and makes rolls greasy. Let the oil recover heat between batches for a uniform golden color.
- Finish on a wire rack or paper towel: drain briefly to remove surface oil but avoid stacking; stacking traps steam and softens the shell.
How to Prep the Vegetables for Maximum Flavor
- Cut for texture: julienne carrots and peppers so every bite has the same mouthfeel; finely shred cabbage so it wilts quickly without releasing excessive water.
- Quick cook, then cool: give the veg a brief sauté to take off rawness and concentrate flavor, then spread them on a tray to cool so steam doesn’t make the wrappers soggy.
- Season in stages: add a little salt early to help draw out moisture and then finish with soy and chili sauce right before cooling so the flavors cling without adding liquid.
- Test for bite: you want vegetables tender-crisp — bright in color and still with a little snap, not mushy.
- Use aromatic highlights: a quick sauté of garlic and the white parts of spring onions infuses the filling with aroma that fills your kitchen while you work.
How to Make Vegetable Spring Rolls (Step-by-Step)
- Thaw and prepare wrappers: if frozen, fully thaw at room temperature so sheets don’t tear while wrapping. Keep them covered with a damp cloth while you work.
- Sauté aromatics briefly in a little oil until fragrant, then add the prepped vegetables and cook until just wilted — you want color and bite.
- Season to taste with salt, pepper, soy (or tamari) and a touch of chili sauce; turn off the heat and spread the filling on paper towels to cool and drain.
- Place a wrapper on a clean surface, add a modest line of filling near the edge, fold the bottom over, tuck the sides, then roll snugly; seal the edge with a dab of water or a thin paste of flour and water.
- Heat oil and test with a small scrap of wrapper — it should sizzle and brown quickly. Fry rolls in small batches until deep golden, turning once for even color.
- Drain briefly on a rack or paper towel, then serve immediately with your favorite dips. After mastering the spring roll technique, you might want to try our delicious spring roll salad with spicy ginger dressing for a fresh twist.
Pro Tip for vegetable spring roll: prevent soggy rolls and scale the filling
- I always do a test fry with one roll or a small scrap of wrapper to confirm oil temperature before committing the whole batch.
- Keep filling amounts modest — overfilling stretches the wrapper and encourages moisture to escape during frying. For smaller wrappers use less filling; for larger, a bit more.
- If you plan to make several dozen, I recommend cooking the filling in two pans so it cools faster and drains better; the quicker it cools, the crisper the final roll.
- Press cooked filling between layers of paper towel and pat dry — I often place a second towel on top and press gently to remove trapped moisture.
- Freeze any unused uncooked rolls on a tray, then transfer to a bag; fry from frozen and add a little extra time to reach golden color without overbrowning.
Seasonal and dietary swaps: gluten-free and unexpected veggie fillings
- Wrapper swaps – Use rice paper for a gluten-free option; they crisp up differently but give a light, delicate shell when fried carefully.
- Seasonal veg ideas – Try roasted sweet potato or butternut squash for autumn rolls (adds sweetness and body), or spring peas and asparagus in spring for a fresh, green profile.
- Flavor boosters – Fresh herbs like cilantro or mint, a squeeze of lime, or toasted sesame oil can add layers of complexity without extra moisture.
- Protein additions – For heartier rolls, add firm tofu that’s been pressed and lightly pan-fried; it keeps structure and absorbs seasonings.
- Nutritional notes – Cabbage provides fiber and vitamin C, carrots add beta-carotene, and peppers boost vitamin A and antioxidants — small swaps can nudge the nutritional profile toward more fiber or vitamins.
- Consider making vegetarian stuffed peppers for a filling alternative that’s equally adaptable to your dietary preferences.
How to Store, Make-Ahead and Reheat Vegetable Spring Rolls
- Cool completely before storing: spread cooled rolls on a tray in a single layer so they don’t steam each other in storage.
- Short-term storage: keep in the refrigerator for up to two days in an airtight container with a paper towel to absorb residual moisture.
- Freezing: flash-freeze uncooked, wrapped rolls on a tray, then bag and label; fry from frozen, adding a couple of minutes to frying time to heat through.
- Reheating: oven or air-fryer is best — re-crisp at moderate-high heat until hot and golden. Microwaving will make them soft, so avoid it unless you plan to re-crisp in a hot skillet briefly afterwards.
- Transport tips: if you’re taking rolls to an event, pack fillings and wrappers separately and fry on-site if possible; otherwise, reheat in an oven at the host location for best texture.
Pairing Suggestions for Spring Rolls with Beverages or Entrees
These spring rolls pair beautifully with light, refreshing beverages — a chilled herbal iced tea, a crisp lager, or a dry sake all complement the fried shell without overwhelming the fresh vegetable flavors. For a fuller meal, serve alongside a warm bowl of spring vegetable soup or a simple noodle salad for contrast in texture and temperature.
For dips, think across sweetness and acidity: sweet chili sauce, a tangy soy-vinegar dip, or a nutty peanut sauce each brings a different profile. Offer a couple of options so guests can mix and match — the contrast between the hot, crunchy roll and a cool, zesty dip is always a hit.
Frequently Asked Questions
What are vegetable spring rolls made of?
Vegetable spring rolls are made of a thin pastry shell filled with a mixture of vegetables like cabbage, spring onions, carrots, and bell peppers. They are then rolled and deep-fried until crispy.
How do I achieve super-crispy spring roll shells?
To achieve maximum crispiness, ensure that the spring roll sheets are fully thawed before using. Also, make sure to drain the vegetable filling well to remove excess moisture before wrapping.
Can I make vegetable spring rolls ahead of time?
Yes! You can prepare the filling in advance and store it in the refrigerator. Just wrap the spring rolls and fry them shortly before serving for the best texture.
What can I use instead of soy sauce for a gluten-free version?
You can substitute soy sauce with tamari or coconut aminos for a gluten-free alternative while still enjoying great flavor.
What are some good dips for vegetable spring rolls?
Vegetable spring rolls pair wonderfully with a variety of dips, such as sweet chili sauce, soy sauce, or a homemade peanut sauce.
Vegetable Spring Roll
Ingredients
Method
- Transfer the spring roll sheets from the freezer to the fridge/ kitchen counter to let them naturally thaw.
- Heat 2 tbsp olive oil in a non-stick pan over low flame.
- Add onions and garlic; sauté until fragrant.
- Add all the vegetables and cook on medium flame for 2 minutes.
- Add salt, pepper, soy sauce, and sriracha; mix well.
- Cover and let the vegetables cook on low flame for 4-5 minutes.
- Stir the vegetables and cook for an additional 4-5 minutes until reduced and lightly browned.
- Transfer the mixture to a plate lined with kitchen paper to absorb excess oil.
- Prepare the spring rolls and deep fry until golden brown.
- Serve hot with dip or chutney or ketchup.