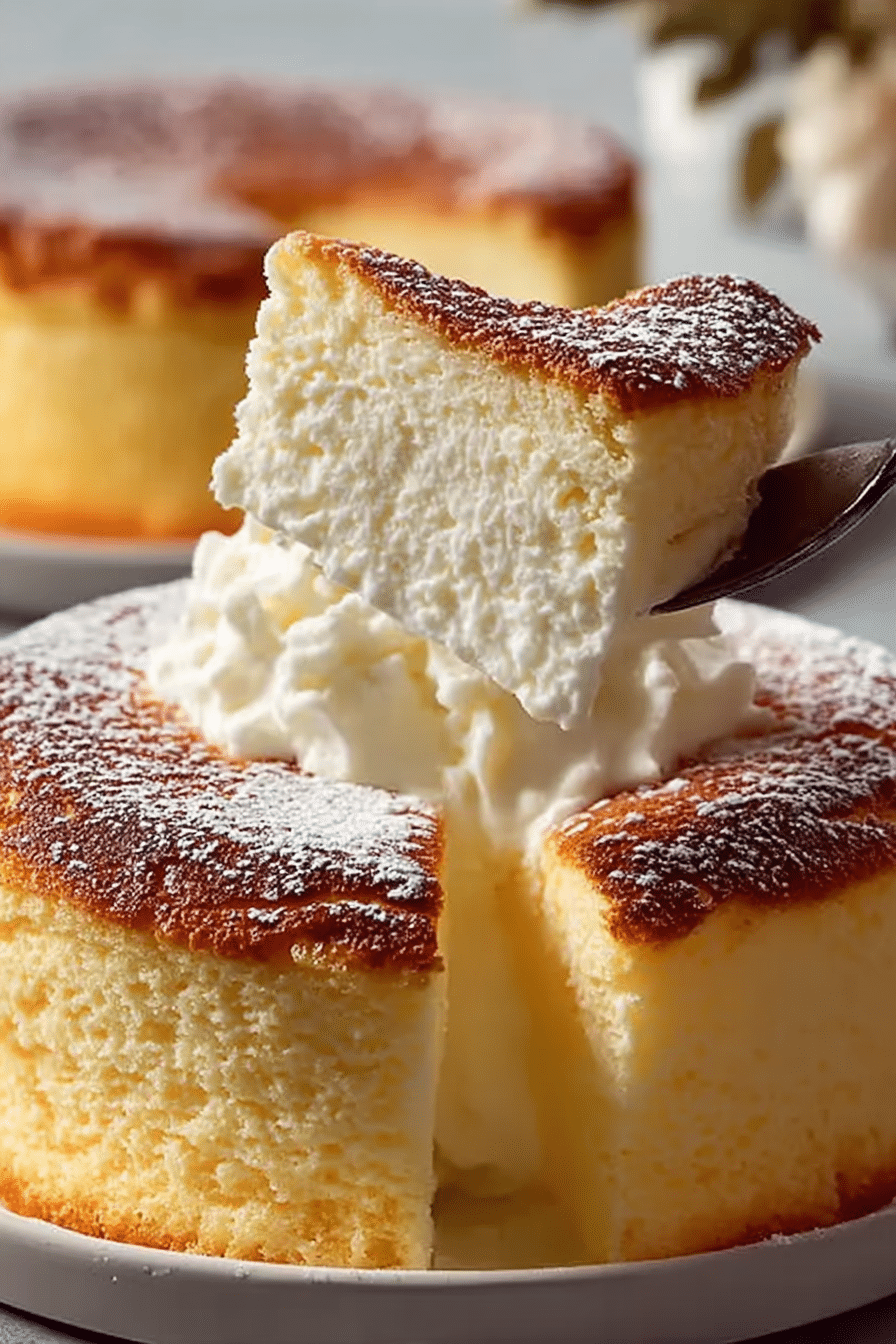
I fell for this Japanese cheesecake the first time I sliced into its cloud-like interior — the texture was startlingly light, yet the flavor stayed softly rich. Over several attempts in my kitchen I traded heavy butter and cream for technique: glossy, stabilized cream cheese base and billowy whipped egg whites. The result is a dessert that feels indulgent but lands at about 160 calories per slice.
I write this recipe for people who want a satisfying sweet without derailing goals. I tested reduced-fat cream cheese brands and timing strategies until I stopped getting cracks or collapsed centers. The trick isn’t a secret ingredient — it’s handling: temperature, gentle folding, and patient cooling.
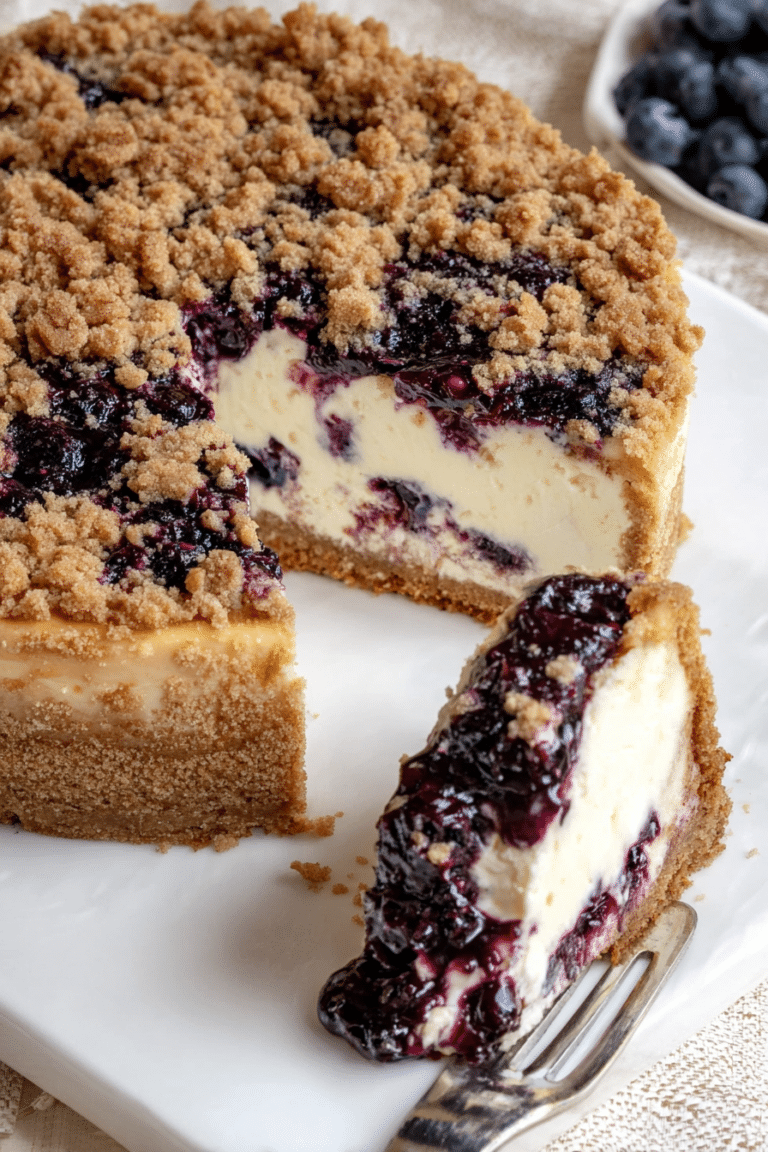
Along the way I kept notes on substitutions that keep flavor and texture intact so you won’t feel like you’re eating a “diet” dessert. If you love cheesecakes, you might enjoy our blueberry crumble cheesecake which perfectly balances flavor and health.
Read on for everything you need, the exact folding technique I use, and practical troubleshooting so your cake rises and stays puffy long after it cools.
Why this viral Japanese cheesecake hack is perfect for health-conscious dessert cravings
This version trims calories by relying on aeration rather than added fat. Because the batter folds whipped egg whites into a lightened cream cheese base, each slice feels large and satisfying without heavy dense richness. The texture is airy and cloudlike; the taste is gently sweet with a bright hint of lemon and vanilla that reads as fresh, not cloying.
Definitive benefits:
- Lower calories compared with traditional baked cheesecakes, with a high protein-to-fat ratio that helps you feel full.
- Airy texture increases perceived portion size — you get a generous slice without excess calories.
- Reduced-fat cream cheese and sugar alternatives preserve the cheesecake’s creaminess while cutting calories.
- It satisfies a dessert craving with familiar flavors so you won’t feel deprived — that emotional satisfaction matters when you’re managing your diet.
Everything You Need for Viral Japanese Cheesecake Hack
Below I explain the role each ingredient plays and which swaps give the best results. I’ll also list the essential tools you’ll want on hand for consistent outcomes. I tested different brands; quality vanilla and properly softened cream cheese make a noticeable difference.
- Reduced-fat cream cheese – Provides the tang and creamy backbone while cutting calories; it needs to be fully softened so it blends silky without lumps.
- Egg yolks – Enrich the base and add structure; they help the cake set without becoming heavy.
- Milk – Thins the base slightly so the batter holds air better; you can use low-fat dairy or a neutral plant milk for fewer calories.
- Vanilla extract – Gives aroma and depth; use high-quality vanilla for the best flavor punch.
- Lemon juice – Brightens the overall flavor and balances sweetness; essential for that fresh finish.
- Cornstarch – Stabilizes the base and helps the cake hold its airy structure when baked.
- Egg whites – Whipped to soft/medium peaks, they are the primary aerating agent and create the soufflé-like lift.
- Cream of tartar – Stabilizes egg whites and improves volume and texture.
- Salt – Enhances flavor contrast so the cake tastes richer than its calories suggest.
- Monk fruit sweetener (or sugar) – Keeps sweetness controlled; monk fruit works well without adding calories and won’t upset the texture if added gradually while whipping.
- 7-inch springform pan and parchment – A smaller pan concentrates rise and gives the signature height; lining both bottom and sides prevents sticking and tearing.
- Roasting pan for a water bath – Ensures even, gentle baking and prevents dry, overcooked edges.
- Electric mixer and heatproof bowls – A mixer gives stable whites; clean, grease-free bowls are non-negotiable for proper whipping.
The Secret to the Perfect Fluffy Texture
The cloud-like crumb is a result of two deliberate actions: an ultra-smooth cream cheese base and properly aerated egg whites folded in gently. Here’s how I handle both to maximize lift and keep the cake stable.
- Beat the cream cheese until perfectly smooth and lump-free — scrape the bowl and mix at medium speed so it becomes silky; any tiny lumps will cause uneven pockets in the final cake.
- Whip egg whites starting at medium speed until foamy, add cream of tartar, then gradually add sweetener while increasing to medium-high until soft–medium peaks form. Look for peaks that bend slightly at the tip — that gives structure without stiffness.
- Lighten the base by folding in one-third of the whites first: use a wide spatula, scoop from the bottom, and fold over the top in a circular motion. This first addition loosens the base and makes subsequent folding easier.
- Add the remaining whites in two additions, folding gently from the bottom and rotating the bowl. Stop when no white streaks remain — over-folding deflates the batter and gives a dense cake.
- The water bath keeps the oven environment moist so the cake sets evenly and the exterior doesn’t dry out, which helps the interior stay tender and souffle-like.
For a deliciously fluffy treat, try our fluffy cinnamon sugar donut muffins which share similar techniques to achieve that perfect texture.
Why Temperature and the Water Bath Matter
Temperature control is the difference between a perfectly risen cake and one that collapses or cracks. Gentle, even heat allows the protein network from eggs and starches to set slowly so the structure holds air instead of snapping shut.
- Bake at a moderate temperature so the outside doesn’t set too fast while the center remains unset — the target oven temperature is 320°F (160°C) for even setting.
- The water bath acts as a buffer: it regulates sudden temperature jumps and provides steam that keeps the cake surface soft, preventing dry edges and large cracks.
- Slow cooling is critical: after baking, leave the cake in the warm oven with the door cracked to avoid a shock cool that forces air out and causes collapse.
- Visual indicators: the top should be lightly golden and the center should jiggle slightly; if it’s rock-solid, it’s likely overbaked and will dry out.
A Low-Calorie Swap That Keeps Flavor (and Texture)
I tested several low-calorie swaps and settled on choices that preserve mouthfeel and flavor while trimming calories. Here’s what works and why.
- Monk fruit sweetener in place of sugar — it sweetens cleanly without adding calories and won’t interfere with the egg-white foam when added slowly during whipping.
- Reduced-fat cream cheese instead of full-fat — it keeps the creamy base but lightens the final slice; choosing a brand with a tight, smooth texture is important.
- High-quality vanilla and a splash of lemon juice — these two ingredients amplify perceived richness so less sugar and fat still taste satisfying.
- Trade-offs: some sugar substitutes can leave cooling aftertastes or slightly different browning. If you prefer a classic flavor, use part sugar and part monk fruit to balance texture and taste.
Explore more healthy dessert options that satisfy your sweet cravings without guilt.
How to Make Viral Japanese Cheesecake Hack (Step-by-Step)
Follow these steps carefully — I recommend assembling mise en place so each stage is smooth. When you see visual cues described below, trust them more than timing alone.
- Preheat the oven to the moderate baking temperature. Line a 7-inch springform pan with parchment on the bottom and sides and position it inside a larger roasting pan for the water bath.
- Beat softened cream cheese in a medium bowl at medium speed until completely smooth and free of lumps, scraping the bowl as needed.
- Add egg yolks, milk, vanilla, lemon juice, and cornstarch to the cream cheese and mix until the base is silky and homogeneous; set aside.
- In a separate, clean large bowl, beat egg whites with cream of tartar and a pinch of salt starting at medium speed until foamy.
- Gradually add monk fruit sweetener (or sugar) while continuing to beat; increase to medium-high and whip to soft–medium peaks that bend slightly at the tips.
- Fold one-third of the whipped whites into the cream cheese base using a wide spatula to lighten it: scoop from the bottom and fold over the top in a circular motion until just incorporated.
- Add remaining whites in two additions, folding gently from the bottom to the top while rotating the bowl; stop once no white streaks remain to avoid deflation.
- Pour batter into the prepared pan and tap the pan gently 2–3 times on the counter to release large air bubbles.
- Place the cake pan in the roasting pan and carefully pour hot water into the outer pan until it reaches halfway up the sides of the cake pan, then transfer to the oven.
- Bake for about 50–60 minutes until the top is lightly golden and the center jiggles slightly when shaken; avoid overbaking so the interior stays tender.
- Turn off the oven, crack the door about 4 inches, and let the cake cool inside for 30 minutes to prevent sudden temperature change and collapse.
- Remove the cake from the oven and water bath, cool to room temperature on a wire rack for about an hour, then cover and refrigerate for at least 3 hours or overnight to firm up before slicing.
- Before releasing the springform, run a thin knife around the edges to prevent tearing; slice with a clean knife, wiping between cuts for neat servings.
Pro-Tips
- I always use room-temperature eggs and fully softened cream cheese — cold ingredients make a lumpy base and reduce the whites’ ability to add lift.
- When whipping whites, stop at soft–medium peaks; overly stiff whites resist folding and create large air pockets that collapse when baked.
- Use a deep roasting pan and pour very hot (not boiling) water into it—this gives immediate steam without shocking the pan or oven.
- For clean slices, chill the cake thoroughly and use a hot, dry knife between cuts; dip and wipe the blade for perfect presentation.
Troubleshooting
- If the cake sinks dramatically in the center: you likely overbeaten the whites or cooled the cake too quickly; try gentler folding and a slower cool-down next time.
- If the top cracks: the oven was too hot or the cake rose too fast; lower the oven temperature slightly and ensure the water bath is deep enough to moderate heat.
- If the cake is grainy or has lumps: cream cheese wasn’t fully softened or not beaten long enough; beat longer and scrape the bowl until silky.
- If the texture is too dense: you under-whipped the egg whites or over-folded them; whip to the correct peak stage and fold only until no streaks remain.
Variations
- Light citrus twist — add lemon or orange zest to the base for brighter aroma.
- Matcha version — fold a small amount of sifted matcha into the base for a green tea cheesecake with subtle bitterness to balance sweetness.
- Berry swirl — fold in a spoonful of strained berry purée right before pouring for visual contrast and fresh flavor.
- Lower-sugar option — replace all sugar with a monk fruit blend tested for baking; expect slightly different browning but similar texture.
Pro Tip for viral japanese cheesecake hack: Cool Slowly to Prevent Collapse
I’ve lost cakes to rapid cooling, so I treat the cool-down like a second bake: slow and deliberate. The proteins continue to set as the temperature drops; if that happens too fast, trapped air contracts and forces the structure to deflate.
- After baking, turn off the oven and crack the door about 4 inches; leave the cake inside for 30 minutes — this gradual temperature drop prevents a sudden collapse.
- Move the cake to a wire rack and let it come to room temperature for about an hour before refrigerating; sudden cold will tighten the structure and can cause moisture weeping.
- Monitor the center jiggle rather than relying on time alone; a slight wobble indicates it will set properly as it cools.
How to Store, Make-Ahead & Serving Ideas (Gluten-free, Vegan Notes)
Plan ahead: this cheesecake benefits from chilling and actually tastes better the next day. Below are practical storage tips, make-ahead strategies, and creative serving suggestions that go beyond a simple fruit compote.
- Refrigerating – Keep the cake covered in the fridge for up to 4 days; chilling firms the texture and improves sliceability.
- Freezing – Wrap individual slices tightly and freeze for up to 2 months; thaw overnight in the refrigerator before serving.
- Make-ahead – Bake a day ahead and store chilled; flavors meld and the texture stabilizes, making it easier to slice for guests.
- Serving ideas beyond compote – lightly macerated citrus segments, a dollop of Greek yogurt sweetened with a little honey, toasted almond flakes, a thin drizzle of dark chocolate, or a dusting of matcha for a refined touch.
- Gluten-free – The recipe is naturally gluten-free if you use a gluten-free sweetener and confirm your cream cheese and additives are certified GF.
- Vegan notes – Making a truly vegan version is a bigger change: silken tofu or dairy-free cream cheese bases and aquafaba-whipped egg-white alternatives can work, but expect differences in rise and texture; test one small cake before committing to the method.
- Community – I’d love to see your twists: share photos of your toppings or flavor swaps so others can try your ideas.
Cultural Significance of Japanese Cheesecake
Japanese cheesecake, often called “soufflé cheesecake” or “cotton cheesecake,” earned global popularity for its delicate balance of airy texture and gentle cheesiness. It emerged as a reinterpretation of Western cheesecake techniques, adapted in Japan to favor lighter textures and subtle sweetness suited to many palates.
Over time the cake became a social-media favorite for its photogenic, pillowy slices and simplicity. Anecdotes from home bakers show how the technique — careful whipping, folding, and slow cooling — traveled quickly online, inspiring countless variations. Learn about more unique dessert creations like strawberry cheesecake tacos that blend cultural flavors and deliciousness.
Frequently Asked Questions
What ingredients are needed for the viral Japanese cheesecake hack?
You’ll need reduced-fat cream cheese, egg yolks, milk, vanilla extract, lemon juice, cornstarch, egg whites, cream of tartar, salt, and monk fruit sweetener (or sugar). For equipment, you’ll need a 7-inch round springform pan, a mixing bowl, and an electric mixer.
How long should I bake the cheesecake?
Bake the cheesecake for 50-60 minutes at 320°F (160°C) until the top is lightly golden and the center jiggles slightly.
Why is a water bath used in this recipe?
A water bath helps to regulate the temperature, preventing sudden changes that can cause the cheesecake to collapse and ensures a smooth, even cooking.
Can I make this cheesecake gluten-free?
Yes! Just make sure to use a gluten-free sweetener and confirm that your other ingredients are also gluten-free.
How long should the cheesecake cool before serving?
After baking, let the cheesecake cool in the oven for 30 minutes, then at room temperature for about an hour, and finally refrigerate for at least 3 hours or overnight before serving.
Viral Japanese Cheesecake Hack
Method
- Preheat oven to 320°F (160°C). Line a 7-inch round springform pan with parchment paper on bottom and sides. Prepare a larger roasting pan for water bath.
- In a medium bowl, beat softened cream cheese until smooth and creamy with no lumps, about 2 minutes.
- Add egg yolks, milk, vanilla extract, lemon juice, and cornstarch to cream cheese. Mix on medium speed until fully combined and silky smooth. Set aside.
- In a separate large clean bowl, beat egg whites with cream of tartar and salt using an electric mixer on medium speed until foamy.
- Gradually add monk fruit sweetener (or sugar) while continuing to beat. Increase speed to medium-high and whip until soft to medium peaks form (peaks should bend slightly at the tips). Do not over-beat.
- Gently fold one-third of the whipped egg whites into the cream cheese mixture using a spatula, stirring in circular motions to lighten the base.
- Add remaining egg whites in two additions, folding gently from bottom to top while rotating the bowl. Fold just until no white streaks remain, being careful not to deflate the batter.
- Pour batter into prepared pan and tap gently on counter 2-3 times to release air bubbles.
- Place cake pan inside larger roasting pan. Carefully pour hot water into outer pan until it reaches halfway up the sides of the cake pan.
- Bake for 50-60 minutes, until top is lightly golden and center jiggles slightly when gently shaken. The cake should be set but not completely firm.
- Turn off oven, crack door open about 4 inches, and let cake cool inside for 30 minutes.
- Remove from oven and water bath. Let cool to room temperature on wire rack, about 1 hour.
- Cover and refrigerate for at least 3 hours or overnight before serving.
- Run a thin knife around edges before releasing springform pan. Slice with a clean knife, wiping between cuts.