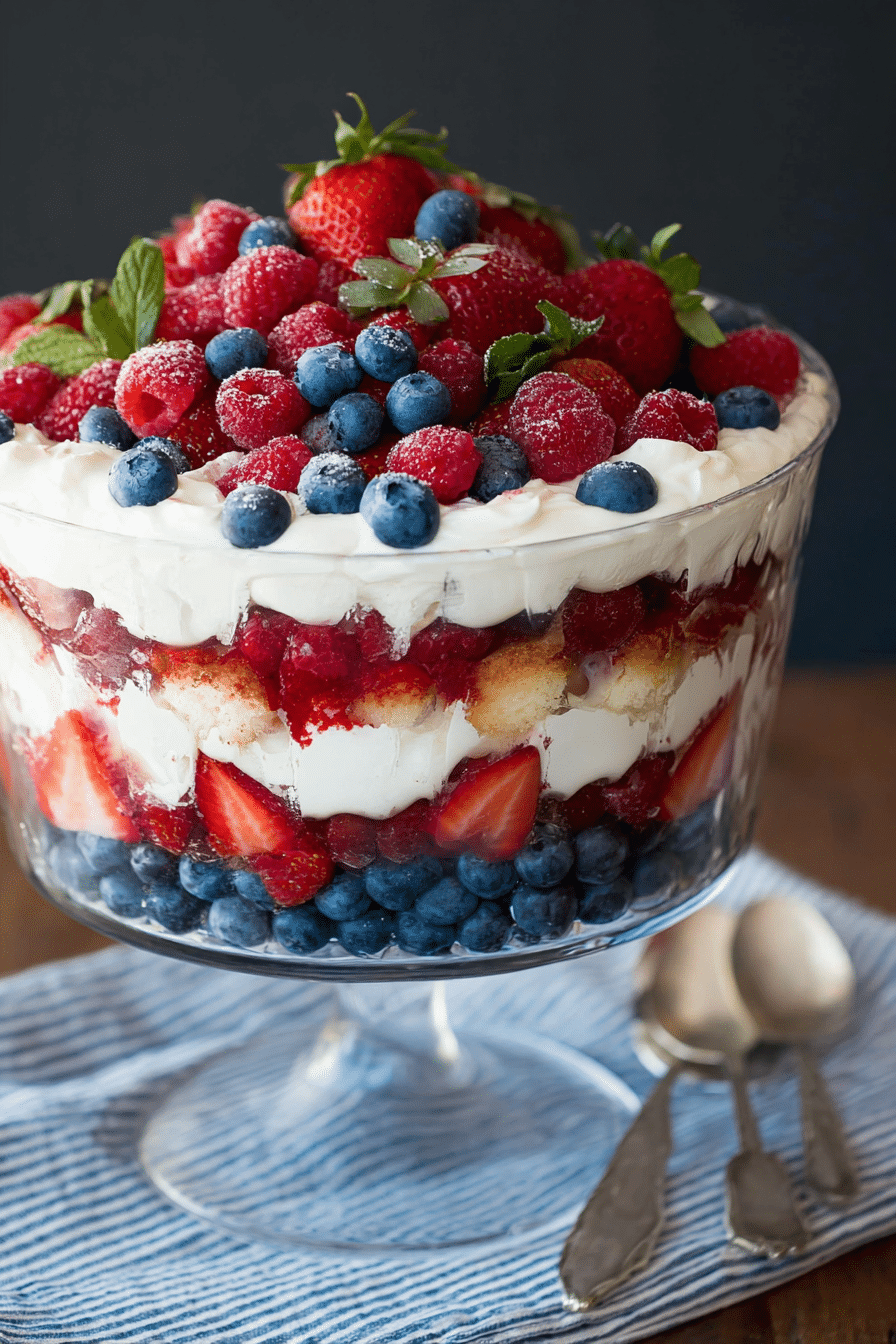
I make this berry trifle whenever I want a dessert that looks like I spent hours in the kitchen but actually let me enjoy the party. It’s the sort of thing I assemble in my kitchen ten minutes before guests arrive and still feel proud to place on the table. The color alone—ruby strawberries, indigo blueberries, glossy blackberries—makes people reach for their phones to take a photo before anyone digs in.
Over the years I’ve served this at backyard barbecues, bridal showers, potlucks, and lazy summer picnics. Each time I tweak one small thing—more berry sauce for a juicy finish, or a sprig of mint for a bright aroma—and the result feels bespoke. Use it when you want a show-stopping dessert with minimal fuss.
In my kitchen I favor seasonal fruit and simple components: a light cake, a generous smear of whipped cream, and berries that still smell sweet when you lift a pint. You’ll love how easy it is to adapt for different diets and how well it travels to a friend’s house or across the picnic blanket.
Why this Berry Trifle is the Easy Dessert Every Host Needs
This trifle thrives on two things: short hands-on time and maximum visual impact. You can prepare the components quickly, assemble in clear jars or bowls for instant wow factor, and serve something that feels celebratory without a last-minute panic. It’s perfect for a casual weekend brunch, a July 4th cookout, or a baby shower when you want dessert that looks polished but is forgiving to make.
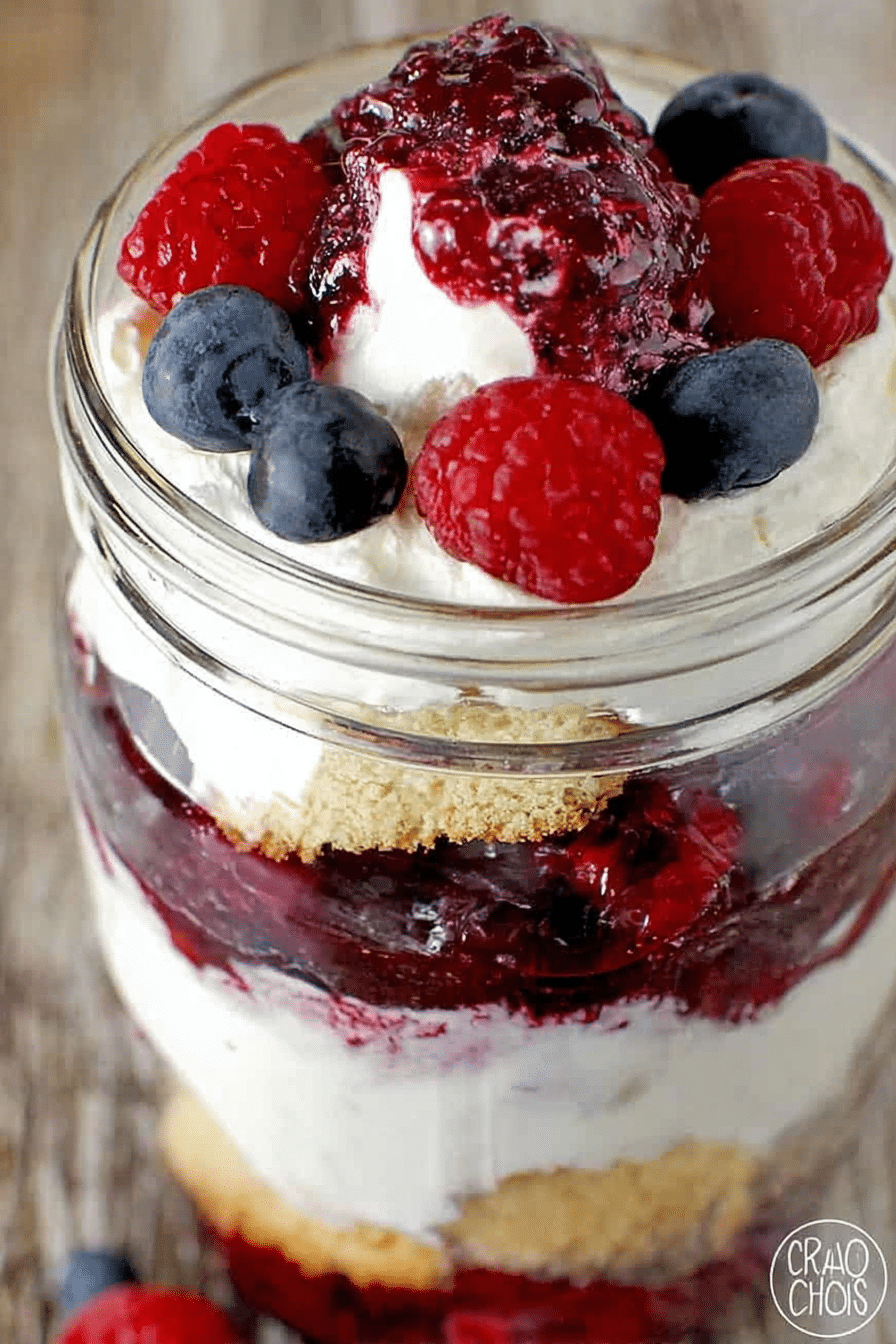
Sensory notes: the sight is unbeatable—the layered reds, whites, and blues pop on any table. The aroma of fresh berries and vanilla-scented cream fills the room as you slice through the cake with your spoon. I like that it scales easily: multiply the layers for a large trifle bowl or dole out individual jars for grab-and-go portions.
Everything You Need for Berry Trifle
Below are the essential components you’ll want on hand. I’m focusing on purpose and swaps rather than exact quantities so you can scale this for four jars or a large bowl. For another showy berry dessert option, you might also enjoy a mixed berry pavlova—its crisp shell and marshmallow center pair wonderfully with the same fruit flavors.
- Angel food cake or shortcake – Provides a light, airy base that soaks up berry juices without getting dense; use a gluten-free sponge if you need to avoid gluten.
- Fresh berries – The star for color, aroma, and texture; choose ripe, firm berries for the best mouthfeel or frozen berries that have been thawed when fresh aren’t available.
- Berry sauce – A quick blended or lightly crushed compote that adds concentrated fruit flavor and a glossy finish.
- Whipped cream – Adds richness and a silky contrast to the berries; swap for coconut cream or a non-dairy topping for a vegan version.
- Optional garnishes – Fresh mint, thin lemon zest, or edible flowers to add fragrance and refine the presentation.
Use local markets for the best seasonal berries—when fruit is in season it smells sweeter and the colors are more vibrant, which changes everything in this dish.
The Secret to Bright, Fresh Berry Flavor
Bright berry flavor comes down to two things: fruit quality and simple balancing. Perfectly ripe berries deliver sweetness and aroma that canned or overcooked fruit can’t match. If your berries are slightly underripe, a light sprinkle of sugar or a brief maceration with a splash of citrus brightens them; if they’re very sweet, a squeeze of lemon lifts the flavors.
Small flavor additions in the cream layer make a big difference: a touch of vanilla bean or finely chopped fresh mint folded into the whipped cream brings freshness and complexity. For a slightly spicier angle, grate a little lemon zest or add a whisper of ground cardamom to the cream—use sparingly so the fruit remains the hero. If you want to explore complementary berry desserts and flavor matches, try a strawberry rhubarb crumble to understand which pairings bring out tartness versus sweetness.
How to Layer for Perfect Texture and Presentation
Layering is where the trifle becomes visually arresting and texturally interesting. Use clear glassware to show off the layers—the contrast between cake, bright fruit, and silky cream is part of the pleasure. Alternate textures deliberately so each spoonful gives a little cake, a little fruit, and a little cream.
- Start with cake pieces at the bottom to create a sturdy base that soaks up berry juices without collapsing.
- Add a spoonful of whole berries for texture and bursts of flavor when bitten.
- Spread or pipe a layer of whipped cream to create a soft contrast against the fruit.
- Repeat layers, finishing with a glossy spoonful of berry sauce and a single pristine berry on top for visual focus.
- Garnish with a small mint sprig, a curl of lemon zest, or an edible flower to introduce aroma and a refined look.
How to Make Berry Trifle (Step-by-Step)
- Prep the berries: sort and rinse fresh fruit, pat dry, and remove stems; if using frozen, thaw and drain any excess liquid.
- Make the berry sauce: process a portion of the fruit to a sauce consistency you like—smooth or slightly chunky—then taste and adjust with a little citrus if needed.
- Prepare the cake: tear or cut the cake into large, rustic pieces that will compress slightly when layered.
- Whip the cream: whip to soft peaks and fold in vanilla or mint if using; keep chilled until assembly.
- Assemble in jars or a bowl, alternating cake, whole berries, and whipped cream, finishing with berry sauce and a decorative berry or mint sprig.
- Serve immediately, or chill briefly to let flavors meld; I often refrigerate for 30–60 minutes so the cake picks up a touch of the sauce but stays pleasantly textured.
If you enjoy layered desserts, you might also like a strawberry cheesecake lasagna that stacks complementary textures in a similar way.
- Troubleshooting (I speak from experience) — If your cake turns soggy, I recommend cutting slightly larger pieces and chilling the assembled trifle briefly before serving so the cream firms up. If the berry sauce runs too thin, simmer it very briefly to concentrate the flavor and body, then cool before using. If whipped cream deflates, I’ve found chilling the bowl and beaters first helps me get firmer peaks faster.
Pro Tip for berry trifle: Make-Ahead & Ingredient Swaps
- Make the berry sauce a day ahead and refrigerate—this deepens the flavor and saves last-minute work. I often keep it in a jar in the fridge and spoon out what I need.
- Whip the cream a few hours in advance and keep it covered; rewhip very briefly if it loses a touch of volume before assembling.
- Swap the cake for a simple gluten-free sponge or cubed pound cake for a denser bite; use coconut cream whipped with a bit of sweetener for a vegan option.
- For a lower-sugar version, choose berries that are naturally less sweet (like raspberries) and use a sugar-free topping or plain yogurt in place of part of the cream.
- I always recommend prepping components separately and assembling close to serving time for the best texture balance between moist cake and fluffy cream.
How to Store, Serve, and Vary Your Berry Trifle
Leftovers keep well in the refrigerator when covered and are best eaten within a couple of days to preserve the textures. If you want to present a slightly different version at your next gathering, swap in yogurt or a layer of granola for crunch. For inspiration using the same fresh-berry theme, try a strawberry shortcake cake for a larger party-style dessert that leans more on cake than cream.
- Storage – Cover the trifle (individual jars are easiest) and refrigerate for up to two days; avoid freezing once assembled because the cream and berries won’t re-texturize well.
- Serving – Let jars sit a few minutes at room temperature so the cream softens slightly for easier spooning and more pronounced berry aroma.
- Variations – Try these quick twists:
- Swap whipped cream for Greek yogurt sweetened lightly with honey for a tangy counterpoint.
- Add a layer of crushed toasted nuts or granola for crunch and contrast.
- Use lemon curd between layers for a citrus-forward lift.
- Change the cake base to brownies for an indulgent chocolate-berry trifle.
Frequently Asked Questions
Can I use frozen berries for the trifle? — Yes! You can use frozen berries, just make sure to thaw them first. They work perfectly in this recipe.
How can I make this trifle suitable for diabetics? — You can swap out high-carb ingredients for low-carb options, such as using sugar-free whipped cream and being mindful of the fruits you choose to keep sugar levels down.
What can I use instead of angel food cake? — If you prefer, you can substitute angel food cake with shortcake or any low-sugar cake recipe that you enjoy.
How long can I store leftover berry trifle? — The berry trifle can be stored in the refrigerator for up to 2 days. Just make sure to cover it to keep it fresh!
What are some variations I can try with this recipe? — You can vary the fruits, add layers of yogurt, or even use different types of cake, like sponge cake or brownies, to mix things up!
Berry Trifle
Ingredients
Method
- Place the cup of berries in a food processor until the berries are all blended. This is a personal taste, you can process until very smooth or leave it with chunks of fruit.
- Make the shortcake if needed and set aside until cooled.
- Break your cake by hand into large pieces.
- Making layers in a cup or tall bowl, with the first layer being a few pieces of the cake, then add berries, then the whipped cream.... and so on.
- Once you have reached the top of the cup pour some of the berry sauce over it and decorate with a berry. You can also add a spoon of the sauce in the middle of the trifle too.
- Best way to eat this is to mix everything first so there's a little bit of each layer in every spoon.
- Enjoy!