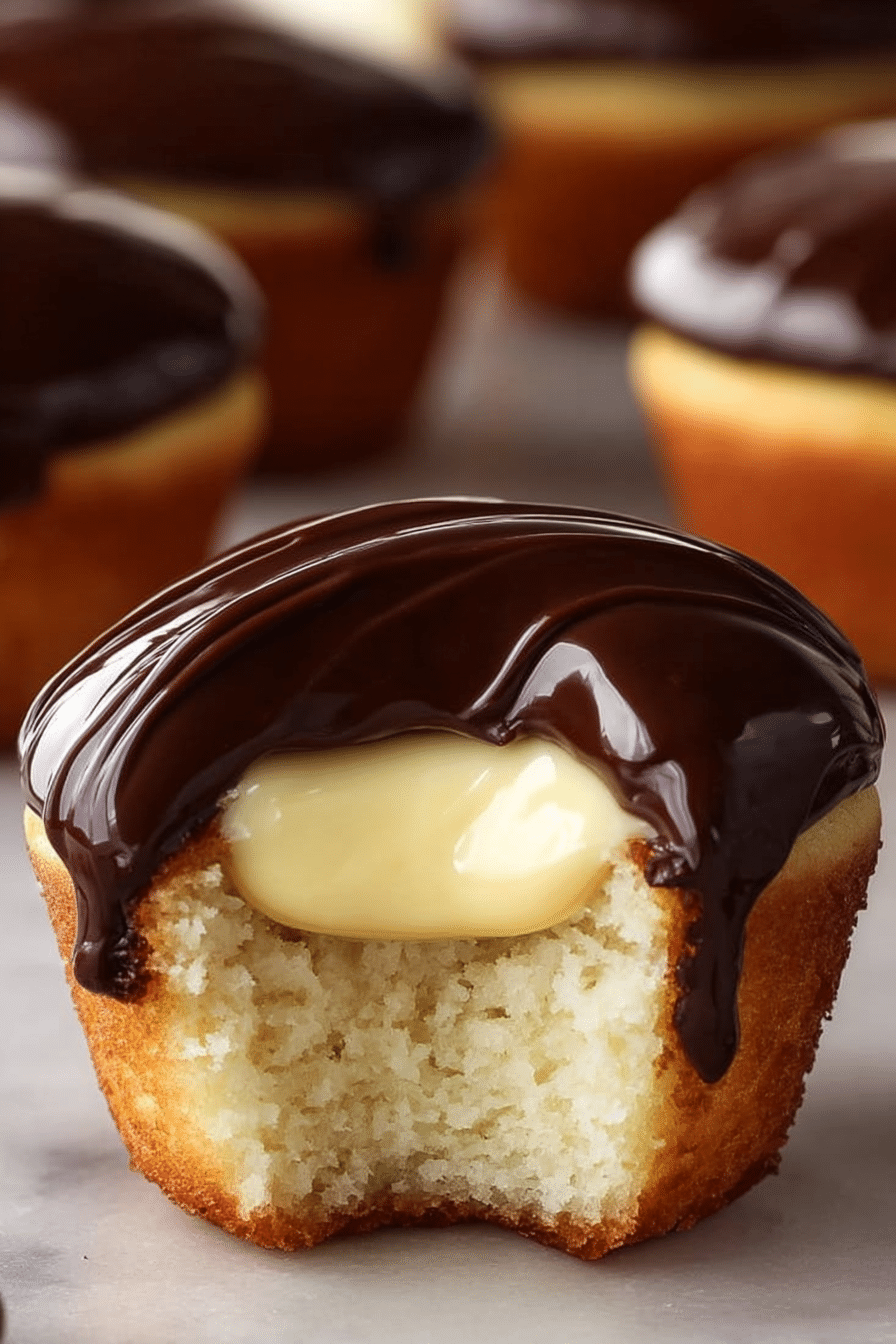
I make these Boston Cream Pie Cupcakes whenever I want a dessert that looks elegant on a platter but travels like a dream. In my kitchen they’ve become the go-to for birthdays, bridal showers, and last-minute dinner parties because each cupcake is a tidy, indulgent package: soft yellow cake, a silky vanilla filling, and a glossy chocolate cap that catches the light on a buffet table.
When I plate them, guests always comment on the presentation — the individual portions make passing trays and dessert stations effortless. They’re sturdy enough to pick up by hand yet delicate in flavor, with the contrast between the warm chocolate sheen and the cool pastry cream creating a memorable moment at every gathering.
Over the years I refined a few small techniques (simple things like how I chill the filled cupcakes before dipping) that keep the filling from leaking and the ganache from sliding off. Those little rituals are what let you serve dozens without a single broken top or weeping cream.
Why These Boston Cream Pie Cupcakes are Perfect for Parties and Celebrations
Portability is the first advantage: each cupcake is an individual serving, so guests can grab one and move about without a fork. Presentation is also effortless — a tower or lined tray of these cupcakes reads as intentional and polished, instantly elevating the celebration ambiance. Flavor-wise, the play between fluffy cake, velvety vanilla pastry cream, and shiny chocolate ganache hits a crowd-pleasing sweet spot that satisfies a range of palates.
For another crowd-pleaser, take a look at our best chocolate chip cookies that are always a hit at parties.
Everything You Need for Boston Cream Pie Cupcakes
Here I describe the key ingredients and tools conversationally so you know the role each plays and what to swap if needed. Remember to double-check for gluten-free and vegan alternatives before you start if you’re serving guests with dietary needs.
- Unsalted butter – Gives structure and flavor; room temperature butter creamed with sugar traps air for a lighter crumb.
- Sugar – Sweetens and helps with browning; you can use a fine-grain sugar for smoother creaming.
- Vanilla – The backbone of the pastry cream and the batter; real vanilla pods or a good extract both work.
- Eggs – Provide lift and richness in the cake and body for the pastry cream (yolks concentrate flavor in the filling).
- Flour and baking powder – Structure and rise; for gluten-free swaps use a tested gluten-free blend plus a binder if needed.
- Buttermilk – Keeps the cake tender and adds a slight tang; sub with a non-dairy cultured milk for vegan versions.
- Milk and cornstarch – The base and thickener for pastry cream; cornstarch ensures a stable, scoopable filling.
- Semi-sweet chocolate – Choose good quality baking chocolate for the ganache; it dramatically affects sheen and flavor.
- Heavy cream – The ganache’s partner; for a lighter or vegan alternative, use a thoughtfully formulated plant-based cream.
- Tools – Cupcake pan and liners, mixing bowls, whisk, heavy saucepan, fine-mesh sieve, piping bag with a filling tip, and a small saucepan for warming cream.
The Secret to a Silky, Lump-Free Pastry Cream
Getting an impeccable pastry cream is all technique: steady whisking, tempering, and rapid cooling. Follow these points and you’ll have a filling that pipes cleanly and tastes luxuriously smooth. For additional reading on pastry cream technique, see our guide to perfect pastry cream.
- Whisk continuously while the mixture heats so starch granules disperse evenly and lumps don’t form.
- Temper the egg yolks by slowly adding a bit of hot milk into them while whisking — this raises their temperature gently and prevents curdling.
- Cook over medium-low heat and bring only to a low boil while stirring; the goal is thickening without scrambling the eggs.
- Once thickened, move the pot to an ice bath and continue stirring; the rapid cool stops carryover cooking and keeps the texture smooth.
- Press plastic wrap directly onto the surface of the cream before chilling to prevent a skin from forming.
- Alternative fillings: if you prefer fruit-forward options, consider thickened strawberry curd or lemon curd, or a chocolate pastry cream for variation.
Why Temperature Matters for Ganache Shine and Cake Texture
Temperature controls both look and mouthfeel: warm cream melts chocolate to a glossy emulsion, while the ganache must return to the right viscosity before you dip the cupcakes. Cake temperature also affects how much ganache soaks in — warm cupcakes will absorb more chocolate and can become soggy.
- Heat the cream just until it starts to steam; pour it over finely chopped chocolate so the pieces melt evenly without overcooking.
- Whisk the ganache until smooth, then let it cool until it’s thick but still pourable — this is when it will coat and set with a mirror-like sheen.
- Allow cupcakes to cool completely before filling; if they’re even slightly warm, the filling can loosen and the ganache can slide off.
- If your ganache is too thin, cool it until it thickens; if it is too firm, warm briefly over a bowl of hot water and whisk until smooth.
Scaling Up: How to Make These Cupcakes for a Crowd Without Losing Quality
When you make a large batch, organization and timing keep the quality consistent. Keep equipment and cooling capacity in mind so nothing becomes a bottleneck.
- Double or triple ingredients as needed but mix in batches if your stand mixer or bowl is full; overfilling a mixer changes aeration and can alter texture.
- Bake in multiple pans and rotate shelves halfway through if your oven holds multiple trays — keep the same bake temperature and check for doneness on a few central cupcakes.
- Make pastry cream and ganache in advance; chill the cream and store ganache in a container at a workable temperature so you can rewarm gently if necessary.
- For large events, consider filling half the cupcakes at the venue and dipping on-site if possible to preserve the freshest shine.
How to Make Boston Cream Pie Cupcakes (Step-by-Step)
Below are clear, actionable steps to guide you through the full process. I suggest photographing progress — it helps when you repeat the recipe for larger events. If you want a lighter fruity variant afterward, try our lemon blueberry cupcakes for inspiration.
- Preheat your oven to a moderate baking temperature and line a muffin pan with paper liners.
- Cream room-temperature butter with sugar until pale and airy; add vanilla and mix until combined.
- Add eggs one at a time, beating well after each so the batter emulsifies and holds air.
- Whisk the dry ingredients together in a separate bowl, then alternate adding them with buttermilk to the creamed mixture, starting and ending with the dry ingredients; mix only until combined to keep the crumb tender.
- Fill each liner about three-quarters full and bake until a toothpick comes out clean; allow cupcakes to cool completely on a wire rack before filling.
- Make pastry cream on the stovetop: whisk yolks, temper with warm milk, then cook with sugar and cornstarch until thick; cool quickly in an ice bath and chill with plastic wrap on the surface.
- Prepare ganache by finely chopping chocolate, heating cream until steaming, pouring over the chocolate, and whisking to a smooth emulsion; cool until thickened but still pourable for dipping.
- Transfer the chilled pastry cream to a piping bag with a filling tip and inject each cooled cupcake with filling; set them upright to settle.
- Dip the filled cupcakes into the ganache or spoon ganache over the tops for a refined finish; allow the ganache to set for 30–60 minutes before serving.
Troubleshooting (presented as a bulleted list for clarity):
- I occasionally see a thin film on cooled pastry cream — pressing plastic wrap directly on the surface prevents it.
- If the cream is lumpy, I strain it through a fine-mesh sieve while warm to smooth it out.
- When ganache won’t set, I chill it briefly until it reaches a thicker viscosity before dipping; if it splits, gentle reheating and vigorous whisking bring it back together.
- If cupcakes are sinking in the middle, I check oven temperature with a thermometer — small ovens can run hot or cool and affect rise.
Pro Tip for Boston Cream Pie Cupcakes: Pipe and Chill Before Transport
Pro-Tips, Troubleshooting, and Variations are presented as bulleted lists for easy scanning.
- Pipe the pastry cream into chilled cupcakes and then chill the filled cupcakes for at least 30 minutes before dipping — this stabilizes the filling.
- After dipping, place cupcakes on a flat tray and chill again for the ganache to set before stacking or packing.
- Transport in a rigid cupcake carrier with individual wells; if you don’t have one, use a shallow box with parchment dividers to prevent sliding.
- If traveling in warm weather, keep cupcakes in a cooler or insulated bag with ice packs placed around (not directly touching) the container to maintain shine and structure.
- I recommend labeling boxes with ‘refrigerate upon arrival’ so hosts know to store them properly.
How to Store, Make-Ahead, and Easy Variations (Gluten-Free, Vegan Swaps, Alternate Fillings)
Storage and thoughtful variations make these cupcakes work for any event or guest list. Below are compact, actionable tips you can use to plan ahead.
- Short-term storage – Store filled and frosted cupcakes in an airtight container in the refrigerator; they stay best for 3–4 days.
- Freezing – For longer storage, freeze baked cupcakes (unfilled) wrapped well; they can keep for months and be thawed, filled, and frosted later.
- Make-ahead strategy – Bake and freeze unfrosted cupcakes, make pastry cream and ganache in advance, then assemble on the day of the event for maximum freshness.
Variations (bulleted for easy scanning):
- Gluten-free swap – Use a tested gluten-free flour blend instead of all-purpose and add a binding agent if your blend requires one; for guidance, see our gluten-free variations.
- Vegan swaps – Replace dairy butter with a solid baking fat alternative, use aquafaba or a commercial egg replacer for structure, swap milk for a thickened plant-based milk, and choose a vegan chocolate for ganache.
- Alternate fillings – Strawberry or raspberry curd, lemon curd, chocolate pastry cream, or a coffee-flavored custard work beautifully instead of vanilla pastry cream.
- Decorative finishes – Sprinkle flaky sea salt, toasted nuts, or a thin white chocolate drizzle over the ganache before it sets for an elevated look.
Frequently Asked Questions
What makes a cupcake Boston cream? A fluffy cupcake injected with a silky vanilla custard filling topped with a rich chocolate ganache frosting is what dreams are made of.
Do Boston cream cupcakes need to be refrigerated? Yes, store filled and frosted Boston cream cupcakes in the refrigerator in an airtight container. They will last for 3 to 4 days. For longer storage, freeze the baked cupcakes for up to 8 months.
Can you put filling in cupcakes before baking? Yes, you can add half of the cupcake batter to the mold, then place your filling, and finally top it with the rest of the batter. This method works well for chocolate or cream cheese-based fillings.
How do I make sure my pastry cream is smooth? To ensure silky, lump-free pastry cream, make sure to mix the sugar and cornstarch with the milk gradually and stir constantly while cooking until it thickens.
Can I scale this recipe for a larger crowd? Absolutely! You can double or triple the ingredients; just ensure you have enough pans and adjust baking times as necessary. Remember to mix in batches if needed.
Boston Cream Pie Cupcakes
Ingredients
Method
- In a large mixing bowl cream together the butter and sugar. Add vanilla and beat again. Add eggs, one at a time, beating well after each addition. Mix together flour, baking powder and salt in a separate bowl. Alternate adding flour mixture and buttermilk to the creamed mixture in 3 batches, beginning and ending with the dry ingredients. Beat after each addition, just until combined.1 cup sugar, 2 teaspoons vanilla, 3 pieces eggs, 1.5 cups flour, 2 teaspoons baking powder, 0.5 teaspoons salt, 0.67 cups buttermilk, 3 pieces egg yolks
- Line a lightly greased muffin pan with cupcake liners and fill each liner ¾ of the way full. Bake in a 350°F oven for 18-25 minutes or until a toothpick comes out clean. Allow to cool completely.
- In a medium bowl, beat egg yolks well. Gradually stir in milk until well blended. In a large, heavy saucepan over medium-low heat, mix together sugar, cornstarch, and salt. Gradually add in milk mixture, stirring well to prevent lumps. Continue cooking over medium-low heat, stirring constantly until mixture reaches a low boil (about 20 minutes). Remove from heat and set pot in a large bowl of ice water, stirring. Add vanilla and stir to combine. Refrigerate until ready to use.
- Place chocolate in a food processor and process until finely chopped. Heat cream in a small saucepan until steaming, then add hot cream to the bowl of chocolate and whisk until smooth. Let cool until handleable.
- When the cupcakes are cooled completely, transfer pastry cream filling to a piping bag with filling tip attached. Fill each cupcake with pastry cream.
- Dip each cupcake into the ganache. Allow 30 minutes to an hour for the ganache to set.