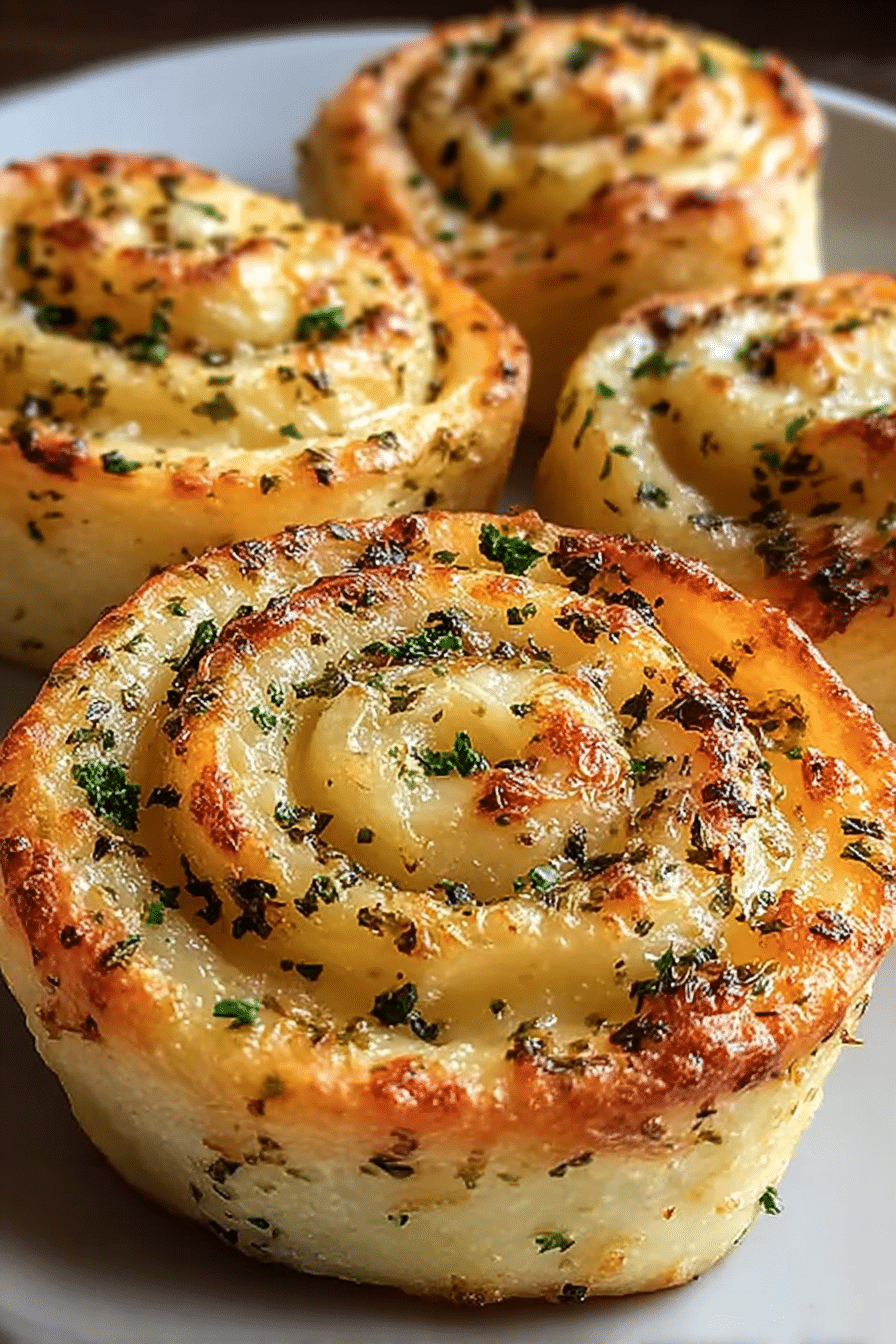
I have a soft spot for appetizers that smell like the whole house is throwing a party before guests even arrive. When I bake these cheesy garlic butter rollups, the first thing that hits you is a warm, buttery garlic aroma that fills my kitchen and has everyone hovering by the oven. They’re the kind of snack I make when I know friends will arrive hungry and chatty.
I love how forgiving this recipe is — it scales up for a crowd and still behaves on a busy night. In my experience, a few small tweaks (like using freshly shredded cheese and warming the butter slightly) make the texture reliably gooey and the tops perfectly golden. These rollups are a lifesaver for last-minute get-togethers: they’re quick, crowd-pleasing, and easy to customize.
If you’re bringing something to a party or just feeding a family full of picky eaters, these rollups hit that comforting, nostalgic note without needing a lot of fuss. Read on and I’ll walk you through what to buy, what to watch for while baking, and a handful of playful variations you can try depending on the crowd.
Everything You Need for Cheesy Garlic Butter Rollups
Below I cover ingredients and tools so you don’t have to hunt around the pantry mid-prep. I note swaps for dietary preferences and what to choose for the best flavor and texture.
- Crescent roll dough – The vehicle for these rollups; use a soft, pliable dough so the rolls seal and brown nicely. For gluten-free guests, swap with gluten-free roll dough or sturdy gluten-free tortillas.
- Mozzarella – Provides the classic stretch and mild milky flavor; pick a low-moisture or freshly shredded block for best melt.
- Parmesan – Adds a salty, nutty finish to the cheese blend; finely grated is ideal for even distribution.
- Unsalted butter – Gives the rollups that rich, buttery crust. If you prefer a deeper flavor, use cultured butter; for vegan options, use plant-based butter that melts well.
- Garlic – Fresh minced garlic brightens the butter; garlic powder can be used in a pinch but fresh is more fragrant.
- Fresh parsley – Adds color and a fresh herbal lift; substitute with basil or chives for a different profile.
- Salt & pepper – Simple seasoning to balance the butter and cheese; adjust to taste.
- Tools – You’ll want a baking sheet, mixing bowl, a pastry brush (or spoon to spoon butter over), and a grater if shredding cheese fresh.
The Secret to Melty, Stretchy Cheese Every Time
Gooey cheese is the star here — these techniques ensure you get that satisfying pull when you bite in.
- Choose semi-soft, high-fat melting cheeses: mozzarella, provolone, fontina, or young gouda deliver excellent stretch and a creamy mouthfeel.
- Avoid pre-grated cheese blends that contain anti-caking agents; freshly shredded cheese from a block melts more evenly and gives a silkier stretch.
- Bring cheeses to room temperature briefly before assembling so they start melting as soon as they hit the oven, but don’t leave them out long enough to become soft and oily.
- Layering matters: a thin base of mozzarella with a light sprinkle of Parmesan on top helps with both stretch and a savory top crust.
Why Temperature and Timing Matter for a Golden Crust
Precise temperature and attentive timing are the two things that separate a soggy rollup from a perfectly golden, slightly crisped shell with bubbling cheese.
- Always preheat your oven fully before sliding the pan in — I set mine to 375°F (190°C) to get a quick, even rise and good browning.
- Bake time affects texture: shorter baking keeps the interior softer and cheesier; a minute or two longer develops a crunchier exterior and deeper color. Aim for about 12–15 minutes, watching for a golden-brown top and bubbling cheese.
- Check doneness visually: look for an even golden hue on the dough and small bubbles of cheese escaping at seams. If the tops brown too quickly, tent with foil for the last few minutes.
Flavor Twists: Herbs, Spices, and Stuffed Add-Ins
These rollups are a friendly platform for extras. Below are ideas with quick pros and cons so you can pick the best twist for your crowd.
- Spinach & ricotta – Pros: adds creaminess and a fresh green element. Cons: adds moisture, so drain spinach well.
- Sun-dried tomatoes & basil – Pros: vibrant color and tangy-sweet punch. Cons: can be chewy; chop finely so it tucks into the roll.
- Pepperoni or chopped prosciutto – Pros: adds savory, meaty flavor that pairs well with mozzarella. Cons: saltier — reduce added salt in the butter.
- Crushed red pepper or smoked paprika – Pros: adds heat or smoky depth without changing structure. Cons: a little goes a long way; taste first.
- Herbed compound butter (thyme, oregano) – Pros: infuses the crust with layered herb notes. Cons: stronger herbs can overshadow delicate cheeses; use sparingly.
How to Make Cheesy Garlic Butter Rollups (Step-by-Step)
Follow these clear, bulleted steps to keep prep streamlined and stress-free. These are practical directions I use in my kitchen when making batches for guests.
- Preheat your oven to 375°F (190°C) and line a baking sheet with parchment or a light coating of oil so the rollups don’t stick.
- Unroll the crescent dough and separate the triangles on a clean surface; if the dough feels cold and stiff, let it sit a few minutes to become pliable.
- Mix melted butter with minced garlic, chopped parsley, salt, and pepper in a small bowl; taste the garlic butter and adjust seasoning — it’s your flavor base.
- Sprinkle shredded mozzarella onto each triangle, then finish with a little grated Parmesan. Keep the cheese distribution even to avoid lumps that burst out during baking.
- Roll each triangle tightly from the wide end toward the point and place seam-side down on the prepared baking sheet to prevent unrolling while baking.
- Brush the tops generously with the garlic butter so they brown and crisp; reserve a little butter to brush immediately after baking for extra gloss and flavor.
- Bake for about 12–15 minutes until the tops are golden and cheese peeks out and bubbles at the seams. If needed, tent with foil to prevent over-browning.
- Let the rollups rest a few minutes out of the oven, brush with the reserved butter, then serve warm so the cheese stays stretchy and molten.
Pro Tips
- I like to shred cheese from a block — it melts more reliably than pre-shredded blends.
- For even baking, space the rollups so air can circulate; overcrowding leads to uneven browning.
- If you want a glossy finish, brush again with melted butter as soon as they come out of the oven.
Troubleshooting
- If the centers are undercooked but the tops are browned, lower the oven temperature slightly and bake a few extra minutes, or move to a lower rack for the remaining time. I’ve done this when my oven runs hot.
- If dough unravels while baking, press the seam down and chill briefly before baking so the dough firms up and seals better.
- If cheese leaks out too much, reduce the amount in each roll and distribute it closer to the center; too much near the edges encourages spillage.
Variations (quick-read bullets)
- Meaty: add thin slices of pepperoni or pre-cooked sausage before rolling.
- Green: squeeze excess water from cooked spinach and mix with a little ricotta before adding.
- Spicy: sprinkle crushed red pepper inside or brush a chili-oil butter on top.
Pro Tip for Cheesy Garlic Butter Rollups: Gluten-free & Vegan Swap Ideas
Here are straightforward swaps so everyone at your party can enjoy them.
- Gluten-free dough – Use a store-bought gluten-free roll dough or a sturdy gluten-free tortilla; be aware some substitutes brown differently, so watch the oven closely.
- Vegan cheese – Choose a melty plant-based mozzarella-style cheese; brands that list coconut oil or cashew as a base tend to melt better.
- Plant-based butter – Use a high-fat vegan butter for browning; some are formulated to behave like dairy butter when baked.
- Texture notes – Vegan versions can be slightly different in stretch and browning; to compensate, use a blend of melty vegan cheese and a sprinkle of nutritional yeast for savory depth.
How to Store, Reheat, and Make-Ahead Rollups
Quick, clear storage and reheating instructions to keep these tasting fresh for leftovers or prepping ahead of time.
- Storing – Cool completely, then store in an airtight container in the refrigerator for up to 3 days.
- Reheating (best texture) – Reheat in a 350°F (175°C) oven on a baking sheet until warmed through and the crust crisps again. Avoid the microwave if you want to preserve the exterior crunch.
- Make-ahead – Assemble rollups, place them on a baking sheet, cover tightly, and refrigerate for a few hours before baking. For longer storage, freeze unbaked rollups on a sheet tray, then transfer to a bag; bake from frozen, adding a few extra minutes to the bake time.
Serve With These Dips and Pairings for Game Night
Here are my go-to sauces, drinks, and sides that make a game-night spread sing.
- Marinara – Classic pairing; bright acidity cuts through the richness.
- Ranch or herbed yogurt dip – Creamy and cooling, great if you added spicy elements to the rollups.
- Garlic aioli – For garlic lovers who want an extra hit of umami and richness.
- Beverages – Beer, a light-bodied red, or sparkling water with citrus work well to refresh the palate between bites.
- Sides – A crisp green salad or a platter of pickled vegetables balances the richness and keeps the spread lively.
Frequently Asked Questions
Can I make cheesy garlic butter rollups ahead of time?
Yes, you can prepare the rollups ahead and store them in the fridge. Just bake them right before serving for the best results!
What cheese can I use for these rollups?
While mozzarella and Parmesan are suggested, feel free to mix it up with cheeses like cheddar or gouda for a different flavor!
Can I use gluten-free dough for this recipe?
Absolutely! You can substitute the crescent roll dough with gluten-free tortilla or dough to make it suitable for gluten-sensitive guests.
How do I store leftover rollups?
Store any leftovers in an airtight container in the fridge for up to 3 days. You can reheat them in the oven for the best texture!
What dips pair well with cheesy garlic butter rollups?
These rollups are delicious with marinara sauce, ranch dressing, or garlic aioli. Feel free to get creative with your favorite dips!
Cheesy Garlic Butter Rollups
Ingredients
Method
- Preheat the oven to 375°F (190°C).
- Unroll the crescent roll dough and separate the triangles.
- Mix melted butter, garlic, parsley, salt, and pepper in a bowl.
- Sprinkle mozzarella and Parmesan cheese on each triangle.
- Roll each triangle tightly starting from the wide end and place seam-side down on a baking sheet.
- Brush the garlic butter mixture over the top of each rollup.
- Bake for 12-15 minutes until golden brown and bubbly.
- Let cool slightly, then serve warm.