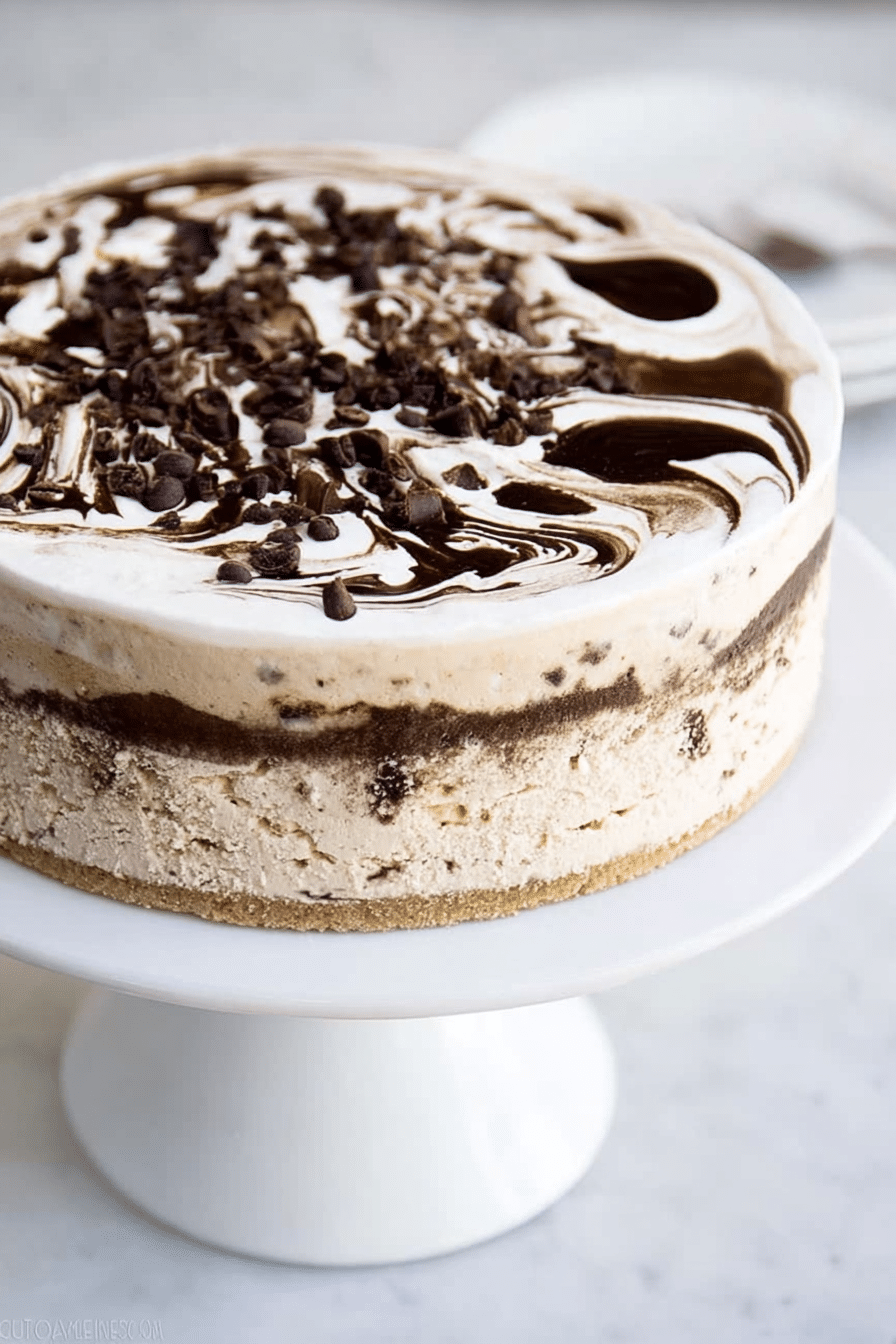
Coffee ice cream cake is that comforting, slightly grown-up dessert you reach for when summer wants something cool but you still crave the deep, roasted flavors of coffee. Imagine a dense, bittersweet brownie base, a thick, silky layer of coffee ice cream, and a ripple of vanilla ice cream with fudge ribbons—firm enough to slice yet soft and melting at the edges when it sits on the plate. I first made this because I wanted something that felt celebratory but didn’t involve twenty piping tips or a week of prep. It’s a perfect end-of-dinner treat for warm nights and a reliable crowd-pleaser at summer barbecues.
I’ve made this particular arrangement dozens of times over the years. The first time I plated it, the coffee layer was a little icy because I’d frozen homemade ice cream too quickly; since then I learned to work with the soft‑serve stage (or beat shop‑bought tubs) so the layers set smooth and creamy. You’ll notice while you spread the coffee layer it wants to slump into the brownie’s edges—use a thin offset spatula and press gently to keep it even. The smell of warm chocolate from the brownie and the heady coffee aroma when you slice into the cake is one of those small kitchen pleasures that makes the extra hour in the freezer worth it.
Ingredients You Need for the Perfect Cake
- Dark chocolate – for a rich, fudgy brownie base; use good quality chocolate for depth.
- Sugars (granulated + dark brown) – granulated for sweetness and brown sugar for a touch of molasses and chew.
- Butter – melts into the chocolate to create that glossy, fudgy texture.
- Eggs – give structure to the brownie and help it set without becoming cakey.
- All-purpose flour – just enough to bind the brownie; overmixing makes it tough, so fold gently.
- Salt – a pinch elevates the chocolate and balances sweetness.
- Coffee ice cream – homemade, no‑churn, or store-bought; this is the star—adjust strength to taste.
- Vanilla ice cream – for contrast and creaminess; swirl with fudge for texture and flavor balance.
- Chocolate fudge – dolloped and swirled into the vanilla layer for ribbons of bittersweet sauce.
- Optional extras – espresso powder for intensifying coffee notes, chopped toasted hazelnuts or pecans for crunch, and a splash of coffee liqueur if you want boozy warmth.
Quality of ingredients matters. Freshly brewed espresso or a robust brewed coffee makes a real difference in the coffee ice cream layer; weak coffee will give you a faint flavor that disappears once frozen. If you need a gluten-free option, swap the brownie base for a dense almond-meal brownie or a pressed cookie crust—just be mindful that texture changes. For a lighter version, pick a lower-fat ice cream, but know that fat helps the ice cream stay creamy when frozen.
Step-by-Step Instructions for Baking
Below is the tested method I use when I want reliable, clean layers that stay put when sliced. I’ll also include little signals I watch for in my kitchen—those are the cues that tell you everything’s going to work.
- Preheat and prepare the pan. Preheat your oven to 375 °F. Line an 8-inch round cake pan with parchment and lightly grease it. I like a little extra parchment hanging over the sides so the brownie lifts out cleanly—this saves you finessing it later when it’s frozen.
- Melt chocolate, sugars, and butter. Set up a double boiler (bain-marie) and gently melt most of the chopped dark chocolate with the granulated and dark brown sugars and sliced butter. Stir slowly until everything is glossy. In my kitchen the steam from the boiler makes the chocolate smell deeply aromatic—if you see any graininess, keep heating and stirring; the mixture should be smooth and hot but not scalding. Remove from heat and let it cool so the eggs won’t curdle when added.
- Temper in the eggs. Add the eggs one at a time, whisking each in fully before adding the next. This builds a silky emulsion and gives the brownie that tender, almost custardy center. If the mixture feels too warm to the touch, wait a few minutes—adding eggs to a very hot chocolate can cook them and make the texture grainy.
- Add dry ingredients and remaining chocolate. Whisk the flour and salt in a small bowl, then fold them into the chocolate mixture along with the remaining chopped chocolate. Fold just until the streaks disappear—overmix and you’ll lose that dense fudginess.
- Bake the brownie base. Pour into the prepared pan. Bake 20–25 minutes: the center should no longer jiggle and a toothpick should come out clean. In my oven that’s right around 22 minutes; ovens vary, so start checking at 18 minutes. Let the brownie cool in the pan 5 minutes, then run a small offset spatula around the edge and unmold onto a wire rack to cool to room temperature. The brownie will still be tender—don’t panic; it firms up in the freezer.
- Prepare the cake ring and assembly base. Place a cake ring mold on a parchment-lined baking sheet and line it with an acetate strip if you have one—this makes unmolding pristine edges much easier. Put the cooled brownie onto the cake board or parchment and set it inside the ring.
- Layer the coffee ice cream. If you’re using homemade coffee ice cream: work while it’s soft but not melted—spread it evenly over the brownie with a chilled offset spatula. If using store-bought: put the ice cream in a stand mixer with the paddle and beat until spreadable but still cold. Spread the softened ice cream into a uniform layer. Cover with plastic and freeze for 2–3 hours until solid. (Pro tip: if your coffee ice cream looks icy, it likely spent too long in a warm spot; beat it to break up crystals and refreeze.)
- Layer the vanilla and swirl fudge. Remove the cake from the freezer briefly to add the vanilla layer. Again, use softened-but-cold vanilla ice cream and spread it evenly. Dollop chocolate fudge on top and use a knife to swirl it gently through the vanilla so you get ribbons without blending the layers. Cover and return to the freezer for at least 3 hours; overnight is best so the layers set completely.
- Unmold and slice. When you’re ready to serve, take the cake out of the freezer and carefully remove the ring mold and peel away the acetate. If the cake has softened a bit, return it to the freezer for 10–15 minutes. To slice, warm a sharp knife under hot water, dry it, then make clean, steady strokes—wiping the blade between cuts keeps edges neat. Let slices sit 5–10 minutes at room temperature to soften slightly for the best mouthfeel.
Tips for Making No-Churn Coffee Ice Cream
No ice cream maker? No problem. I’ve made the coffee layer using a simple no‑churn method more times than I can count—it’s my go-to when I don’t want extra equipment to clean.
- Gather your base ingredients. Heavy cream and sweetened condensed milk are the two pillars. The condensed milk brings sugar and body; the whipped cream provides the aeration that mimics churned ice cream.
- Flavor with strong coffee. Mix brewed strong coffee or espresso (cooled) with a little instant espresso powder if you want an extra punch. Taste the coffee mixture before folding it in; it should be noticeably coffee-forward because freezing will mute the flavor.
- Whip and fold. Whip the heavy cream to stiff peaks. In a separate bowl, stir the sweetened condensed milk with your cooled coffee until fully combined. Gently fold the coffee-condensed milk mixture into the whipped cream—work quickly but gently so you don’t deflate the cream. If you like, add a pinch of salt and a splash of vanilla to round the flavors.
- Freeze and check texture. Spread into a shallow pan or into your cake ring over the brownie layer and freeze until firm. For creamier texture, let it soften just slightly and fold once during the first hour of freezing to break up large ice crystals. If it tastes flat after freezing, a small spoon of instant espresso dissolved in a teaspoon of hot water stirred into the base brightens it without adding more liquid.
What can go wrong and how to fix it: if your no‑churn ice cream becomes icy, that usually means the mixture was too cold when folded or your cream wasn’t whipped fully. Defrost slightly and remix to redistribute the fat, then refreeze. If it’s too sweet, balance with a pinch of fine sea salt or more bitter coffee. If it’s too weak in coffee flavor, dissolve a little instant espresso into a tablespoon of hot water and whisk it in—don’t add straight espresso as the extra water can change texture.
Creative Flavor Combinations and Variations
I love tweaking this cake depending on season and mood. Here are tested variations that work well with the structure of a brownie base and two ice cream layers.
- Mocha Hazelnut – stir a spoonful of hazelnut paste into the coffee ice cream and sprinkle chopped toasted hazelnuts between layers for crunch.
- Vanilla Caramel Swirl – fold ribbons of salted caramel into the vanilla layer and lightly salt the top of the brownie before assembly.
- Coffee + Almond – add almond extract sparingly to the vanilla layer and top with toasted sliced almonds for texture.
- Mediterranean Twist – use a cookie crumb base with crushed biscotti and add a sprinkle of flaky sea salt to the fudge swirls.
- Peanut-butter ribbon – ripple warmed peanut butter through the vanilla for a sweet-savory contrast.
If you want a non-coffee twist, try matcha flavors—see our matcha latte inspiration for ideas on incorporating green tea into a creamy layer.
Consider a peanut-butter swirl or topping for contrast — our peanut butter milkshake recipe is a great source of flavor pairing ideas.
For inspiration on layered presentation and fruity cream fillings, check out our strawberries and cream layering technique.
Presentation Ideas for Serving Coffee Ice Cream Cake
Good presentation doesn’t need fuss—clean slices and a few thoughtful touches go a long way. I usually do a few simple things that make guests think I spent longer than I did:
- Garnish with chocolate shavings and whole coffee beans – they add contrast and a little crunching sound when you bite in.
- Serve with a hot espresso shot – the contrast of hot espresso poured over the slice melts the fudge ribbons into a glossy stream.
- Plate with sauce drizzles – a thin streak of chocolate or salted caramel on the plate lifts the slice visually and provides an extra hit of flavor.
- Use edible flowers or mint leaves – they brighten the look for spring or summer parties.
For a light summer pairing, serve slices with a refreshing frozen peach rose slushy to balance the rich coffee flavor.
If you’re serving a crowd, slice the cake while it’s very cold and let the pieces sit a few minutes before serving—this ensures neat wedges without a melted puddle.
Frequently Asked Questions
Below are common questions I get when friends try this at home. I include the answers I give them after actually making the cake several times.
- Can I use store-bought ice cream for this cake?
Yes. Beat store-bought ice cream in a mixer until softened and spreadable but still cold, then layer and refreeze. If the tub is very hard, let it sit a few minutes at room temp before beating. - How long does the ice cream cake need to freeze?
Freeze each ice cream layer for 2–3 hours until solid, then once fully assembled freeze another 3 hours (overnight is best) to ensure the layers are completely set. - How do I slice neat pieces without melting the cake?
Use a very sharp knife warmed under hot water, dry it, and make firm long strokes. Wipe the blade between cuts. Let slices sit 5–10 minutes at room temperature to soften slightly before serving. - Can I make this ahead and how should I store leftovers?
Yes — you can make it ahead. For best quality eat within 1–2 weeks; it can keep up to a month if tightly wrapped and stored in the coldest part of the freezer. Wrap the cake well (plastic wrap + airtight container) to prevent freezer burn. - I don’t have an ice cream maker — how can I make a no-churn coffee ice cream for this cake?
Make no-churn coffee ice cream by whipping heavy cream to stiff peaks and folding in sweetened condensed milk mixed with strong brewed coffee or espresso. Adjust coffee strength to taste, then spread and freeze as directed.
Conclusion and Final Thoughts
Making this coffee ice cream cake in my kitchen always feels like a little ceremony. There’s the satisfying melt of chocolate into butter, the quick pulse of the mixer smoothing shop-bought ice cream into spreadable silk, and the quiet waiting while the freezer does its work. Expect a slightly firm brownie base that softens as it meets the creamy coffee and vanilla layers. Expect strong coffee flavor up front with a sweet, chocolatey finish.
This is a recipe I return to when I want dessert to feel special but not fussy. Try the no‑churn method if you don’t have an ice cream maker, experiment with a hazelnut or caramel riff, and make sure you plan enough freezing time—rushing is the only reliable way to end up with icy or slumping layers. If you make this, I’d love to hear what tweaks you tried: did you add nuts? A liqueur? Swap the base for a cookie crust? Share your adjustments and photos—it’s how a recipe becomes your own.
Happy baking and freezing, and enjoy that first fragrant bite where chocolate meets coffee and ice creams softly melt together on your tongue.
Coffee Ice Cream Cake
Ingredients
Method
- Preheat oven to 375 °F. Line 8-inch round cake pan with parchment paper. Lightly grease cake pan and set aside.
- Over a double boiler, gently melt together 8 oz of the chopped chocolate with sugars and butter. Once mixture is smooth and melted, remove from double boiler and allow to cool slightly.
- Add eggs, one at a time, to cooled chocolate mixture. Whisk until each egg is incorporated. In a small bowl, whisk together flour and salt. Add flour mixture and remaining 2 oz of chopped chocolate to batter. Fold to combine until there are no longer any dry streaks of flour.
- Pour into prepared cake pan. Bake for 20-25 minutes until center of brownies no longer jiggle and a toothpick inserted in center of brownie comes out clean. Allow to cool in pan for about 5 minutes. Run a mini offset spatula around the edges of brownie to unmold. Unmold brownie and place on a wire rack to cool to room temperature.
- Place cake ring mold on top of a parchment lined baking sheet. Line cake ring mold with acetate. Place cooled brownie on top of the cake board and place inside the ring mold.
- If using homemade coffee ice cream: Use freshly spun ice cream while it is still a little soft. Spread on top of brownie layer. Cover with plastic wrap and keep in freezer for 2-3 hours, or until the ice cream layer is solid. If using store bought ice cream: Place ice cream in the bowl of a stand mixer fitted with a paddle attachment. Beat ice cream until softened and spreadable, but still cold. Spread ice cream on top of brownie layer. Cover with plastic wrap and keep in freezer for 2-3 hours, or until the ice cream layer is solid.
- Remove ice cream cake from freezer and add vanilla ice cream layer using homemade/store bought directions above.
- Spread vanilla ice cream into an even layer. Dollop chocolate fudge over vanilla. Use a knife to swirl chocolate into ice cream. Cover with plastic wrap and return to freezer for another 3 hours, or until ice cream layer is solid. At this point, overnight is best to ensure ice cream cake layers are set.
- Remove ice cream from freezer. Gently remove metal cake ring mold. Gently peel off acetate strip. If ice cream cake starts to melt, cover with plastic wrap and return to freezer.
- Use a sharp knife to cut into cake. Brownie layer will be a bit stiff during slicing. It will soften as you eat the ice cream cake. Enjoy immediately! Keep leftovers well wrapped and covered in the freezer.