I make this grilled cheese paneer & corn sandwich more often than I expected when I first tried it—it’s my go-to when time is short but I still want something comforting and protein-rich. Over the years I learned small tricks (how to keep the paneer plush, when to butter the bread, and how long to press the sandwich) that turn a rushed meal into something satisfying.
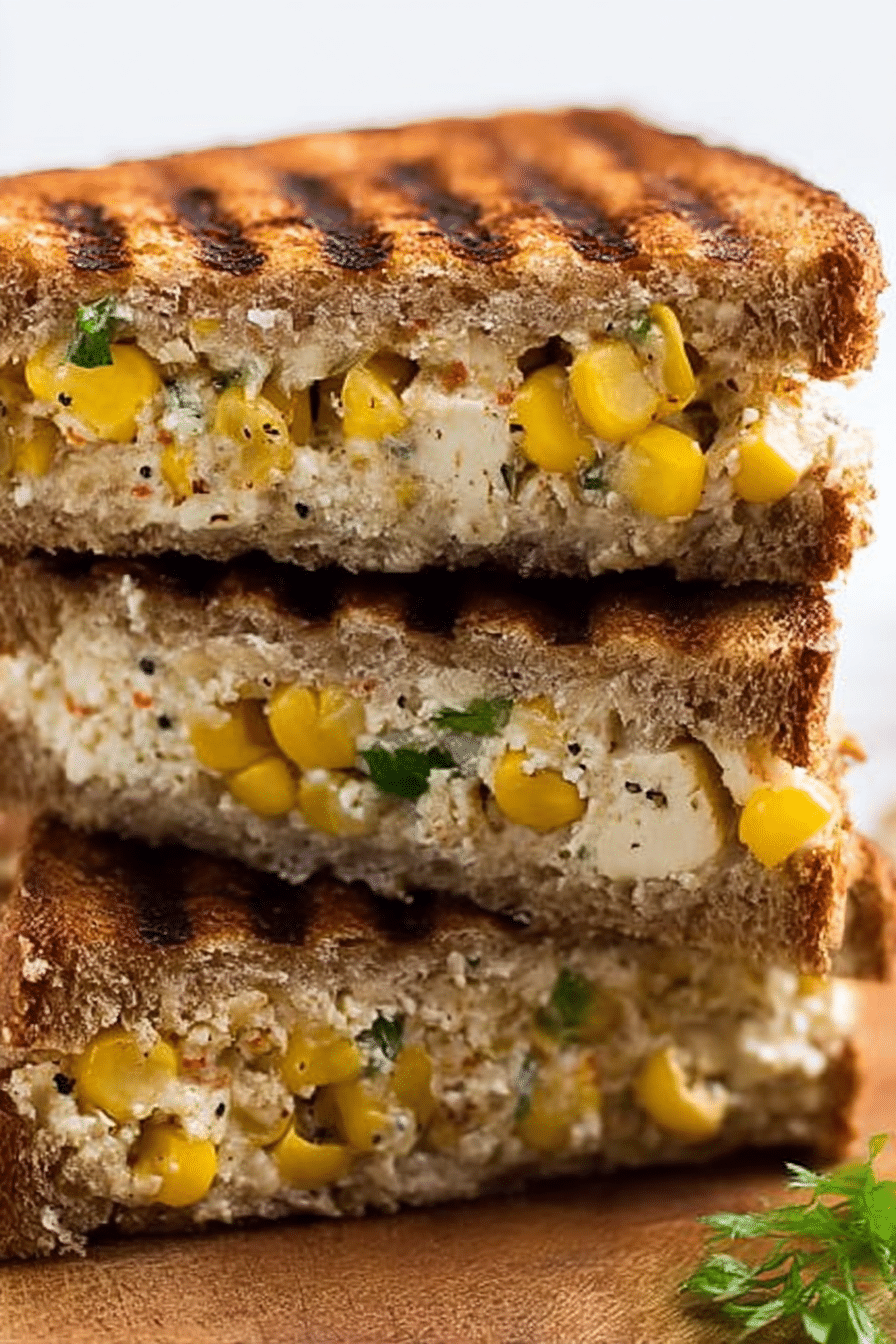
The beauty of this sandwich is that it hits a crowd-pleasing balance: golden, crunchy exterior, soft paneer-and-corn filling, and melty cheese for glue and richness. I often throw it together when I need something quick after work, and the whole kitchen fills with a simple, warm aroma—onion, garlic, and the faint herbiness of dried fenugreek.
If you’re juggling family dinners, study breaks, or a late work night, this sandwich is easy to adapt to what you already have in your fridge. I’ll walk you through the small, practical steps I use so you get consistent results even when you’re short on time.
Why this Grilled Cheese Paneer & Corn Sandwich is Weeknight-Friendly
This sandwich is designed to be efficient without feeling like a compromise. It needs minimal chopping, cooks quickly, and uses pantry-friendly ingredients that store well. The method keeps the filling rich and non-soggy so you can assemble and grill without fuss.
- Quick prep: most of the work is grating and a brief sauté—the whole process fits into a tight evening schedule.
- Flexible ingredients: swap in what you have—frozen corn, leftover paneer, or even canned sweet corn—and the sandwich still sings.
- Family-friendly: mild spices and melting cheese make this an easy win for kids and adults alike; serve with ketchup or a green chutney for contrast.
Sensory note: picture a warm, sunlit plate—crisp, amber-brown bread, a soft, pale filling studded with sweet corn, and thin ribbons of melted cheese stretching with each bite.
Everything You Need for Grilled Cheese Paneer & Corn Sandwich
Below is a conversational ingredient and equipment guide so you can gather everything quickly. I’ve included straightforward substitutions for gluten-free and vegan options so it works for a variety of diets.
- Paneer – The filling’s protein and texture; if you want a softer result, grate or crumble it. For a vegan substitute use firm tofu pressed and crumbled.
- Sweet corn – Adds pop and natural sweetness; frozen or canned both save time and work well.
- Onion & garlic – Provide savory depth; finely chop so they blend into the filling without adding large raw pieces.
- Kasuri methi (dried fenugreek) – Adds a subtle, savory-herb note that makes the filling taste more rounded; optional but distinctive.
- Butter or butter substitute – For a golden crust; use vegan butter for a dairy-free version or a light oil if needed.
- Cheese slices – Meltability is key; see the cheese section for best choices. Use a vegan melting slice if avoiding dairy.
- Bread – Choose a sturdy slice that crisps without collapsing (see next section). For gluten-free, pick a dense gluten-free loaf.
- Salt, pepper, and red chili (or chili flakes) – Simple seasoning to make the filling pop.
- Equipment – A nonstick or cast-iron grill pan, spatula, grater, and a bowl for mixing the filling are all you need for fast assembly.
If you like sandwich variety, keep a few extra ideas handy; for example, try a grilled chicken pesto sandwich for a different flavor profile.
If you’re looking for similar comfort, try our grilled chicken pesto sandwich for a flavorful twist.
The Secret to a Crispy Grill in Minutes
The difference between a soggy sandwich and a beautifully crisp one comes down to three small tricks: butter temperature, pan heat control, and steady pressure while grilling.
- Warm the butter slightly before spreading so it coats the bread evenly—cold butter tears the bread and leaves gaps where steam can collect.
- Keep the pan at medium heat. Too hot and the exterior burns before the cheese melts; too cool and the bread absorbs moisture. Aim for a steady sizzle, not a roar.
- Press the sandwich gently with a spatula as it grills. Pressing helps create even contact for grill marks and compacts the layers so cheese melts uniformly.
- Flip only once. Frequent flipping slows browning and can make the sandwich greasy because the filling has more time to release moisture.
Sensory cue: listen for a consistent, even sizzle and watch for a deep golden-brown edge before flipping—then you’ll get that satisfying crunchy tear when you cut the sandwich.
Best Bread & Cheese Choices for Fast Assembly
Your bread and cheese choices determine how quickly the sandwich comes together and how reliably it melts and stays intact on the grill.
- Sourdough or country loaf – Thick, sturdy slices that crisp beautifully without going limp.
- Whole wheat or multigrain – Adds nuttiness and structure; look for slices that are not too thin.
- White sandwich bread – Works fine for speed and yields a classic soft‑center/crispy-edge contrast if you like a faster, lighter build.
- Cheeses that melt well – American-style slices, cheddar, or a mild mozzarella are reliable. Combine a melting cheese with a flavorful slice if you want more complexity.
- Layering for speed – Put a thin cheese layer directly on the buttered bread, add the paneer-corn mixture, then another cheese slice on top before closing—this traps heat and encourages faster melting.
For a different grilled sandwich idea, try this grilled chicken pesto option for variety and quick assembly.
<p>If you’re looking for similar comfort, try our <a href=’https://vnicefood.com/grilled-chicken-pesto-sandwich/’>grilled chicken pesto sandwich</a> for a flavorful twist.</p>
How to Keep the Paneer Filling Soft, Not Soggy
Keeping the paneer filling airy and moist without sogginess is simple if you control moisture at two stages: while cooking the filling and during assembly.
- Cook the aromatics (onion and garlic) briefly until fragrant—this removes rawness without adding liquid.
- Use grated or crumbled paneer so it warms through quickly; avoid overcooking, which can dry it out.
- If using frozen corn, cook and drain it well before mixing so excess water isn’t trapped in the filling.
- Kasuri methi adds a dry, savory lift that keeps the filling tasting layered without making it wet—rehydrate it lightly with your hands to release aroma, but don’t soak it.
- A small amount of butter or a binding cheese helps the filling hold together without becoming runny; avoid adding cream or watery sauces.
Visualize a light, fluffy filling dotted with glossy corn kernels that contrast with the toasted bread—soft inside, crisp outside.
If you want another recipe that highlights soft textures in a different preparation, this creamy cilantro lime chicken salad is a good reference.
<p>For another delicious meal idea, try our <a href=’https://vnicefood.com/sesame-chicken-salad/’>creamy cilantro lime chicken salad</a>, which also highlights soft textures.</p>
How to Make Grilled Cheese Paneer & Corn Sandwich (Step-by-Step)
Follow these clear steps so you get a consistent sandwich every time. Read the troubleshooting tips below if something goes off track.
- Heat a small amount of oil in a pan over medium heat. Add finely chopped onion and garlic and cook just until the raw smell dissipates.
- Add grated or crumbled paneer and pre-cooked corn to the pan. Season with kasuri methi, red chili, salt, and pepper; mix until combined and warm through. Remove from heat promptly.
- Mix chopped coriander into softened butter (or brush plain butter on the bread). Spread the butter on the outside faces of two bread slices; buttering both outside faces gives a superior crisp.
- Assemble: place the paneer-corn mixture on the unbuttered side of the bread, pile it slightly high, top with a cheese slice, and close with the other bread slice (buttered side out).
- Heat your grill pan over medium. Add a small knob of butter and place the sandwich in the pan. Press gently with a spatula and grill until golden brown, then flip and repeat until the cheese has melted and both sides are evenly browned.
- Transfer to a board, let the sandwich rest for a minute to set, then cut and serve with ketchup or chutney.
Troubleshooting (I use these quick fixes):
- If the bread browns too fast and the cheese isn’t melted, lower the heat and cover the pan briefly to trap heat and finish melting.
- If the filling is watery, drain the corn well and cook the mixture longer next time to evaporate excess moisture before assembling.
- If the sandwich feels greasy, reduce the butter you brush on the bread or pat the filling dry with a paper towel before assembling.
- If the paneer tastes bland, increase the kasuri methi slightly or add a small squeeze of lemon to brighten it before grilling.
Pro Tip for Grilled Cheese Paneer & Corn Sandwich: Make-Ahead Filling & Batch Prep
I keep these pro tips concise and in bullet form so they’re easy to scan—use them to shave minutes off weeknight meals.
- Make the paneer-corn filling ahead and refrigerate for up to 3 days; reheat briefly in a pan before assembling so it’s warm and not releasing cold moisture.
- Freeze portions of the filling in flat zip-top bags for up to 2 months; thaw in the fridge overnight then warm gently before using.
- Assemble multiple sandwiches without grilling, wrap them tightly, and refrigerate for a quick reheat on a grill pan when you need dinner.
- Use leftover filling as a filling for wraps, as a topping for baked potatoes, or folded into scrambled eggs for a fast breakfast.
Note: I keep these Pro-Tips, Troubleshooting notes, and Variations as bullets so they’re easy to scan.
How to Store, Reheat, and Vary Your Grilled Cheese Paneer & Corn Sandwich
Store and reheat properly so leftovers stay enjoyable—then try a few simple variations to keep the sandwich interesting throughout the week.
- Short-term storage: Refrigerate cooled, wrapped sandwiches for up to 2 days. Reheat on a skillet over medium-low to regain crispiness instead of using a microwave.
- Reheating tips: Use a low-medium skillet and a splash of water covered with a lid for 30–60 seconds if the cheese needs to melt, then crisp both sides again. Alternatively, reheat in an oven or toaster oven at moderate heat for a few minutes.
- Freezing assembled sandwiches: Freeze un-grilled sandwiches between parchment and reheat in a toaster oven from frozen—add a minute or two on low heat to ensure the filling warms through without burning the crust.
- Variations (easy swaps):
- Add a smear of green chutney or harissa for a spicy layer.
- Mix in shredded carrot or bell pepper for extra crunch and color.
- Swap paneer for crumbled, well-pressed tofu for a vegan version; use vegan cheese and butter.
To complement your sandwich, you can serve warm, cheesy breadsticks on the side for extra indulgence.
<p>To complement your sandwich, consider these <a href=’https://vnicefood.com/homemade-cheese-breadsticks-irresistible-cheesy-treats/’>homemade cheese breadsticks</a> for extra cheesy goodness.</p>
Frequently Asked Questions
Can I use paneer for grilled cheese?
Absolutely! Paneer makes a fantastic filling for grilled cheese sandwiches, providing a delicious and protein-packed twist on the classic recipe.
What are the ingredients in the Grilled Cheese Paneer & Corn Sandwich?
The sandwich features paneer (grated or crumbled), sweet corn, onion, garlic, kasuri methi, red chili, butter, fresh coriander, bread slices, and cheese slices.
How can I keep the paneer filling soft and not soggy?
Cook the paneer mixture just until heated through, drain any excess liquid from the corn, and avoid adding wet sauces. These steps keep the filling fluffy and prevent sogginess.
Can I make the paneer filling ahead of time?
Yes. Prepare the paneer filling in advance and store it in the fridge. Reheat briefly and assemble the sandwich when ready to eat.
What type of bread works best for this sandwich?
Sourdough, whole wheat, or a sturdy white sandwich bread are all good choices—look for slices that will toast to a crisp exterior without collapsing.
Grilled Cheese Paneer & Corn Sandwich
Ingredients
Equipment
Method
- Heat oil in a pan and sauté onion and garlic until fragrant.½ cup sweet corn, 1 small onion (finely chopped)
- Add paneer, corn, kasuri methi, red chili powder, and mix well; cook for 2 minutes and set aside.1 clove garlic (finely chopped), 1 teaspoon kasuri methi (crushed), ⅛ teaspoon red chili powder, ¾ tablespoon oil
- Mix butter with coriander leaves and spread on the bread slices.2-3 tablespoons butter, 1 tablespoon coriander leaves (chopped)
- Layer the paneer-corn mixture and cheese slices on the buttered bread; close the sandwich.4 slices bread, 2 slices cheese
- Grill the sandwich until golden brown and crispy, then cut and serve.