I make these turtles whenever I want a small, impressive treat that comes together without fuss. Over the years I’ve tweaked the little details — how long to toast the pecans, which caramel holds its shape, and how to melt chocolate so it stays glossy — and the result is a candy that looks special but is surprisingly simple to make.
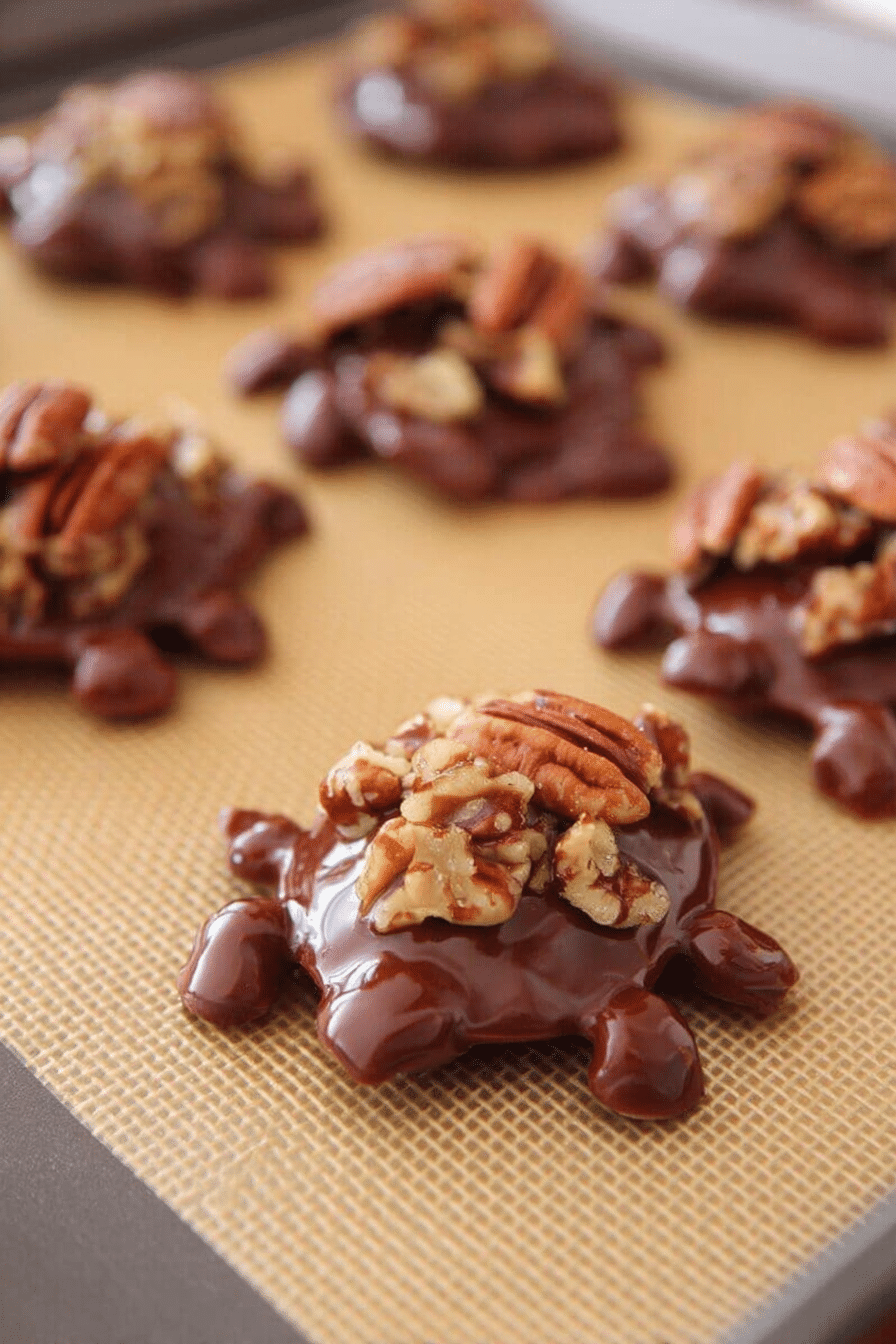
I like that you can taste each component: the toasty pecans, the chewy ribbon of caramel, and the snap of chocolate. I’ll walk you through the tiny tricks that make each bite balanced — not too sweet, with real nutty character.
If you’re making these as gifts, I’ll share quick packaging ideas and storage advice so your turtles look and taste perfect when you give them away.
Everything You Need for Homemade Turtles Candy
Use good-quality basics and a few simple tools and you’ll be surprised how polished the final candy looks. Thick, pourable caramel is essential so the caramel clings to the pecans instead of running off; choose chocolate that melts smoothly and sets with a nice shine. A rimmed baking sheet, parchment, and a small heatproof bowl for melting chocolate are all you need.
- Pecans – The star for crunch and nutty flavor; toasting improves aroma and bite.
- Thick caramel topping – Use a thicker sauce so it holds the clusters; can be swapped for melted soft caramels if needed.
- Milk or dark chocolate – Provides the glossy finish and balances the caramel; choose chocolate you enjoy eating.
- Shortening (optional) – A tiny bit will loosen the chocolate for easier drizzling and help it set with a smooth sheen.
- Tools – Baking sheet, parchment paper, spoon for dropping clusters, and a microwave-safe bowl or double boiler for melting chocolate.
For those who want to explore more delicious flavors, check out our homemade chocolate turtles recipe.
How to Make Homemade Turtles Candy (Step-by-Step)
Follow these simple steps and you’ll have tidy clusters that set cleanly. I use short, focused steps so you can move confidently through the process.
- Toast the pecans on a rimmed baking sheet in a preheated oven until they’re fragrant and lightly golden; cool completely so the caramel will cling instead of sliding off.
- Optional: Roughly chop the toasted pecans so the clusters are more compact and easier to eat.
- Toss the cooled pecans with the thick caramel until each piece is coated and sticky; this helps the nut clusters hold together.
- Drop heaping spoonfuls of the caramel-coated pecans onto parchment-lined baking sheets, spacing them so they don’t touch.
- Chill the clusters in the refrigerator until the caramel firms — this makes them easier to coat in chocolate without flattening.
- Melt the chocolate (and optional shortening) gently in short microwave bursts, stirring between intervals so the chocolate is smooth and not overheated.
- Drizzle or spoon melted chocolate over each chilled cluster, covering the top and letting a little drizzle fall over the sides for a classic look; let set at room temperature or chill briefly to firm the chocolate.
- Store in an airtight container in the refrigerator or pack into gift boxes once set.
The Secret to the Perfect Caramel Layer
The caramel is the glue of the turtle — get its consistency right and everything else follows. I keep the caramel on the thicker side so it clings to the nuts without sliding off. These quick tips will save you time and improve texture.
- Use a thick, pourable caramel or melt soft caramels with a splash of cream for a controlled consistency.
- If your caramel is too thin, chill the coated clusters briefly so the caramel firms before you add chocolate.
- If the caramel is too stiff, gently warm it until spoonable; don’t overheat or it will become too runny.
- When mixing, coat the nuts evenly but avoid drowning them — you want distinct nut bits for crunch, not a smooth caramel blob.
Why Toasting Pecans Makes a Big Difference
Toasting activates browning and oils that deepen the flavor; I always toast for a few minutes to bring out a warm, slightly sweet nuttiness. Watch them closely — they can go from perfect to too dark quickly.
- Spread pecans in a single layer so they toast evenly and develop a golden color.
- Stir or shake the pan once during toasting to prevent hot spots and burning.
- Remove when they’re fragrant and lightly browned; carryover heat will darken them slightly as they cool.
- Let them cool completely before coating so the caramel adheres properly and the nuts don’t steam under the caramel layer.
Pro-Tip for Homemade Turtles Candy
- I use a small cookie scoop or heaping spoonfuls to make uniform clusters for a neat finished look.
- If your chocolate thickens too fast, warm it gently over low heat or short microwave bursts to restore fluidity.
- Work in small batches so chilled clusters don’t sit too long and start to sweat when brought back to room temperature.
- For faster cleanup, line your baking sheet with parchment and peel it away once the clusters are fully set.
- For more candy-making tips, you might find our old-fashioned divinity candy post helpful.
Troubleshooting
I run into common hiccups and here’s how I handle them; these are things I learned by making batch after batch.
- If the caramel slips off the nuts: chill the clusters longer before coating so the caramel firms up.
- If the chocolate is dull or streaky: make sure the chocolate isn’t overheated; add a tiny bit of shortening or reheat gently to smooth it.
- If pecans taste flat: they likely weren’t toasted long enough — a few extra minutes will deepen the flavor.
- If the candies sweat after refrigeration: let them come to room temperature in the fridge, then move to a cool, dry spot to avoid condensation.
Storage Tips: How to Keep Your Turtle Candies Fresh
Store turtles in an airtight container in the refrigerator to keep the chocolate firm and the caramel stable. If you need longer storage, freeze them in a single layer on a tray, then transfer to a sealed container. Thaw in the fridge to avoid moisture forming on the chocolate.
- Best stored refrigerated for up to one week in a tightly sealed container.
- To freeze, layer with parchment between rows to prevent sticking and use an airtight container to avoid freezer odors.
- Avoid storing near strong-smelling foods; chocolate readily absorbs odors.
Variations to Try: Experimenting with Nuts and Chocolate
These turtles are very adaptable — swap nuts and chocolate to match preferences or dietary needs. Here are a few ideas to get creative.
- Use toasted almonds, hazelnuts, or cashews for a different crunch and flavor profile.
- Trade milk chocolate for dark chocolate to reduce overall sweetness and add depth.
- Try white chocolate with a pinch of sea salt atop each turtle for contrast.
- For a nut-free version, use toasted sunflower seeds or roasted coconut chips as the base.
- If you’re interested in experimenting with different nuts, try our Oklahoma nut candy for a delightful twist.
Creative Uses for Turtle Candies
Beyond boxes of sweets, turtles can top desserts, dress up a cookie board, or be tucked into small gift bags. I often use them as a finishing touch on ice cream or chopped over brownies for texture and a caramel-chocolate pop.
- Chop and sprinkle over vanilla or coffee ice cream for an instant sundae upgrade.
- Include a few in holiday gift boxes paired with homemade cookies for a polished presentation.
- Mix broken pieces into snack mixes or caramel corn for added crunch and chocolate.
- Incorporate your turtle candies into other treats by following our harvest caramel corn recipe for a fun snack mix.
Frequently Asked Questions
What if I can’t find caramel ice cream topping?
You can use homemade caramel sauce or melt pre-made caramel candies to get the thicker, spoonable consistency you need.
Can I use dark chocolate instead of milk chocolate?
Absolutely. Dark chocolate pairs beautifully with the sweet caramel and brings a pleasant balance to the overall flavor.
How long do these turtle candies last?
Stored in an airtight container in the refrigerator, the candies will stay fresh for up to one week.
Is it necessary to toast the pecans?
Toasting boosts the pecans’ flavor and aroma, but if you’re short on time you can skip it — the candies will still be tasty.
Can I freeze turtle candies for later?
Yes. Freeze in an airtight container to prevent freezer burn and thaw in the fridge before serving to avoid condensation on the chocolate.
Homemade Turtles Candy
Ingredients
Method
- If your pecans aren’t toasted, spread them on a baking sheet and bake in a preheated 350°F oven for 7-10 minutes, stirring halfway through. Let cool completely before using.
- Optional: Roughly chop the toasted pecans into smaller pieces for more manageable clusters.
- Stir the toasted, cooled pecans with the caramel topping until the nuts are evenly coated.
- Drop heaping tablespoons of the caramel-coated pecans onto a parchment-lined baking sheet. Place in the refrigerator to chill for 1-2 hours, or until solid.
- In a heatproof bowl, combine the chocolate chips and optional shortening. Microwave until melted and smooth.
- Drizzle or pour the melted chocolate over each pecan cluster and let set.
- Store leftovers in an airtight container in the refrigerator for up to a week.