I make this no bake banana pudding dessert when weeknights crowd my calendar and I still want something comforting to share with the family. It comes together in about 20 minutes, uses just a handful of ingredients, and produces that familiar creamy texture everyone reaches for after dinner. The aroma of vanilla and ripe bananas drifting from the fridge is always a signal that the evening will be relaxed.
In my kitchen this recipe is the definition of simple: minimal prep, no oven time, and a finish that looks like you spent more effort than you did. I often assemble it right after dinner and let it rest in the fridge while we finish chores—by the time dessert comes out the layers have softened into a spoonable, crowd-pleasing treat. The contrast between crisp cookie, creamy pudding, and tender banana is reliably satisfying.
Before we dive in, a quick note to keep this post useful and easy to scan: please present the Pro-Tips, Troubleshooting, and Variations sections as bulleted lists so readers can grab the key info quickly. I’ll share what I do to keep the pudding stable, how to stop banana slices from browning, and a few easy swaps for dietary needs.
Why This No Bake Banana Pudding Dessert Is Perfect for Busy Weeknights
This recipe shines when time is tight. It takes roughly 20 minutes to assemble, needs only a few pantry staples, and can be finished ahead of time so you don’t have to rush serving. Families love it because it feels like a treat without complicated steps; kids can help layer the dish and adults appreciate the minimal cleanup.
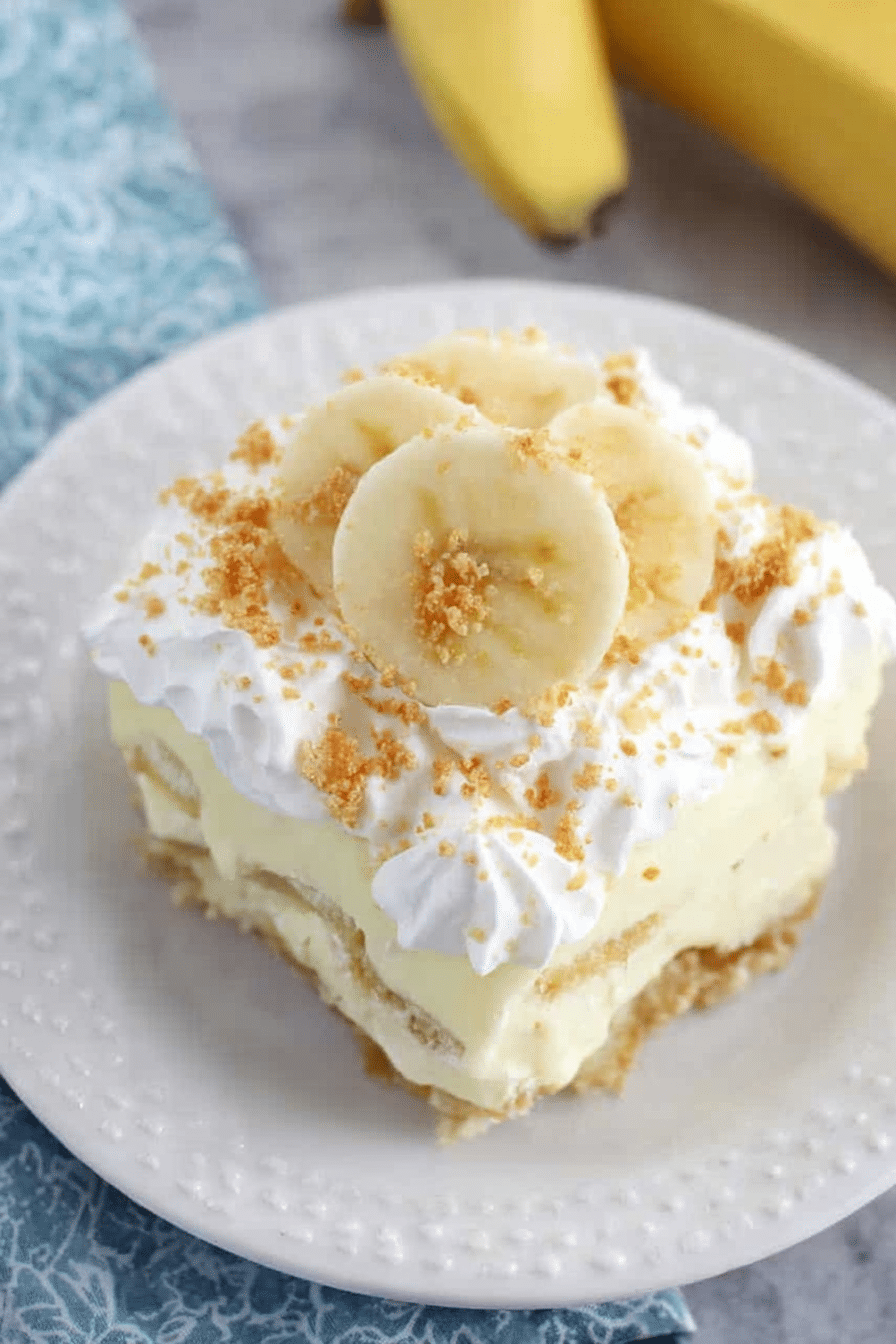
Sensory note: the pudding layer should be luxuriously smooth and pillowy, the bananas add a fresh, fruity brightness, and crushed wafers on top provide a final, satisfying crunch. Because it’s no-bake, the vanilla aroma stays fresh and inviting rather than baked into the dessert.
Everything You Need for No Bake Banana Pudding Dessert
Below is a conversational checklist of ingredients and tools to have ready. I focus on ingredient quality—using ripe bananas and cold milk will improve texture and flavor—while keeping swaps simple for busy cooks. Remember: do not use exact measurements here; this is about purpose and substitutions.
- Instant vanilla pudding mix – Provides the quick, settable pudding base; you can swap for another flavor to vary the dessert.
- Milk – Cold milk helps the instant mix hydrate smoothly and keeps the pudding silky.
- Bananas – Ripe but still firm bananas give the best sweetness and texture; overripe will get mushy in layers.
- Whipped topping – Lightens and stabilizes the pudding; can be swapped for chilled whipped cream or a dairy-free alternative.
- Wafer cookies – The traditional crunchy layer; pick plain vanilla wafers or substitute graham crackers, chocolate wafers, or a gluten-free cookie.
- Tools – A large mixing bowl for whisking, a whisk or spatula, and a 9×13″ (or similar) dish for layering are all you need.
The Secret to a Stable, Spoonable Pudding Layer
The trick to a pudding that holds its shape yet is easy to spoon comes down to thorough mixing and a little stabilization from the whipped topping. Your goal is a smooth, lump-free base with enough air to keep the pudding tender but firm after chilling.
- Whisk the instant pudding mix into cold milk quickly and evenly until the mixture is completely dissolved and there are no streaks or clumps; I always scrape the bowl sides so nothing is left unmixed.
- Fold in half the whipped topping gently to keep some air; this makes the pudding lighter while helping it set into a spoonable texture.
- Chill the combined pudding briefly if you can—20–30 minutes helps the structure set and improves scoopability when serving.
How to Keep Banana Slices from Browning
Bananas brown when their flesh meets oxygen. A little acidity or proper layering will keep slices looking fresh longer and maintain the dish’s bright appearance.
- Coat banana slices lightly with lemon juice (or a fruit juice with acidity) right after slicing; this is the fastest way to slow browning.
- Layer bananas away from the top surface when possible—placing a pudding layer over bananas protects them from air exposure.
- If you’ll serve the pudding soon, slice bananas just before assembling; for make-ahead desserts, reserve a few extra banana slices to add fresh on top before serving.
How to Make No Bake Banana Pudding Dessert (Step-by-Step)
Follow these clear steps using simple tools. I use a large bowl so I have room to whisk and fold without spills. Use “you” directions below to guide the cook.
- Prepare your pudding mixture by whisking the instant pudding mix with cold milk until smooth and lump-free.
- Fold in half of the whipped topping to the pudding to create a light, stable layer.
- Make the first cookie layer by lining wafers side-by-side across the bottom of your dish.
- Arrange a single layer of banana slices over the cookies so each bite gets banana in it.
- Spoon half the pudding mixture over the bananas and smooth gently with the back of a spoon.
- Repeat the layers (cookies, bananas, remaining pudding) and finish with the remaining whipped topping spread evenly on the surface.
- Crush a few cookies and sprinkle them on top for texture; add a few fresh banana slices if you reserved any for appearance.
- Chill briefly if you can; the dessert is best after the layers have had a little time to marry but can be served quickly if needed.
Pro Tip for no bake banana pudding dessert: Best Cookie Base Choices
I like to switch the cookie base depending on what I’m serving it with or who I’m feeding. The cookie choice dramatically alters the dessert’s personality—use this to your advantage when you want a simpler or more decadent finish.
- Vanilla wafers – The classic choice; light and neutral so the banana and pudding shine.
- Graham crackers – Slightly sweeter and more caramel-like, great with a sprinkle of cinnamon.
- Chocolate wafers – Adds a chocolate note that pairs beautifully with banana.
- Gluten-free wafer or cookie options – Keeps the dessert inclusive without changing structure.
- How to crush evenly: place cookies in a zip-top bag and press gently with a rolling pin or use a food processor for a finer crumb.
Easy Variations: Gluten-Free, Vegan, and Scratch Pudding Options
Below are quick swaps to make the dessert fit dietary needs or to move away from instant mixes. Presenting these as bulleted items makes them easier to scan and try.
- Gluten-free version: Use certified gluten-free cookies or crushed gluten-free graham crackers as the base.
- Vegan version: Use a plant-based milk and a dairy-free whipped topping; choose vegan cookies or a crust made from blended nuts and dates.
- Scratch pudding alternative (simple technique): Cook a stovetop custard by combining milk, a sweetener, a thickener like cornstarch, and a vanilla extract—whisk until thickened, cool, then fold in whipped topping to stabilize before layering.
- Healthier swaps: Replace part of the whipped topping with yogurt for tang and fewer calories, or use banana slices with a sprinkle of toasted oats to add fiber and chew.
Troubleshooting
I keep a short troubleshooting list in my head for the small things that can go wrong; here are the fixes I use when assembling the pudding.
- If the pudding is too thin: whisk more vigorously to ensure instant mix is fully dissolved, then chill to help it set; folding in a bit more whipped topping can also thicken the texture.
- If the bananas become brown too quickly: add a light brush of lemon juice and reserve fresh slices for topping.
- If the cookie layer gets soggy: slightly stagger cookie layers and serve sooner, or opt for sturdier cookies like grahams for longer holding time.
- If the top looks messy when spreading whipped topping: chill the pudding layer briefly until slightly firm, then spread with an offset spatula for a clean finish.
How to Store, Make-Ahead, and Serve Your Banana Pudding
This dessert is great for make-ahead plans. Store it properly so the texture and appearance remain appealing.
- Make-ahead: You can assemble the pudding a few hours before serving and refrigerate; for best appearance, add any delicate banana slices to the top right before serving.
- Storage: Cover tightly and refrigerate leftovers in an airtight container for up to 2 days; expect the bananas to brown gradually over time.
- Serving: Let the dish sit at room temperature for 10–15 minutes before serving for the pudding to soften slightly, then scoop with a wide spoon so each portion gets cookie, banana, and pudding.
Frequently Asked Questions
How long does it take to make no bake banana pudding dessert?
This delicious dessert takes about 20 minutes to prepare, making it perfect for busy weeknights!
Can I use a different type of pudding mix?
Absolutely! Feel free to experiment with different pudding flavors like chocolate or coconut to give your dessert a unique twist.
What can I do to prevent the banana slices from browning?
To keep banana slices from browning, you can coat them lightly with lemon juice before layering them in the dessert.
Is there a gluten-free option for the cookie base?
Yes! You can use gluten-free wafer cookies to create a tasty cookie base that everyone can enjoy.
How should I store leftover banana pudding?
Store any leftovers in an airtight container in the refrigerator for up to 2 days. Just remember that the bananas may brown over time.
No Bake Banana Pudding Dessert
Ingredients
Method
- Gather your ingredients and a 9x13" baking dish, a whisk, and a large bowl.
- In a large bowl, whisk together the pudding mix and milk until smooth. Then whisk in half of the whipped topping.
- Use the majority of wafer cookies to form the base layer in the baking dish.
- Layer banana slices over the cookies, then add half of the pudding mixture. Repeat with remaining ingredients.
- Crush remaining cookies and sprinkle on top. Optionally, add leftover banana slices.