I love bringing small, jewel-like desserts to parties—there is something about the neat, individual tart that feels both elegant and effortless. In my kitchen these raspberry lemon tarts have become my go-to: they sit on the dessert table like little suns, and guests always drift toward them first. I make them when I want something that looks spectacular but doesn’t require me to stand over the oven for hours.
There’s a sensory memory I chase with this recipe: the bright citrus scent when I zest a lemon, the soft whisper of a whisk as the filling comes together, and the satisfying contrast when you bite through a crisp shell into a creamy, tangy center topped with fresh raspberries. If you enjoy the balance of sweet and tart, you might also appreciate a different take with a larger-format cake—try this complementary idea for a Strawberry Lemon Cake to switch things up on your dessert table.
I appreciate recipes that are forgiving for busy hosts, so I’ve built these tarts to be make-ahead friendly and flexible for dietary needs. Over the years I learned a few small technique changes that keep the filling silky and prevent soggy bottoms—those are the details I’ll share so you can feel confident serving them to a crowd.
Read on for equipment notes, technique tips, sensible swaps (including a no-bake option), plating ideas, and clear, scannable troubleshooting pointers I use in my kitchen when I’m preparing desserts for a party.
Why Raspberry Lemon Tarts Are Perfect for Entertaining
These tarts are a visual and flavor-focused party piece: the bright yellow filling topped with ruby raspberries creates instant color contrast that reads like effortless elegance on any table. The individual portions make them easy for guests to pick up and eat while mingling, and they scale well for themed gatherings.
The balance of sweetness from the filling and the tart snap of fresh raspberries appeals across ages and palettes—people who prefer desserts that aren’t too sweet will still reach for a second. If you love the balance of sweet and tart flavors in small-format desserts, you may also enjoy our Strawberry Lemon Cake, which carries the same sunny profile in a sliceable format.
Everything You Need for Raspberry Lemon Tarts
Use fresh, top-quality citrus and ripe berries whenever possible—they make the biggest difference in aroma and bright flavor. Below I list the main ingredients and tools conversationally so you know what each item does and what to swap if you need to.
- Frozen or pre-baked tart shells – A convenient starting point that saves time; choose sturdy shells that will hold a creamy filling without collapsing. (See the next section for homemade and dietary alternatives.)
- Granulated sugar – Adds sweetness and helps stabilize the filling; you can reduce it slightly if you prefer tarter results.
- All-purpose flour – Acts as a gentle thickener so the filling sets cleanly; a gluten-free blend can substitute when needed.
- Sweetened condensed milk – Provides creaminess and a rounded sweetness and keeps the texture silky without adding heavy cream.
- Eggs – The building blocks for structure and richness; they help the filling set while staying tender.
- Sour cream – Adds a little tang and softens the richness; Greek yogurt or dairy-free yogurt are good swaps.
- Vanilla – A little vanilla smooths the lemon’s edge and deepens flavor complexity.
- Fresh lemon juice – The star ingredient for bright acidity and fragrance; always use fresh juice for the cleanest citrus flavor.
- Fresh raspberries – For topping and contrast; use ripe but firm berries so they hold their shape on the tart.
- Powdered sugar (optional) – A light dusting for presentation; omit for a less sweet finish.
- Tools – A good whisk, mixing bowls, a rimmed baking sheet for shells, and a reliable oven thermometer make the process smooth and repeatable.
Dietary adaptations: for vegan or dairy-free needs, choose tart shells without butter and swap sweetened condensed milk for a reduced coconut milk concentrate and sour cream for a thick dairy-free yogurt; for gluten-free, use certified gluten-free shells or bake a shell with a gluten-free flour blend.
The Secret to Silky Lemon Filling
Silky filling comes down to temperature control, thorough mixing, and not overbaking. I aim for a custard that’s set but still tender—think satin rather than rubbery.
- Whisk sugar and flour first to disperse the dry ingredients evenly and prevent lumps when the wet ingredients are added.
- When you combine eggs with the condensed milk and sour cream, whisk vigorously until smooth; this builds an even emulsion that gives the finished filling a glossy texture.
- Add lemon juice last and whisk briefly to incorporate—adding acid early can sometimes encourage curdling if the eggs are not well emulsified.
- Bake until the filling is set at the edges and only slightly wobbly in the center; residual heat will finish the set without drying the custard.
- Allow the tarts to cool fully before chilling so the filling firms with a silky mouthfeel rather than splitting or sweating in the fridge.
If you enjoy a different lemon format that practices the same custard technique, try working with Lemon Bars as another canvas for smooth, zesty filling and a tender finish.
How to Choose or Make the Best Tart Shells
The shell is the crunchy counterpoint to the creamy filling—choose or make shells that are thin, crisp, and neutral in flavor so they let the lemon sing. Both store-bought and homemade shells have merits: store-bought saves time and is excellent for large batches; homemade gives you control over texture and flavor.
- For store-bought shells: look for shells labeled “sturdy” or “tart shells” rather than fragile pastry cups; blind-bake them briefly if they aren’t already pre-baked to avoid soggy bottoms.
- For homemade shells: cream a butter-based dough and chill it well before shaping—this prevents shrinking and creates a flakier texture.
- To pre-bake (blind-bake) shells: weigh the dough down with pie weights or dried beans on parchment to keep edges from puffing; remove weights near the end so the base crisps.
- Gluten-free shells: use a tested gluten-free flour blend and add a touch of xanthan gum if the blend lacks binders; par-bake to ensure crispness.
- Vegan shells: replace butter with a solid vegetable shortening or coconut oil that’s chilled; treat the shell gently and blind-bake to firm the structure.
To see another example of tart shell choices in action, take a look at these Mini Lemon Meringue Tarts which highlight shell textures and how they pair with bright citrus fillings.
Quick No-Bake and Dietary-Friendly Swaps
When oven time is limited or you need a dietary-friendly version, a chilled lemon filling sets beautifully in a firm crust and keeps the same bright flavor profile. The goal is to keep texture light and refreshing.
- No-bake lemon filling: whisk a stabilized lemon cream using a dairy base (or coconut cream for dairy-free), a thickener like cornstarch or gelatin/agar-agar, and sweetener—then chill until firm.
- Vegan option: use full-fat coconut milk reduced on the stove to concentrate sweetness and thicken, then set with agar-agar; finish with dairy-free yogurt for tang.
- Gluten-free crust: make a simple crumb crust from certified gluten-free cookies or oats bound with butter or coconut oil, pressed into tart pans and chilled until set.
- Lower-sugar swap: reduce added sugar and rely on ripe raspberries and lemon zest to contribute brightness; sweetened condensed milk can be replaced with a lighter sweetened dairy or plant-based condensed alternative.
How to Make Raspberry Lemon Tarts (Step-by-Step)
Below are the core steps I follow in my kitchen. I keep the process tidy: pre-bake shells, make a smooth filling, portion carefully, and chill. These instructions are written so you can follow along without measuring notes here—your recipe card will contain precise amounts.
- Preheat your oven and arrange pre-made tart shells on a rimmed sheet; blind-bake shells if your recipe calls for it and let them cool slightly.
- In a bowl whisk dry ingredients together thoroughly to eliminate lumps.
- Add condensed milk, eggs, sour cream, and vanilla, whisking until the mixture is completely smooth and homogenous.
- Stir in fresh lemon juice last and give the mixture a final brisk whisk so it has a silky, pourable texture.
- Pour or spoon the filling into each shell to an even level and return them to the oven; bake until the centers are set but still have a slight jiggle.
- Remove from the oven and cool to room temperature on a wire rack before chilling in the refrigerator for at least an hour to finish firming.
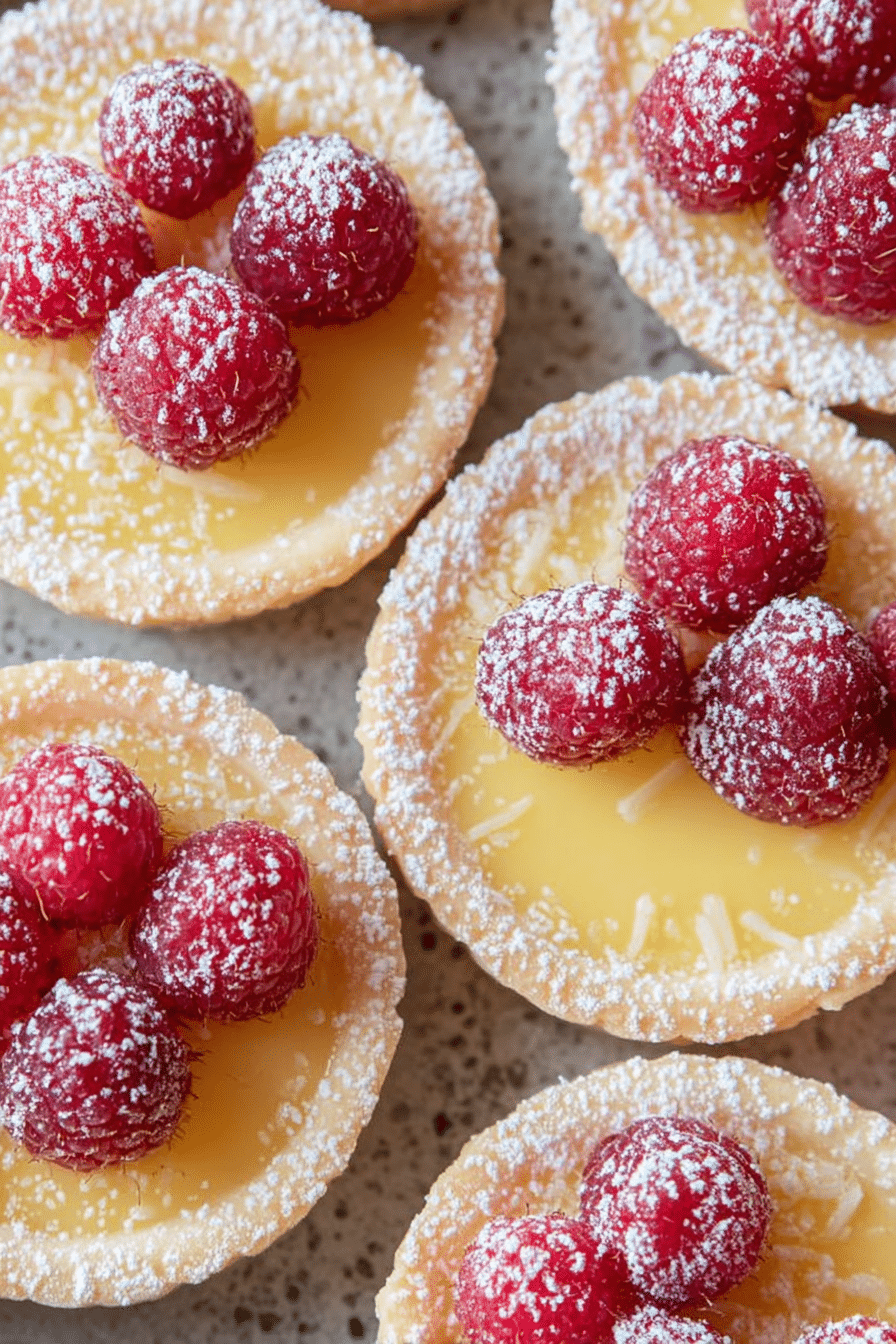
- Top each chilled tart with a few fresh raspberries and a light dusting of powdered sugar just before serving.
Common troubleshooting notes from my kitchen follow as a bulleted list so you can quickly scan fixes when something isn’t behaving as expected.
- If the filling curdles while mixing: stop and whisk energetically—sometimes tempering by adding a spoonful of the dairy to the eggs first smooths the emulsion.
- If the filling is too wobbly after baking: it likely needs a few more minutes; watch the edges for a firm set and allow carryover heat to finish the center.
- If shells become soggy: ensure shells are fully pre-baked and cooled; consider a quick glaze of melted white chocolate on the interior base to act as a moisture barrier for very wet fillings.
- If raspberries bleed onto the filling: blot berries gently before placing them, or arrange them at the last moment right before serving.
- In my experience, using an oven thermometer and removing tarts as soon as they’re set prevents overbaking and preserves silkiness.
Plating and Garnish Tips for a Show-Stopping Dessert Table
Presentation is as simple as letting color contrast do the work. Fresh raspberries on pale yellow filling, a tiny scatter of finely grated lemon zest, and a measured dusting of powdered sugar create visual layers that read as refined and intentional.
- Use small clusters of 2–4 raspberries for a composed look rather than piling them on; the negative space around the fruit makes each tart feel curated.
- Add micro-mint leaves or a single edible flower for a sophisticated pop of green or color that complements the raspberries.
- Serve on a large board with alternating tart faces up and angled to create depth; place small bowls of extra raspberries and lemon wedges nearby for guests to help themselves.
- For contrast, plate the tarts on matte or dark-colored platters so the bright filling and berries read more intensely under buffet lighting.
Pro Tip for Raspberry Lemon Tarts: Scale for a Crowd without Losing Texture
Keep these practical pointers in mind when you multiply the batch—these are presented as bulleted pro tips for quick scanning.
- Maintain ingredient ratios exactly when scaling; scaling linearly keeps texture consistent across larger batches.
- Divide work into stages: bake shells in one session, make filling in another, then assemble and chill—this prevents timing bottlenecks.
- Use multiple shallow baking sheets rather than stacking shells closely on a single sheet to ensure even heat circulation.
- Chill finished tarts on racks in single layers to cool evenly; refrigerate in batches to avoid crowding and sweating.
- For events, consider packaging individual tarts in clear boxes for easy guest pickup—this helps maintain texture during transport and serving.
How to Store, Make-Ahead, and Easy Variations
These tarts are exceptionally make-ahead friendly when you plan the order of assembly. Bake shells and prepare filling the day before, assemble and chill overnight, then add raspberries right before serving to preserve freshness.
- Refrigeration: Store assembled tarts covered in the fridge for up to 2–3 days; add berries and powdered sugar right before serving.
- Freezing: You can freeze unfilled prebaked shells for future use; thaw completely before filling. Avoid freezing filled tarts as raspberries and the custard texture degrade on thaw.
- Make-ahead timeline: Bake shells 1–3 days ahead, make filling the day before, assemble and chill the day of the event for best texture.
Variations (scannable bullet list):
- Lavender Lemon: steep a little dried culinary lavender in warm cream before adding to the filling for a floral note.
- Raspberry-Lime: swap some lemon juice for lime juice for a sharper citrus edge.
- Berry Medley: top tarts with a mix of small berries (currants, blueberries, halved strawberries) for seasonal variety.
- Chocolate-Shell: brush the interior of the shell with melted dark chocolate before filling for a textural and flavor contrast.
- Creamy No-Bake: use a chilled lemon mousse set in a crumb crust for a lighter, no-bake alternative that still feels elegant.
Pair these tarts with a bright beverage for balance—this Frozen Raspberry Lemonade makes a refreshing companion for a summer spread and echoes the tart’s flavors nicely.
Frequently Asked Questions
Can I use fresh tart shells instead of frozen ones?
Absolutely! Fresh tart shells will work perfectly for this recipe. Just ensure they are pre-baked before adding the lemon filling.
How can I make this recipe gluten-free?
You can substitute the all-purpose flour with a gluten-free flour blend. Just make sure to check that your tart shells are also gluten-free!
Can I prepare these tarts in advance?
Yes, you can! Simply prepare the tarts and store them in the refrigerator until you’re ready to serve. Just add the fresh raspberries and dusting of powdered sugar right before serving.
What can I use instead of sour cream?
You can substitute sour cream with Greek yogurt or even a dairy-free yogurt if you’re looking for a healthier or dairy-free option.
How long do the tarts last in the fridge?
The tarts can be stored in the refrigerator for about 2-3 days. Just keep them covered to maintain their freshness.
Raspberry Lemon Tarts
Ingredients
Method
- Preheat the oven to 350℉. Arrange the frozen tart shells on a baking sheet. Bake the empty tart shells for 15 minutes.
- In a mixing bowl, whisk together the sugar and flour until combined. Add the sweetened condensed milk, eggs, sour cream, and vanilla and mix until fully incorporated. Lastly, add the lemon juice and whisk until smooth.
- Distribute the filling evenly between all 20 pre-baked tart shells. Return the pan to the oven and bake for 15-20 minutes or until the lemon filling is set and no longer jiggly when you wiggle the pan. Remove from the oven and let cool to room temperature before transferring to the refrigerator to chill for at least 1 hour before serving.
- Once the tarts have chilled or right before serving, top each tart with a few fresh raspberries. Add a dusting of powdered sugar right before serving for a pretty garnish, if desired. Enjoy!