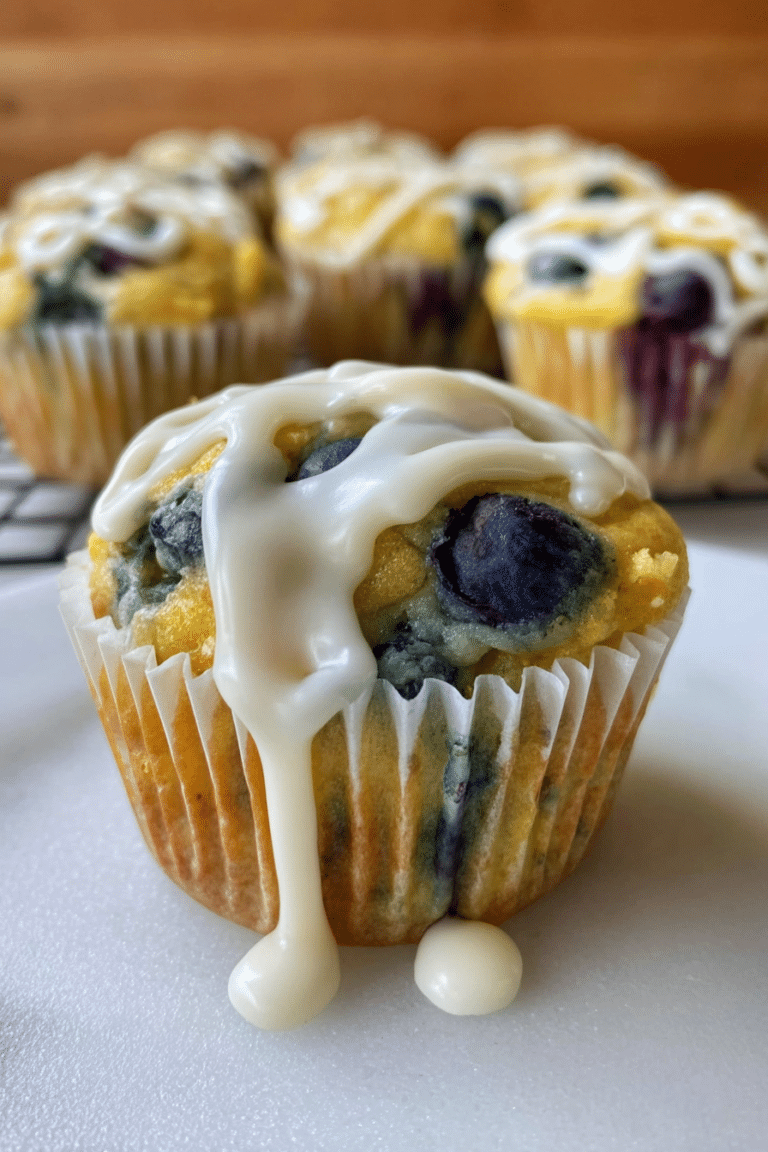
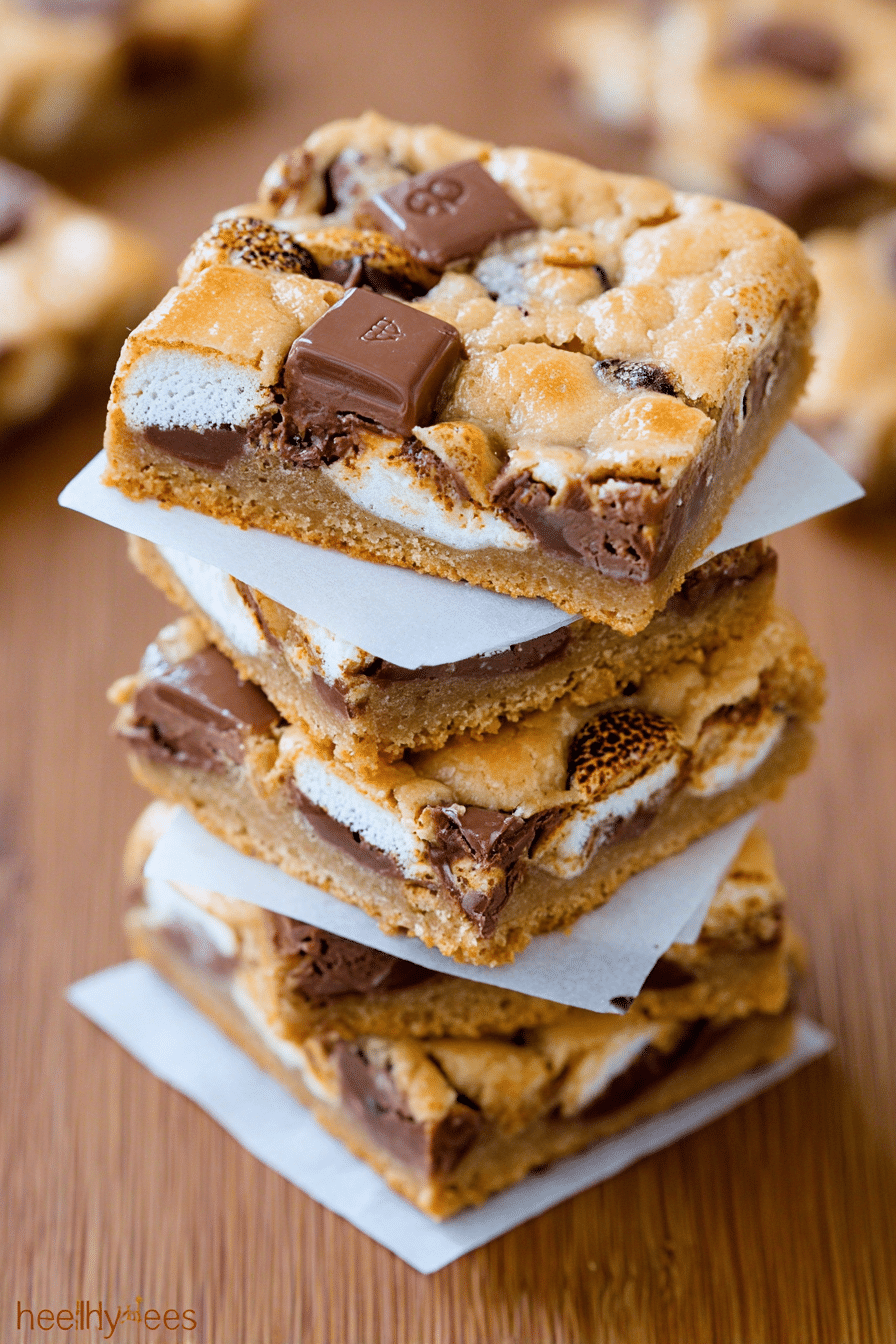
I make these S’mores Bars whenever I want a dessert that brings people together without a fuss. They borrow that nostalgic campfire flavor—toasted marshmallow, melty chocolate and a graham base—but in a thick, chewy bar that travels, stacks, and feeds a crowd. I love how they look when you cut into them: a soft cookie middle, chocolate pockets and marshmallow peaks peeking out.
When I test these I pay attention to small details that make a big difference—how cold the crust is before the dough goes on it, how tacky the dough should be when you press it, and when the marshmallows on top are done. I’ll tell you what I learned so you can skip the mistakes I made the first time.
I like serving these at backyard parties because they’re easy to cut into squares and even easier for guests to grab with a napkin. They’re not fussy, and they still look like you put in effort. The toasted marshmallow shine and the chocolate chunks sinking into the cookie layer are what get people excited.
Why These S’mores Bars Are Party-Perfect
These bars give you everything people love about s’mores without needing a fire pit. The texture is layered and inviting: a crisp graham base, a thick, chewy cookie layer, and a top studded with chocolate and toasted marshmallows. That contrast—crunch, chew and gooey—is what makes a crowd go back for seconds.
They’re ideal for gatherings because they slice into neat squares, hold up on a platter, and can be made ahead. Visually, the browned marshmallow tops and glossy chocolate chips are simple but dramatic on a serving board. Skip the generic descriptions—these are straightforward, family-friendly, and reliably popular.
Everything You Need for S’mores Bars
Below I list the key ingredients and what each one does for the final bar—no exact measurements here, just purpose and swaps. After the ingredient notes I include practical equipment tips so you’re set up for success.
- Graham crackers (crumbs) – Provide the crunchy, slightly sweet crust that stands up to the cookie layer. Substitute digestive biscuits if needed.
- Butter – Adds fat and tenderness to both the crust and cookie layer; melted butter gives a denser chew in the cookie, while softened butter will yield a slightly lighter texture.
- Granulated sugar – Helps with spread and crisp edges in the cookie layer.
- Brown sugar – Adds moisture and chew thanks to its molasses content; it’s a big part of that thick, tender bite.
- All-purpose flour – The structure for the cookie layer; you can swap with a 1-to-1 gluten-free flour blend if you need gluten-free.
- Baking powder – Gives a touch of lift so the bars stay thick without becoming cake-like.
- Salt – Balances sweetness; reduce if you’re using salted butter.
- Eggs (room temperature) – Bind the dough and create tenderness; room-temperature eggs incorporate more evenly and produce a more consistent batter.
- Vanilla – Simple flavor amplifier that rounds the cookie notes.
- Chocolate chips or chunks – Melt pockets of chocolate through the cookie layer; choose dark, milk, or semi-sweet depending on how sweet you want the bars.
- Mini marshmallows – Folded into the dough they add chew; a handful on top gives you those signature toasted peaks.
- Chocolate bar pieces – Pressed into the top they create melty slabs and visual interest.
- Extra graham pieces – For garnish and crunch on top.
Equipment tips
- Use a stand mixer or a sturdy hand mixer for even creaming; a wooden spoon will do if you prefer hands-on mixing.
- Line your baking pan with parchment and leave overhang—this is the easiest way to lift the whole slab out for tidy slicing.
- An offset spatula helps spread tacky dough without tearing the crust underneath.
The Secret to Thick, Chewy Texture
Getting that dense, chewy middle is mostly about balance: enough moisture, just the right amount of flour, and minimal overmixing. Measure flour by spooning it into your measuring cup and leveling it off to avoid packing—too much flour is the quickest route to dry, dense bars. If you weigh ingredients you’ll be even more consistent.
Butter temperature matters. Melted butter gives you a chewier, denser result because it encourages more spread and a tighter crumb; softened butter produces a slightly airier bar. I usually use a mix—melted for richness in the cookie layer, but make sure it’s not piping hot when you add the eggs or they’ll scramble.
Finally, chocolate chips and marshmallows both contribute to chewiness: chips create pockets that keep bites gooey, while mini marshmallows folded into the dough hold pockets of chew without completely melting away during baking. The contrast in textures is why a bite feels so satisfying.
How to Scale These Bars for Any Crowd
- Half batch – Make a half-size pan for smaller gatherings; expect slightly less bake time since the slab will be thinner.
- Double or triple – For larger groups, double or triple the recipe and use multiple pans or a larger sheet. If you use a shallow, wide sheet, the bars will bake faster—watch closely and reduce time as needed.
- Pan size adjustments – If you move to a deeper pan, add a little extra baking time; if you use a wider, shallower pan, shorten the bake. The goal is a golden top with no visible wet batter in the center.
- Storage for leftovers – Keep extras at room temperature in an airtight container for a few days or freeze portions for longer. Wrap slices individually for quick reheating.
How to Make S’mores Bars (Step-by-Step)
- Preheat the oven so it’s fully up to temperature before you bake—this helps the crust set and the cookie layer rise correctly.
- Press the graham crumb plus butter mixture firmly into your lined pan and chill it briefly; chilling prevents the crust from melting into the dough and keeps a defined bottom layer.
- Cream sugars with the butter, then add eggs one at a time and vanilla; stop mixing as soon as the eggs are incorporated to avoid overworking the dough.
- Whisk dry ingredients separately, then fold them into the wet mix on low speed; immediately stop once the flour disappears—overmixing will toughen the bars.
- Fold in chocolate chips and some marshmallows—these will create interior pockets of gooeyness. Scoop the dough over the chilled crust and spread gently with an offset spatula.
- Top with chocolate bar pieces, extra mini marshmallows and a few graham pieces; press them slightly into the dough so they adhere but don’t sink completely.
- Bake until the top is golden and there’s no visible raw batter; timing varies with pan size, so test visually and with a gentle jiggle—center should be set but still soft.
- Cool completely before slicing—this helps the layers firm up and gives you cleaner cuts. If you’re short on time, chill briefly to speed this up.
Pro Tip for s’mores bars: Make-Ahead & Clean Slices
- I like to make these a day ahead—the flavors meld and the bars are easier to slice cleanly after chilling overnight.
- For the sharpest slices, chill the slab until firm, then run a sharp knife under hot water, dry it, and cut with a single smooth stroke; wipe the blade between cuts.
- Keep the parchment overhang when baking so you can lift the whole slab out instead of forcing pieces from the pan edge.
- If you want toasted tops without a torch, pop the whole pan under a hot broiler for seconds—watch it closely so the marshmallows brown, not burn.
Troubleshooting
- If the crust collapses into the dough: I let the crust chill longer before adding the dough; a cold crust is sturdier and resists baking into the cookie layer.
- If bars are dry and crumbly: you likely overmeasured flour or overbaked. I check a few minutes early and use a visual test—no wet batter, and the center still feels slightly soft.
- If marshmallows vanish into the batter: use mini marshmallows folded in gently and reserve extras for the top so you still get those toasted peaks.
- If slices are messy: I chill the whole pan and use a heated, wiped knife for clean edges.
Presentation Ideas for Parties: Boards, Toppings & Kid-Friendly Plates
Lay the bars out on a large wooden board with small bowls of extra toppings so guests can customize. Offer a drizzle station with chocolate sauce and salted caramel, a bowl of chopped nuts, and a sprinkle bowl with crushed graham crackers for texture.
For kids, create individual paper plates with a mini cup of marshmallows and a piece of chocolate so they can press their own topping onto a warmed bar—this keeps little hands busy and makes serving fun. For a grown-up twist, serve squares with a small ramekin of espresso or a scoop of vanilla ice cream.
Variations and Dietary Swaps
- Swap chocolate types: use dark chocolate for less sweetness, milk chocolate for a creamier bite, or white chocolate for a sweeter, ivory-colored contrast.
- Nut add-ins: fold in chopped toasted pecans or walnuts for crunch and nuttiness.
- Gluten-free option: use gluten-free graham crackers and a 1:1 gluten-free flour blend to keep texture similar.
- Dairy-free alternative: choose plant-based butter and dairy-free chocolate; mini marshmallows can be found in vegan varieties too.
- Lower-sugar tweak: use a darker chocolate and reduce how many chips you fold in; swapping part of the granulated sugar for a natural sweetener can help but will affect texture.
How to Store, Reheat, and Easy Variations to Try Next Time
Store cooled bars in an airtight container at room temperature for a few days. For longer storage, freeze wrapped slices and thaw at room temperature when you’re ready to serve. To bring back gooeyness, warm individual pieces briefly in a microwave or oven—just a few seconds in the microwave or a minute in a hot oven works wonders.
When I make them again I often switch the top chocolate for a flavored bar (peanut butter, almond, or salted caramel) and sprinkle a pinch of flaky sea salt on top after baking. Small changes like that keep this recipe fresh while using the same reliable technique.
Frequently Asked Questions
Can I use different types of chocolate in S’mores Bars?
Absolutely! While semi-sweet chocolate chips are classic, you can experiment with dark chocolate, milk chocolate, or even white chocolate to suit your taste.
What can I substitute for graham cracker crumbs?
If you don’t have graham crackers, you can use crushed digestive biscuits or any other sweet crust option. Just keep in mind that the flavor may slightly change.
How do I store leftover S’mores Bars?
Store any leftovers in an airtight container at room temperature for up to 3 days. You can also freeze them for longer storage!
Can I make S’mores Bars ahead of time?
Yes! You can prepare the bars a day in advance and store them covered at room temperature, making them a great make-ahead dessert for gatherings.
What is the best way to cut S’mores Bars for serving?
To get clean slices, let the bars cool completely, then run a knife around the edges before lifting them out using the parchment paper. Use a sharp knife for the best results!
S'mores Bars
Ingredients
Method
- Preheat oven to 325°F and line a 9"x13" baking pan with parchment paper. Leave some paper hanging over the sides.
- Crush graham crackers, combine with melted butter, pour mixture into the pan, and press evenly. Freeze while making cookie dough.
- Blend sugars and melted butter in a large mixer. Add eggs one at a time and vanilla. Mix until well combined.
- Whisk together flour, baking powder, and salt. Slowly add the flour to the wet mixture and stop the mixer once combined. Fold in marshmallows and chocolate chips.
- Scoop dough onto the prepared crust, spread evenly, top with toppings, and press slightly. Bake for 35-45 minutes until golden brown.
- Remove from oven and let cool fully for at least 1 hour before cutting.