Spicy crispy chicken burgers have exploded on menus and in home kitchens over the past few years — everyone wants that perfect contrast of hot heat, crunchy crust, and tender chicken inside. I make this one whenever I want a weekend treat that’s worth the little mess it makes in the kitchen. The first bite should give you a mouthful of crackly, seasoned crust, followed by juicy, slightly spicy chicken and a cooling smear of mayo. It’s the kind of sandwich that smells like comfort and confidence: warm oil, toasted buns, and chili in the air.
I first developed this recipe when I wanted that Zinger-style crunch at home but with a little Indonesian heat I love. After a few tests — a burnt first batch, an under-seasoned second — this version is the one I keep coming back to. It’s built around bone-free chicken thighs for juiciness, a double-dredge technique for maximum crunch, and a tangy-spicy sauce to tie everything together.
Ingredients for the Perfect Burger
Below I walk through the ingredients I use and why. For quick reference, the full measured ingredient list appears after these notes.
- Boneless chicken thighs – my go-to for juicy, forgiving meat; they stay moist through frying and have a little more fat for flavor.
- Egg whites – help the dry mix stick and give a thin, even bind without being heavy.
- Rice-based or plain flour – forms the base of the crust; a little cornstarch or baking powder helps the crunch.
- Gochugaru / chili flakes – gives aromatic, slightly smoky heat; adjust if you prefer milder or brighter spice.
- Paprika and garlic powder – they deepen the savory notes without adding more heat.
- Baking powder – a small amount lifts the crust and creates a bubbly, crisp texture.
- Japanese mayo and Sriracha – combine to make a creamy, tangy, spicy sauce that cools the chicken and clings to the bun.
- Light soy and rice vinegar – add umami and brightness to the sauce so the sandwich never tastes flat.
- Ice-cold water – an odd but key trick: quick dips in near-freezing water before a second dredge give a flakier, layered crust.
- Burger buns – good quality, lightly sweet buns toast beautifully and hold up to the saucy chicken.
- American cheese & lettuce – cheese adds creamy saltiness; lettuce gives a fresh snap and keeps the bun from getting soggy right away.
If you want a cooling condiment option, a quick healthy tzatziki sauce is great for balancing the heat and adding freshness.
Measured Ingredients (recipe used and tested)
- 4 boneless chicken thighs
- 2 egg whites
- 1 tbsp flour (for wet seasoning mix)
- 2 tbsp gochugaru (marinade)
- 1 tbsp paprika
- 1 tbsp garlic powder
- 1/2 tsp salt
- 1/2 tsp sugar
- 2 cups flour (dry mix)
- 2 tbsp gochugaru (dry mix)
- 1 tbsp paprika (dry mix)
- 1 tbsp garlic powder (dry mix)
- 1 tbsp onion powder (optional)
- 1 tsp baking powder
- 1/4 tsp salt (dry mix)
- 1/2 tsp sugar (dry mix)
- 2 tbsp Japanese mayo
- 1 tbsp sweet chili sauce
- 1 tbsp Sriracha
- 1/2 tbsp light soy sauce
- 1/2 tbsp rice vinegar (or white vinegar)
- 1/2 tbsp chili flakes
- 3 cups ice cold water (for dredging)
- burger buns, lettuce, American cheese slices
Step-by-Step Cooking Instructions
I write these steps in the order I do them in the kitchen, with notes about what I saw and why I do each step. The recipe yields 4 burgers and the hands-on prep takes about 15 minutes; total cook time is about 25 minutes (plus at least 3 hours marinating).
- Make the wet seasoning and marinate the chicken.In a bowl, whisk the egg whites gently with a little flour and the marinade spices (gochugaru, paprika, garlic powder, salt, sugar). I use my hands to rub this into the thighs so the spice clings. You want a thin, even coating, not a paste. Marinate in the fridge at least 3 hours, ideally overnight — I’ve found longer marinating softens the meat and lets the chili flavor penetrate.
What I watch for: if the marinade looks too wet and pools, pat the chicken slightly so the dry mix will stick later. If the chicken sits more than 24 hours, rinse and pat dry before dredging to avoid an over-salty crust.
- Prepare the dry mix and the sauce.Mix the dry mix in a wide bowl: flour, gochugaru, paprika, garlic powder, onion powder (if using), baking powder, salt, and sugar. Baking powder is key — it puffs the crust and helps achieve that crackly texture. Taste a tiny pinch (careful) so you know the spice balance; it should be savory with a clear chili note.
For the sauce, stir Japanese mayo with sweet chili sauce, Sriracha, light soy, rice vinegar, and chili flakes. The mayo brings creaminess, the chili sauces bring layered heat, and the vinegar brightens and prevents the sandwich from tasting one-dimensional.
- Double-dredge using ice-cold water.This is where the magic happens. Dredge a piece of marinated chicken lightly in the dry mix so every inch has a dusting. Then dip the piece quickly in ice-cold water — about 5 seconds — being careful not to scrub off the flour. Lift it, wait roughly 10 seconds so excess water stops dripping, then dredge again in the dry mix. Repeat for each piece; I use fresh ice water for each piece if I’m picky, but you can reuse it once if needed.
Why this works: the cold water creates little pockets between layers of coating that puff up in the hot oil, giving that pronounced crunch. If the coating slides off during frying, the first coat was probably too wet or you didn’t let it rest before frying.
- Rest the coated chicken.After the second dredge, let the pieces rest for 5 minutes at room temperature. This helps the crust adhere and dries the outer layer slightly so it browns evenly. If you’re in a hurry, at least give it a couple of minutes.
- Deep fry until golden and cooked through.Heat oil in a deep pan to medium heat (the goal is roughly 175–180°C / 350–360°F if you use a thermometer). Fry the thighs gently so the inside cooks without burning the outside — on my stove this takes between 10–15 minutes per piece, depending on thickness. I flip once or twice to keep the crust even.
Cooking cues: listen for a steady sizzle — too loud means oil’s too hot and will brown too fast; a dull bubble means the temperature is low and the crust will absorb oil. A golden-brown color is what you want; if it gets too dark sooner than 10 minutes, lower the heat and peek inside one piece to check doneness.
Optional: for extra crispiness, let the pieces rest on a rack for a minute, then fry again 5–8 minutes (a short second fry). This double-fry is the trick many restaurants use to get a crust that stays crisp longer.
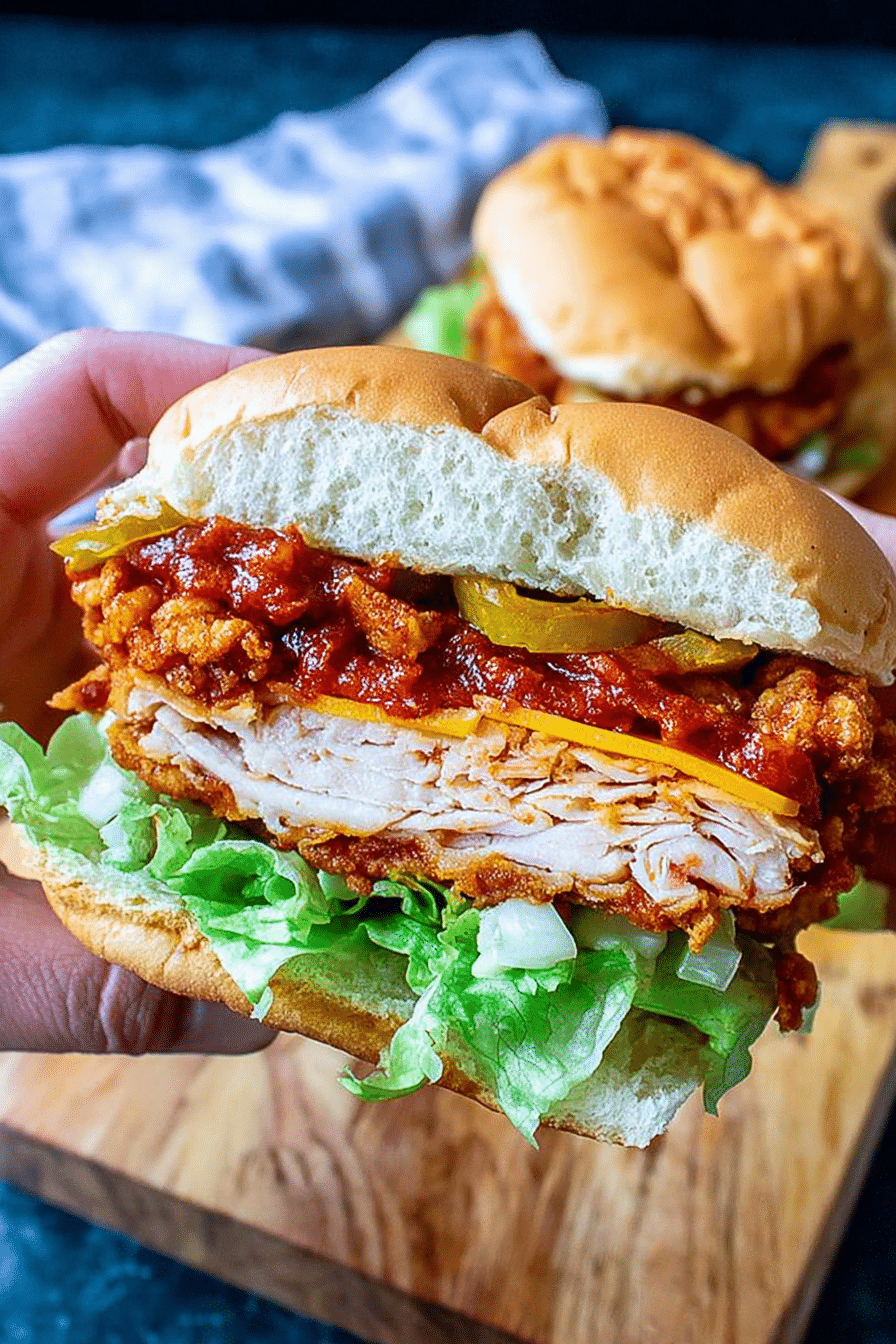
- Finish and assemble.Remove chicken to a wire rack and sprinkle a little flaky salt and, if you want, a pinch more gochugaru for color and aroma. Toast your buns in the same pan or a dry skillet so they’re warm and slightly caramelized — that toasting gives a tiny crunch and prevents sogginess. Spread the spicy mayo on both bun halves, place the chicken on the bottom bun, add a slice of American cheese while the chicken’s still hot so it softens slightly, add lettuce, and cap with the top bun.
Serving cue: this burger is best eaten the day it’s made. The crust is at its peak for the first hour; after that it starts to soften though still tastes great.
Customization Options for Spice Levels
One of the best parts of this recipe is how tweakable it is. I always dial the heat based on who’s eating.
- Milder – cut the gochugaru in the marinade and dry mix by half, omit the chili flakes in the sauce, and add a touch more sweet chili or mayo to the sauce. Cooling toppings like cheese, pickles, or a yogurt-based slaw also mute heat without hiding flavor.
- Medium – follow the recipe as written. The balance of gochugaru and Sriracha gives a layered, tangy heat that’s punchy but not overwhelming.
- Hot – add a pinch of cayenne to the dry mix, increase Sriracha, and fold diced jalapeños into the sauce. For serious heat, finish with a dusting of crushed chili crisp.
For an extra tangy kick, try our dill pickle hot sauce to layer bright heat and acidity into your spicy crispy chicken burger.
Recommended Sides to Pair With Your Burger
Think texture contrast and temperature: crunchy, cool sides cut through the richness and hot sides echo the comfort factor.
- Creamy coleslaw – a crisp, tangy coleslaw adds crunch and a cooling bite that pairs perfectly with spicy fried chicken. I like mine with a touch of apple cider vinegar and a little sugar to balance.
- Sweet potato fries – their natural sweetness complements the chili spices; toss with a little smoked paprika for continuity.
- Onion rings – double-battered and fried until bubbly and golden; the soft onion inside is a neat foil to the chicken’s chew.
- Pickles – bright, brined slices give an acidic lift with every bite.
Serve your burger with our super creamy coleslaw for a crunchy, cooling side that pairs perfectly with spicy fried chicken.
For a satisfying alternative to fries, try baked garlic parmesan potato wedges that crisp up nicely alongside the burger.
Cooking Methods: Frying, Air Frying, Baking
Here’s how to get a great result with different equipment. I test all three methods on different days so I can compare crispiness and juiciness.
- Deep-frying (recommended) – Pros: the most authentic crunch and mouthfeel; crust is shatteringly crisp. Cons: more oil, more cleanup. Tip: keep oil at medium heat (about 175–180°C / 350–360°F). Cook time: 10–15 minutes per piece depending on thickness; optional second fry 5–8 minutes for extra crunch.
- Air-frying – Pros: less oil, cleaner kitchen. Cons: slightly drier interior and a different crust texture — crisp but not quite as layered. Tip: air-fry at 200°C / 400°F, spray the coated chicken lightly with oil, and cook 12–16 minutes, flipping halfway. Check internal temp for 74°C / 165°F.
- Baking – Pros: easiest cleanup, fewer splatters. Cons: crust won’t be as deep-fried crunchy. Tip: bake at 220°C / 425°F for 20–25 minutes, flip once and finish under the broiler for a minute if you want more color.
Storage Tips and Leftover Ideas
I always plan for leftovers because properly stored fried chicken makes great lunches. Leftover cooked chicken will keep in an airtight container in the fridge for 3–4 days, or freeze for up to 2 months (wrap tightly to avoid freezer burn).
- Reheating to restore crispiness – avoid microwaves if you care about texture. Reheat in a preheated oven or air fryer at 200°C / 400°F for 8–10 minutes until piping hot. A short spritz of oil helps the crust revive.
- Leftover ideas – slice the chicken for a salad with crunchy cabbage and a citrus-y dressing, shred it into tacos with pickled onions, or make a cold chicken sandwich with extra mayo and pickles. Leftover meat is also great chopped into ramen bowls for an easy weeknight meal.
- Storing components – keep the sauce in a small jar in the fridge for up to a week. Toast buns just before serving to prevent sogginess.
FAQ
How can I make this spicy crispy chicken burger less (or more) spicy?
To make it milder, reduce or omit the gochugaru, Sriracha and chili flakes in both the marinade and the dry mix, and use more sweet chili sauce or Japanese mayo in the sauce. To make it hotter, add more gochugaru, extra Sriracha or a pinch of cayenne/extra chili flakes. You can also balance heat with cooling toppings like cheese, pickles, or a tangy slaw.
Can I use chicken breast instead of thighs?
Yes. Chicken breast works but is leaner and can dry out. Pound breasts to an even thickness, brine or marinate a little longer, and watch frying time closely—breast will usually cook slightly faster than thighs. Thighs give juicier results and tolerate longer frying without drying.
What tips make the coating extra crispy?
Follow the double-dredge and ice-cold water method in the recipe, use baking powder in the dry mix, let the coated pieces rest 5 minutes before frying, and don’t overcrowd the oil. Fry over medium heat so the inside cooks without burning the crust. An optional second fry (5–8 minutes) after resting gives even more crispiness.
Can I air-fry or bake this instead of deep-frying?
Yes. Air fryer: preheat to 200°C/400°F, lightly spray the coated chicken with oil and air-fry 12–16 minutes, flipping halfway, until golden and cooked through. Oven: bake at 220°C/425°F for about 20–25 minutes (flip once) and finish under a broiler for a minute if you want extra color. Both methods yield less oil but slightly different texture than deep-frying.
How should I store leftovers and reheat to keep the chicken crispy?
Store cooked chicken in an airtight container in the refrigerator for up to 3–4 days, or freeze for up to 2 months. To reheat and restore crispiness, use a preheated oven or air fryer at 200°C/400°F for 8–10 minutes (until hot). Avoid microwaving unless you don’t mind a softened crust.
Conclusion: Enjoy Your Homemade Burger!
There’s a lot of satisfaction in making a spicy crispy chicken burger at home: the smell while it fries, the audible crunch when you bite, and the way the sauce melts into the bun. I hope the tips above help you avoid the mistakes I made on round one and get straight to the good stuff. Try one change at a time — maybe swap in breast for a lighter bite, or dial the gochugaru up for weekend heat. If you post your version, tag it with how you tweaked the spice or sides — I love seeing people make recipes their own.
Final note: this recipe makes 4 generous burgers and takes about 40 minutes of active time plus marinating. Don’t rush the dredge and rest steps; they’re the reason the crust comes out restaurant-worthy.
Spicy Crispy Chicken Burger
Ingredients
Method
- Mix all the wet seasoning better in a bowl.
- Add chicken thigh and coat every single piece with the marinate.
- Marinate for at least 3 hours or overnight.
- Mix all the dry mix ingredients in a bowl.
- Mix all the sauce ingredients together in a bowl.
- Take a piece of chicken thigh and lightly dredge it in the dry mix.
- Dip the chicken in ice cold water for 5 seconds.
- After lifting, wait for 10 seconds before putting it back into the dry mix.
- Dredge the chicken again, coating every inch.
- Let it rest for 5 minutes before frying.
- Deep fry in hot oil until golden brown.
- Let it rest, then sprinkle with salt and more gochugaru.
- Toast the burger buns and spread a generous amount of sauce on them.
- Assemble the burger with chicken, cheese, and lettuce. Serve and enjoy!