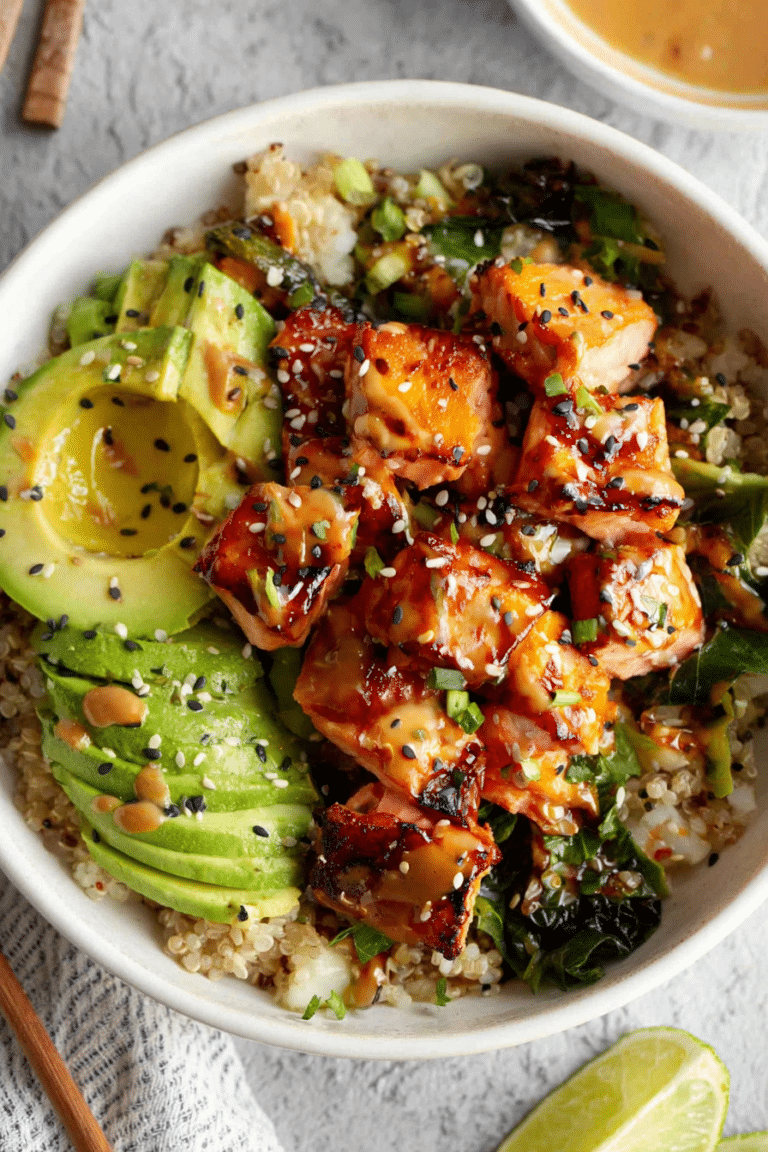
I cook a lot of weeknight dinners, and this sticky chicken bowl is one I keep coming back to when time is short and hunger is high. It hits that sweet‑and‑spicy spot, comes together fast, and cleans up even faster — exactly what my weeknights need. I first started tweaking the glaze until it clung to the chicken and the edges caramelized just right; that small change made all the difference.
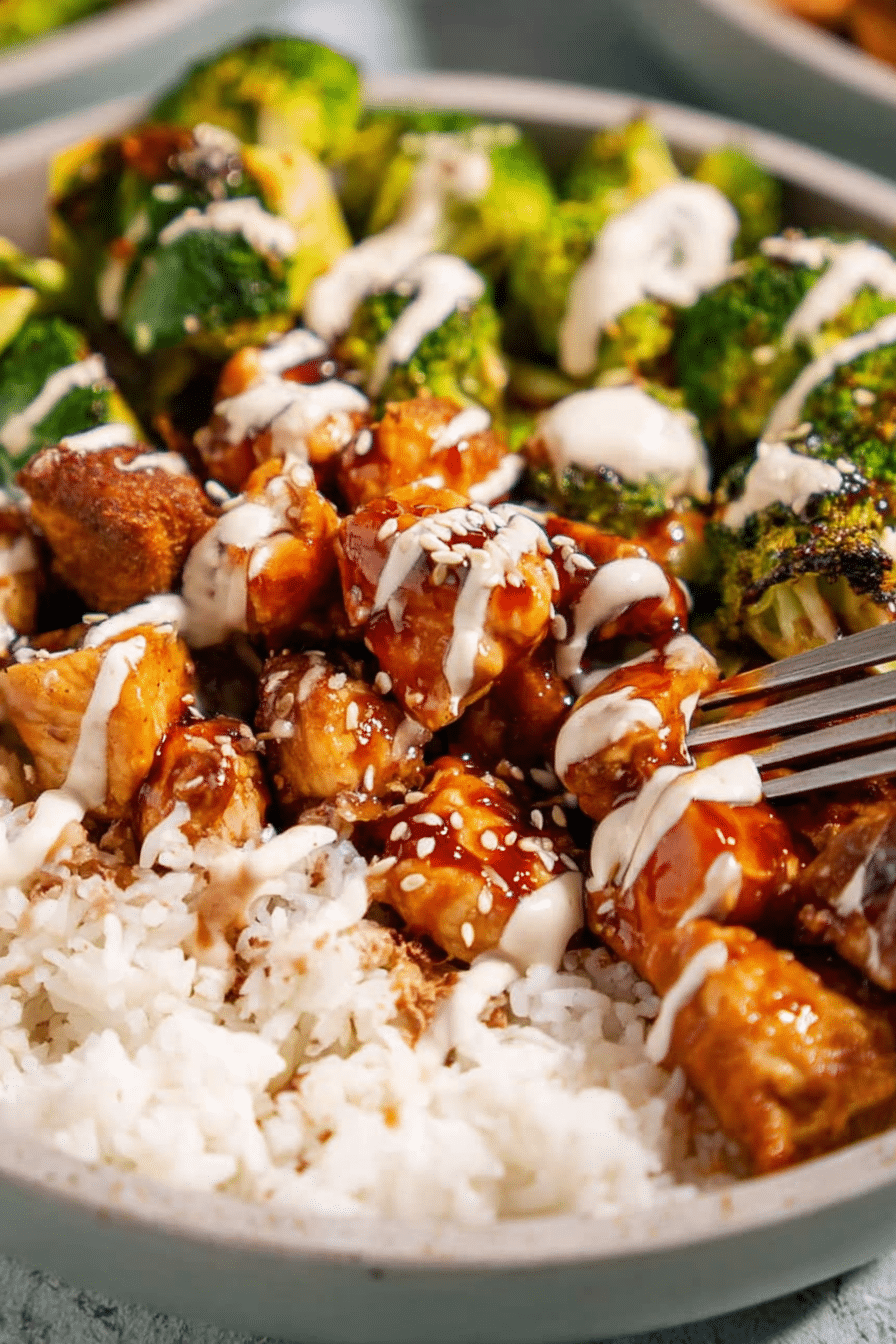
I like to keep the prep minimal: cut the chicken into even pieces so everything cooks uniformly, get rice going first, and then finish the chicken and sauce while vegetables steam. The result is a bowl that looks colorful, smells sweet and tangy, and has a pleasant sticky sheen that makes each forkful feel satisfying.
Over the years I’ve learned small, practical tweaks that save time without sacrificing flavor — simple swaps for lower sodium, make‑ahead sauce, and alternative proteins so the recipe works for different diets. If you’re feeding a family or just want an easy solo dinner, this recipe delivers reliable results and flexible options.
Everything You Need for Sticky Chicken Bowls
Lay everything out before you start so the cooking flow is smooth. Here’s a conversational run‑through of the main ingredients and why they matter, plus common swaps and equipment that make this recipe work for busy cooks.
- Boneless chicken – The canvas for the sticky glaze; thighs add extra juiciness while breasts keep it lean.
- Oil – For browning and preventing sticking; use neutral oil or a mild sesame oil for extra aroma.
- Garlic – Fresh adds bright savory notes; garlic powder can stand in if you’re out of fresh cloves.
- Soy sauce – Provides the salty, savory backbone; low‑sodium versions keep salt in check, and tamari makes it gluten‑free.
- Honey – The sweetener that gives the glaze its sticky quality; maple syrup or coconut sugar are good swaps for different flavors.
- Brown sugar (optional) – For extra caramelization and depth; omit or use coconut sugar for a less refined option.
- Vinegar (rice vinegar or lemon) – Balances the sweetness and brightens the sauce; choose what you have on hand.
- Chili flakes – For heat; reduce or skip to make the sauce milder.
- Cooked rice – The base that soaks up sauce; try brown rice, quinoa, or cauliflower rice for lighter options.
- Green onions – Fresh garnish that adds color and a mild bite.
- Sesame seeds – For nutty crunch and visual contrast.
- Spicy mayo – A quick drizzle made from mayo and hot sauce brightens the bowl; swap for yogurt sauce for a lighter finish.
- Optional vegetables (broccoli, snap peas, carrots) – Add texture and color; steam or quickly stir‑fry for best results.
- Equipment – A nonstick or stainless skillet for the sauce, a pot or rice cooker for rice, and a sharp knife for even cuts. A slow cooker or pressure cooker works if you want hands‑off methods.
How to Make Sticky Chicken Bowls (Step-by-Step)
These steps keep the process fast and predictable. Cut the chicken evenly so it finishes at the same time, and use the sauce timing below to get that perfect glaze without burning.
- Prep and rice: Start rice first so it’s ready when the chicken is done; I usually have rice steaming while I prep the chicken and sauce.
- Cut chicken even: Cut chicken into small, even pieces so they brown and finish at the same rate — aim for uniform bites.
- Pan method — sear then glaze: Heat oil over medium or medium‑high. Add chicken in a hot pan, leave it undisturbed for a short sear, then stir and finish cooking until just done. Add minced garlic near the end of browning so it doesn’t burn.
- Add sauce and reduce: Pour the sauce over the chicken, bring to a simmer, and let it reduce until it thickens and coats the pieces. Watch the heat — medium to medium‑low keeps the sugar from scorching.
- Vegetables: Steam or pan‑sauté broccoli and other veggies until crisp‑tender and bright green; they should still have a bite to contrast the sticky chicken.
- Slow cooker option: Brown the chicken quickly in a skillet for color, transfer to the slow cooker with sauce, and cook on low for several hours until tender; finish by reducing the sauce on the stove if needed.
- Instant Pot/pressure cooker: Use a quick sauté to brown, then pressure cook briefly. Release, remove chicken, and simmer the sauce on sauté mode to thicken.
- Finish and serve: Spoon warm rice into bowls, top with sticky chicken and vegetables, then garnish with green onions, sesame seeds, and a drizzle of spicy mayo.
The Secret to the Perfect Sticky Texture
Perfect stickiness comes down to three things: sauce ratio, heat control, and finishing technique. Focus on those and you’ll get a glossy, clingy glaze instead of a thin sauce.
- Balance the sweet and salty: The right ratio of honey (or sweetener) to soy sauce determines how syrupy the glaze becomes when reduced.
- Reduce without stirring too much: Let the sauce bubble gently so water evaporates; excessive stirring cools the pan and prevents proper reduction.
- Control the heat: Too high and the sugars will burn; medium to medium‑low lets the sugars caramelize slowly and coat the chicken evenly.
- Finish off the heat: Remove the pan from direct heat once the sauce is glossy and clings to a spoon — residual heat will thicken it slightly more without overcooking the chicken.
- Optional thickener: If you want an extra‑sticky finish, whisk a small amount of cornstarch slurry into the sauce at the end and simmer briefly until glossy.
Why Using Fresh Ingredients Matters
Fresh ingredients sharpen flavors and textures, especially in quick recipes where every ingredient is tasted. Fresh garlic, bright green broccoli, and a good soy sauce make the bowl sing.
- Fresh vs bottled: Fresh garlic and fresh citrus add brightness that bottled seasonings can’t replicate.
- Vegetables: Crisp, just‑cooked vegetables bring texture contrast and color; frozen works in a pinch but will be softer.
- Sauces and sodium: Using low‑sodium soy lets you control salt and highlight the glaze’s other elements rather than masking them.
- Aroma and satisfaction: Fresh ingredients release aromas as they cook — that sweet, garlicky steam is part of what makes the meal feel homey and complete.
Pro-Tip for Making the Best Sticky Chicken Bowls
I use these practical tips when I want a reliably great bowl with minimal fuss.
- Make the sauce ahead: I sometimes mix the sauce the night before so the flavors meld and the cook night is faster.
- Marinate briefly: If you have 30 minutes, let the chicken sit in a little sauce for deeper flavor; it’s a quick meal prep win.
- Reserve a little sauce: Keep some of the sauce aside before adding to the pan to use as a finishing drizzle for fresh shine.
- Use seasonal vegetables: Swap in seasonal produce to keep the bowls interesting and nutritious.
- Leftovers as marinade: I often save leftover sauce to marinate tofu or roast vegetables the next day.
Troubleshooting
If something goes sideways, here are quick fixes I use in my kitchen.
- Sauce is too thin — simmer a bit longer over medium‑low or add a small cornstarch slurry to thicken.
- Sauce is too sweet — add a splash more vinegar or a squeeze of fresh lemon to balance.
- Chicken is dry — reduce cooking time and cut pieces a little larger next time; thighs tolerate longer cooking.
- Sugar burning — lower the heat and deglaze the pan with a splash of vinegar or water to loosen the fond and prevent bitter char.
Storage Tips for Leftover Sticky Chicken Bowls
Store properly to keep texture and flavor for busy weekday meals.
- Refrigerate in airtight containers: Keeps well for up to three days; store rice and chicken together or separately depending on your reheating preference.
- Freezing: Freeze portions in freezer‑safe containers for up to 2–3 months; thaw overnight in the refrigerator before reheating.
- Reheating: Gently reheat on the stove over low heat with a splash of water, or microwave covered for short bursts to keep the chicken moist.
- Meal prep containers: Use shallow containers so food cools quickly and reheats evenly for grab‑and‑go lunches.
Variations to Try with Sticky Chicken Bowls
Use these variations to tailor the bowls to your diet, pantry, or seasonal produce.
- Plant‑based: Swap chicken for firm tofu or tempeh; press tofu for better browning and let the sauce cling as it cooks.
- Different proteins: Use shrimp, salmon, or thin steak slices for a change of pace; adjust cooking times accordingly.
- Flavor twists: Add grated ginger to the sauce, swap honey for maple for a different sweetness profile, or stir in a spoonful of hoisin for depth.
- Grain swaps: Try brown rice, bulgur, or cauliflower rice for lower carbs or different textures.
- Veggie-forward: Add roasted sweet potatoes, sautéed mushrooms, or bell peppers to vary color and nutrition.
Nutritional Information and Healthy Ingredient Swaps
Here’s the basic nutritional snapshot and easy swaps to make the bowl lighter or lower in sodium without sacrificing flavor.
- Nutrition snapshot: The recipe as written provides approximately 559 kcal, 25 g fat, 73 g carbohydrates, and 15 g protein per serving — adjust portions and swaps to fit your goals.
- Lower calories: Use a lighter oil, swap regular mayo in the spicy drizzle for plain yogurt, or choose cauliflower rice to reduce carbs.
- Lower sodium: Use low‑sodium soy or tamari and taste before adding extra salt.
- Swap sweeteners: Replace refined brown sugar with coconut sugar or reduce the sweetener and rely on a touch more vinegar for balance.
- Boost protein: Use chicken thighs or add edamame to raise the protein content and make the bowl more filling.
Frequently Asked Questions
Can I use chicken thighs instead of breasts for this recipe? Absolutely! Chicken thighs will add even more flavor and juiciness to your sticky chicken bowls.
How do I make the sauce less spicy? You can reduce or omit the chili flakes to make the sauce milder. Adjust to your personal taste!
Can I prepare this recipe in advance? Yes! You can marinate the chicken and prepare the sauce ahead of time. Just store them in the fridge until you’re ready to cook.
What can I serve with sticky chicken bowls? These bowls are great on their own, but you can pair them with steamed vegetables, a side salad, or even some crispy wontons for added crunch!
How do I store leftovers? Store leftovers in an airtight container in the fridge. They should last for up to 3 days. Reheat in the microwave or on the stove for best results!
Sticky Chicken Bowls Recipe
Ingredients
Method
- Cut the chicken into small, even pieces.
- Heat oil in a skillet over medium heat.
- Add the chicken and cook until lightly browned.
- Stir in the minced garlic and sauté for a few seconds.
- Mix soy sauce, honey, brown sugar, and vinegar in a bowl.
- Pour the sauce mixture over the chicken.
- Let the mixture simmer until it begins to thicken.
- Spoon warm rice into serving plate.
- Top the rice with the sticky chicken and garnish with green onions, Spicy Mayo Sauce and sesame seeds.