I cook fast on weeknights, and these teriyaki chicken meal prep bowls are my go-to when I need healthy lunches ready for the week. I like that the oven does most of the work so I can handle rice and prep while the chicken roasts. The kitchen fills with the sweet, soy-forward aroma of the sauce and the bright snap of roasted bell peppers and broccoli—that smell means dinner (or tomorrow’s lunch) is handled.
I usually prep this recipe on a Sunday evening or a busy weeknight. I let the chicken rest after roasting so the sauce re-coats each bite in a glossy coating—this is key to juicy chicken and thick sauce. When I open the fridge the next day, the bowls still look vibrant: green broccoli, red peppers, glossy dark-brown chicken, and fluffy rice.
If you want fast, healthy, and satisfying meals for the week, this method keeps things simple and reliable. Read on for the exact gear, ingredient notes, timing tips, and quick troubleshooting I use in my kitchen.
Why These Teriyaki Chicken Meal Prep Bowls Are Perfect for Busy Weeks
These bowls are built around time efficiency and make-ahead convenience. I designed the process so the oven handles the chicken and veggies together—freeing the stovetop for rice. The whole process takes about 35 minutes from start to finish, and it yields four portions so you can cut down on daily cooking.
- Quick turnaround: about 35 minutes total, which is perfect for weeknights when you don’t have time for long recipes.
- Oven-first approach: roasting the chicken and vegetables at the same time frees up burners and reduces hands-on time.
- Meal-prep friendly yield: four bowls means grab-and-go lunches for several days, saving time and mental energy during the week.
- Sensory note: the kitchen fills with a sweet-savory teriyaki aroma while the roasted veggies add bright color and texture to the bowls.
Everything You Need for Teriyaki Chicken Meal Prep Bowls
Keep your shopping trip focused by separating pantry staples from fresh items. Use low-sodium soy sauce to control salt, and swap in a gluten-free soy sauce or tamari if needed. Below I list the main ingredients and the tools that make this method fast and predictable.
- Pantry staples – soy sauce (low sodium preferred), honey, cornstarch (for thickening), mirin (real mirin for depth), and cooking oil.
- Fresh ingredients – chicken breasts, fresh ginger, garlic, broccoli florets, and bell peppers for color and crunch.
- Tools – an oven-safe baking dish for the chicken and sauce, a rimmed baking sheet for the veggies, a reliable thermometer to check chicken doneness, and a pot or Instant Pot for rice.
- Substitutions – use gluten-free soy sauce or tamari if you need a gluten-free option; swap chicken for tofu or shrimp for different proteins.
The Secret to a Thick, Glossy Teriyaki Sauce
The thick, glossy finish comes from a simple cornstarch slurry and the right balance of salty, sweet, and umami. Real mirin gives a subtle sweetness and depth that imitation products can’t match—if you have it, use it. The sauce should cling to the chicken like a sticky glaze, not run off in a thin puddle.
- Make a smooth slurry by whisking cornstarch into cold water before adding it to hot liquids—this prevents lumps and produces a clear, glossy finish.
- Balance the sauce: soy sauce provides salt and umami, honey adds sweetness, mirin rounds the flavor, and fresh ginger and garlic add aromatic lift.
- Add the slurry toward the end of cooking and heat just until the sauce thickens; overcooking can make it gummy.
- Sensory note: the finished sauce should have a shiny sheen and a warm, caramelized aroma that makes the kitchen smell like a quick takeout counter—without the wait.
Best Rice and Grain Options for Fast Meal Prep
Rice choice affects texture and how the bowls hold up through the week. Jasmine is fragrant and slightly sticky, which helps rice and sauce mingle. Basmati stays light and separate. If you want lower carbs or faster cook times, use quick-cook quinoa or riced cauliflower.
- Jasmine rice: fragrant, slightly sticky, pairs well when you want a cohesive bowl.
- Basmati rice: fluffier and drier, good if you prefer separated grains.
- Quinoa: cooks quickly and adds protein; use pre-rinsed quinoa for best texture.
- Cauliflower rice: a low-carb option that reheats quickly; lightly steam or sauté so it doesn’t become watery in the fridge.
- Cooking tip: if you cook rice on the stovetop, use the proper water ratio and rest it covered for a few minutes—this gives you fluffy, separate grains every time.
Timing Tips: Cook Chicken and Veggies Together Without Stress
Timing keeps things moving and prevents overcooked chicken or soggy veggies. I arrange the oven racks so the chicken and vegetables fit comfortably side-by-side and roast at the same temperature. Prep the sauce and rice before you start roasting to streamline the final steps.
- Preheat the oven and position racks so you can fit the chicken dish and a sheet pan of vegetables without crowding.
- Start the chicken in the oven, then slide the veggies in partway through so they finish when the chicken is resting—this prevents under- or over-roasting.
- Cook rice while the chicken roasts so everything comes together within the 35-minute window.
- Rest the chicken after cooking so juices redistribute—this improves moisture and helps the sauce cling to cubed chicken when you slice it.
- Sensory note: moving the sheet pan in and out releases a burst of roasted sweetness and toasty vegetable aroma that signals the final 10 minutes of cooking.
How to Make Teriyaki Chicken Meal Prep Bowls (Step-by-Step)
- Preheat your oven to 400°F (200°C). Pat chicken dry so the sauce adheres evenly.
- Whisk a cornstarch slurry in cold water until smooth; add it to an oven-safe dish with soy sauce, mirin, grated ginger, chopped garlic, and honey, and stir until combined.
- Place chicken breasts into the teriyaki mixture in the dish and transfer to the hot oven. Roast until the chicken reaches an internal temperature of about 155°F; it will rise to the safe target while resting.
- Meanwhile, toss broccoli florets and sliced red bell peppers with avocado oil, salt, and pepper on a rimmed baking sheet. Roast for 15–20 minutes depending on how crisp or tender you like them, placing the sheet pan in the oven alongside the chicken.
- Cook your rice on the stovetop or in an Instant Pot while the chicken and veggies roast. Fluff and keep covered until assembly.
- Remove chicken and veggies from the oven. Let the chicken rest for about 10 minutes so it stays juicy. The teriyaki sauce will thicken in the hot baking dish into a glossy, jelly-like coating.
- Slice the chicken into bite-sized pieces, return it to the thickened sauce in the dish, and stir to coat well so the sauce clings to each piece.
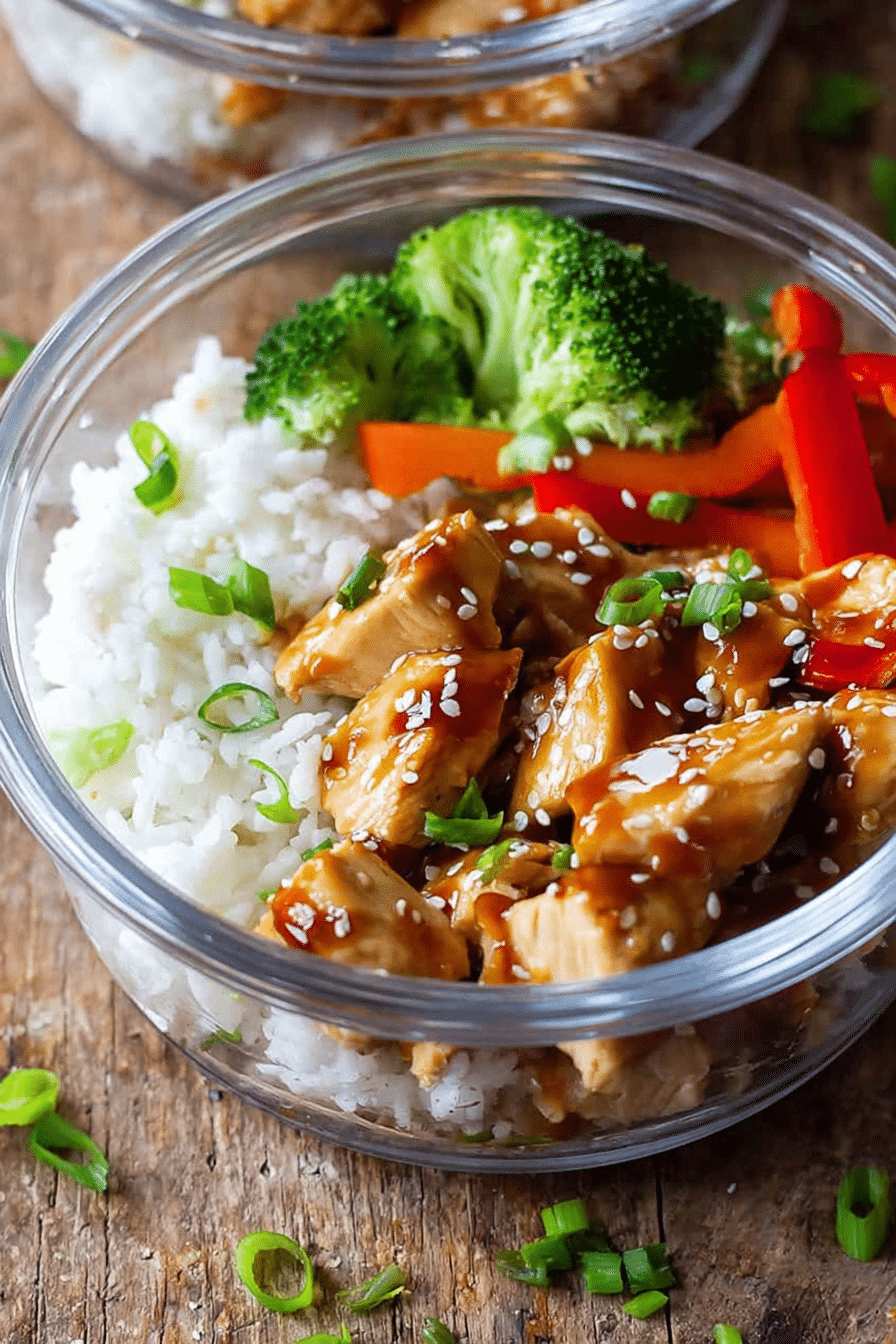
- Divide rice, chicken tossed in teriyaki sauce, and roasted vegetables into four meal prep containers. Garnish with sesame seeds and sliced spring onions. Store in the fridge for up to four days.
Pro Tip for Teriyaki Chicken Meal Prep Bowls: Gluten-Free & Low‑Carb Swaps
- Gluten-free option: use tamari or a certified gluten-free soy sauce; keep the same quantity so the balance of flavor remains intact.
- Low-carb swap: replace rice with cauliflower rice or shredded cabbage—sauté quickly to remove excess moisture before assembling bowls.
- Plant-based protein: press and drain firm tofu, roast it alongside the vegetables, and toss it in the teriyaki sauce at the end for best texture and flavor absorption.
- Lower sugar: reduce the honey slightly or swap in a sugar-free liquid sweetener, then taste and adjust so the sauce still has a pleasant balance.
- Salt control: use low-sodium soy sauce and adjust salt at the end if needed; I taste before serving and add a pinch if the veggies mute the sauce.
Troubleshooting
- If the sauce is lumpy: I whisk the cornstarch into cold water thoroughly before adding it to hot liquids—if lumps form, strain the sauce through a fine-mesh sieve.
- If the sauce is too thin: simmer it a little longer and then whisk in a tiny extra bit of slurry; heat gently until it thickens to a glossy coat.
- If the chicken is dry: make sure to rest the chicken after roasting; if you overcook, slice it thin and toss it in the sauce to help rehydrate the meat.
- If veggies are soggy: roast them on a single layer with space between pieces and avoid overcrowding the pan so steam can escape and edges can caramelize.
Variations
- Spicy teriyaki: add a splash of sriracha or chili paste to the sauce for heat without changing the method.
- Sesame-citrus: finish with a squeeze of lime and a sprinkle of toasted sesame seeds for a brighter finish.
- Mixed-grain bowls: use a blend of farro and rice or brown rice for nuttier texture and longer shelf life in the fridge.
- Vegetable-forward: bulk up with snap peas, carrots, or roasted eggplant for variety and extra nutrients.
How to Store, Reheat and Customize Your Teriyaki Chicken Meal Prep Bowls
Store the bowls in airtight containers in the fridge for up to four days. Keep sauces and wet components together so the chicken soaks in flavor, or separate if you prefer keeping grains drier until reheating.
- Storage: use airtight containers and cool the food to room temperature before sealing to avoid excess condensation.
- Reheating (microwave): cover loosely and heat in 60–90 second intervals, stirring in between so the sauce heats evenly; add a splash of water if rice feels dry.
- Reheating (stovetop): reheat chicken and sauce gently in a skillet over medium-low heat with a teaspoon of water or stock to loosen the sauce; add veggies at the end to avoid overcooking.
- Customize at service: add toasted nuts, a soft-boiled egg, pickled vegetables, or extra spring onions and sesame seeds to change the bowl each day.
Frequently Asked Questions
How long can I store the Teriyaki Chicken Meal Prep Bowls in the fridge?
You can store the Teriyaki Chicken Meal Prep Bowls in the fridge for up to 4 days. Just make sure to keep them in airtight containers!
Can I make this recipe gluten-free?
Absolutely! Simply use gluten-free soy sauce or tamari instead of regular soy sauce, and you’ll have a delicious gluten-free meal prep option.
What can I use instead of chicken?
You can swap the chicken for tofu, shrimp, or even a mix of your favorite vegetables for a plant-based option!
How can I customize the veggies in the meal prep bowls?
Feel free to use your favorite veggies! Snap peas, carrots, or zucchini all work great and add variety to your meal prep.
Is there a way to make the teriyaki sauce less thick?
Yes! If you prefer a thinner teriyaki sauce, you can reduce the amount of cornstarch or add a bit more water or low-sodium soy sauce to achieve your desired consistency.
Teriyaki Chicken Meal Prep Bowls
Ingredients
Method
- Preheat oven to 400F (200C).
- Add cornstarch and cold water to a small bowl and whisk until no lumps are left.
- Add cornstarch slurry to an oven-proof baking dish, soy sauce, real mirin, ginger, garlic, honey and whisk until well combined.
- Add chicken breasts to teriyaki sauce and place in the hot oven for approximately 25 minutes or until the chicken has an internal temperature of 155F.
- In the meantime, add broccoli florets and bell pepper slices to a large baking sheet, drizzle with avocado oil, season with sea salt and pepper, and then place next to the chicken in the oven for 15-20 minutes.
- While everything is in the oven, cook your rice in either the Instant Pot or on the stovetop.
- Remove chicken and veggies from the oven and let the chicken rest for approximately 10 minutes.
- Then remove the chicken from the sauce, cut into bite-sized cubes, and return to the teriyaki sauce.
- Divide chicken, teriyaki sauce, veggies, and rice into 4 meal prep containers, garnish with sesame seeds and sliced spring onion, and store in the fridge for up to 4 days.