I started making baked cabbage chips when I wanted a crunchy snack that didn’t derail a healthy day. After a few rounds of trial and error in my kitchen I learned how to coax deep golden edges and a satisfying snap from humble cabbage leaves. I like these because they’re fast, forgiving, and require almost no prep — perfect for weekday cravings.
What sold me on cabbage chips was how little they ask of the pantry: a head of cabbage, a pinch of salt, and a touch of oil if you want it. They’re dramatically lower in calories than deep-fried chips and work with vegan, keto, Paleo, and gluten-free plans. In my kitchen the smell of roasting cabbage is oddly comforting — a toasty, slightly sweet aroma that suggests something very good is happening.
I’ll walk you through the tools and small technique tweaks that make the difference between limp, soggy leaves and crisp, golden chips. I’ll also share easy swaps (including an oil-free option), seasoning ideas I reach for, and how I store them so they stay crunchy between snack sessions.
Why Baked Crispy Cabbage Chips Are the Guilt-Free Crunch You Need
These chips are a low-calorie alternative to conventional snack chips because cabbage itself is mostly water and fiber, so you get volume and a satisfying mouthfeel with far fewer calories. They fit vegan and keto plans with minimal adjustments and naturally skip gluten and added sugars. Cabbage brings vitamins, antioxidants, and fiber — so the snack is more than empty crunch: it has micronutrient value and fills you up faster than air-puffed options.
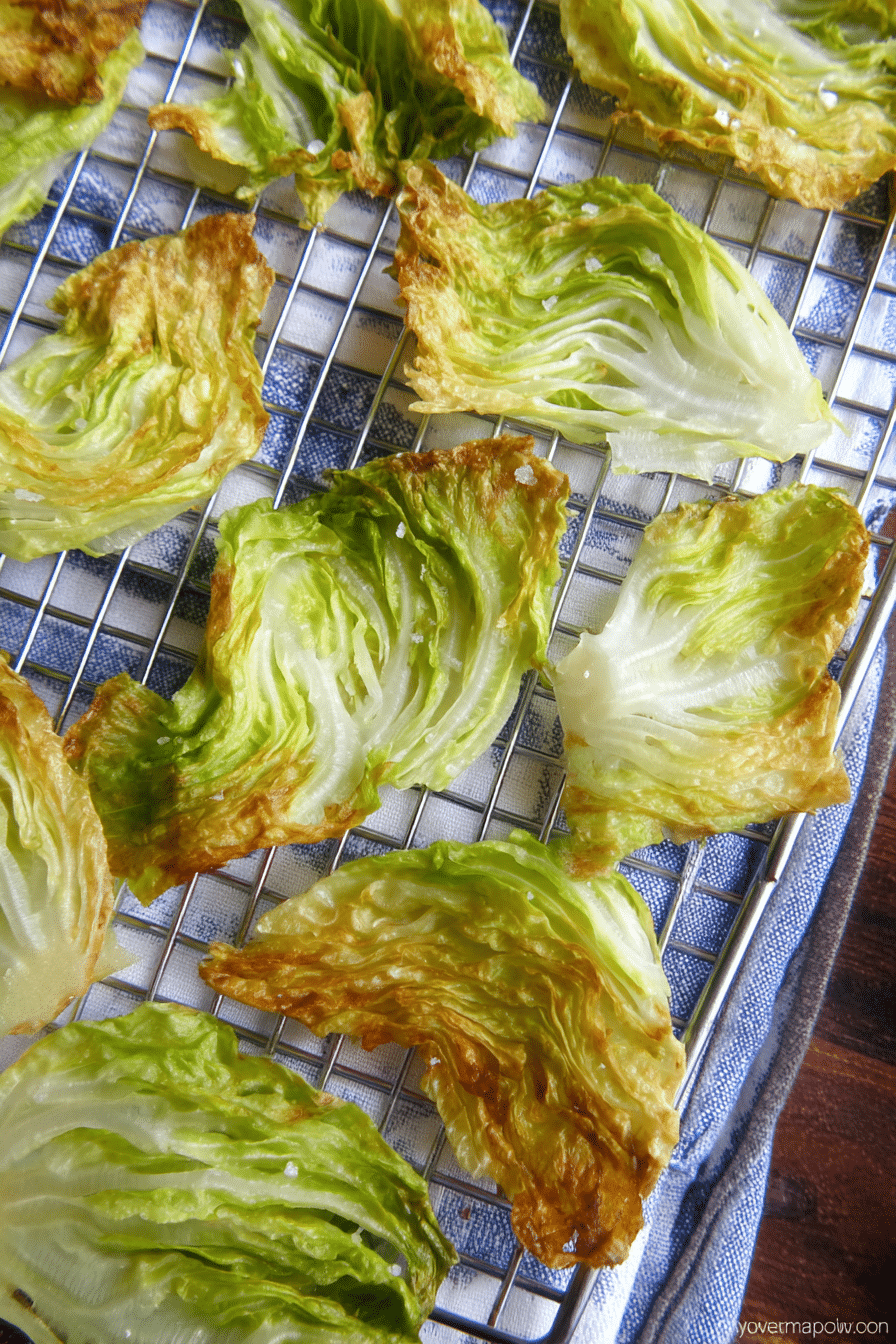
Visually, the best batches turn a pale green to warm, deep amber at the edges; you should hear a crisp snap when you bite. The aroma while baking leans savory-sweet and toasted, which primes your appetite but with none of the heaviness of fried snacks.
Everything You Need for Baked Crispy Cabbage Chips
This recipe is famously simple. Below I list the core pantry items and the equipment that will help you get evenly browned, crispy chips. I also include alternatives if you don’t have the exact tool on hand.
- Ingredient List (conversational) — A quick overview of the main players:
- Ingredient – Cabbage: the base of the chips; green cabbage is reliable, red cabbage adds color, and savoy can be more tender and slightly quicker to crisp.
- Ingredient – Oil: promotes even browning and crisp texture; choose neutral oils or avocado/olive for flavor. Use none for an oil-free version (chips will be less deeply browned).
- Ingredient – Salt: essential for seasoning and for drawing a bit of surface moisture during roasting; adjust to taste.
- Ingredient – Optional seasonings: garlic powder, smoked paprika, nutritional yeast, chili flakes, or herb blends to dial flavor up or down.
Essential equipment:
- Large rimmed baking sheet (or two) — for a single-layer bake.
- Wire cooling rack that fits inside the baking sheet — lifts leaves for air circulation and crisping.
- Parchment paper — a fine alternative if you don’t have a rack; you may flip pieces halfway through for more even color.
- Air fryer or dehydrator — optional alternatives that I cover below.
If you’re a fan of cabbage, try these miso butter roasted cabbage wedges for another delicious twist!
The Secret to Perfectly Crispy Cabbage Chips
Getting consistent crunch is about managing moisture and surface contact. I learned that the thinner and drier a piece is going into the oven, the crisper it will be coming out.
- Trim the core well so you’re not left with dense, water-heavy pieces that take much longer to dry and brown.
- Pat thicker leaves with a towel or let them air-dry briefly after washing; excess surface water is the enemy of quick crisping.
- Temperature and time: I use 300°F (about 150°C) as a reliable starting point. Expect roughly 30–35 minutes for average green cabbage leaves; thinner or red cabbage can finish in 20–30 minutes, while very thick or core-adjacent pieces may need up to 40 minutes.
- Oil vs. oil-free: a light coat of oil helps the surface brown and gives a sturdier crunch. If you skip the oil, plan on slightly longer baking and watch the edges — the chips will crisp but remain paler.
- Even spacing is key: overlap a little if you must, but overcrowding traps steam and leads to floppy pieces. A wire rack inside your sheet pan makes a big difference for even airflow and browning.
Why Oven Temperature and Time Matter for Crispiness
Heat is your tool for evaporating water from the leaves and triggering Maillard browning at the edges; the balance of temperature and time decides whether a leaf crisps or burns.
- Temperature range: low-and-slow (275–300°F / 135–150°C) lets moisture escape before the edges darken too quickly and is forgiving for thicker leaves. A slightly higher temp (about 325°F / 160°C) shortens baking time but requires closer attention.
- Leaf thickness impacts time: very thin savoy or shredded leaves will dry out fast; dense green leaf segments near the core need longer. Adjust by 5–10 minutes depending on thickness.
- Even heat distribution: rotating the pan once during baking and using a rack help avoid hot spots and patchy browning. If you’re using parchment only, pause once to flip over the larger pieces.
- Endgame check: darker, ambered edges indicate crispness. Slightly darker spots are okay — fully blackened areas are burnt, so pull chips before they cross that line.
Air Fryer, Dehydrator, or Grill: Alternative Cooking Methods
These alternatives let you adapt based on equipment and the texture you want. I’ve used all three and here’s how I approach each.
- Air fryer – Quick and efficient. Preheat to around 320–350°F (160–175°C) and cook in a single layer for short bursts of time, checking often. Expect crisp results in under 15 minutes depending on leaf thickness; shake the basket every few minutes for even color.
- Dehydrator – Preserves more raw nutrients and creates a lighter, drier crisp. Set to a low temperature (roughly 120–135°F / 50–57°C) and dehydrate for several hours until fully dry and brittle. This is great if you want shelf-stable chips without oil.
- Grill – For a smoky edge: use indirect heat and cook until leaves lose moisture and char slightly at the edges. I like quick blasts over very low direct heat to avoid burning — the result is more rustic and with a pleasant charred aroma.
How to Make Baked Crispy Cabbage Chips (Step-by-Step)
- Preheat your oven to about 300°F (150°C) and fit a wire rack inside a large rimmed baking sheet, or line the sheet with parchment.
- Remove the tough core and tear or cut leaves into medium-to-large pieces so they can lay mostly flat.
- Place the pieces in a bowl. Drizzle with a little oil if using, sprinkle with salt, and toss with your hands so each piece gets a light coating. For oil-free, skip the oil and toss with salt only.
- Arrange pieces on the rack or parchment in a mostly single layer. A little overlap is okay but avoid densely stacking them.
- Bake for about 30–35 minutes for typical green cabbage, checking toward the end. Thin or red cabbage may finish earlier (20–30 minutes); thicker pieces near the core may need 35–40 minutes. Remove when edges are deep golden and the leaves look dry.
- Cool completely on the rack or sheet — chips firm up as they cool. Taste and adjust salt or other seasonings while still slightly warm.
- Variation note: if you want a crisp similar to pan-fried texture, try crisping small batches quickly in an air fryer instead. For other cabbage preparations, you might enjoy this
If you’re looking for more cabbage-based ideas, check out this recipe for easy fried cabbage.
Flavor Variations: Savory, Spicy, and Gourmet Seasonings
Seasonings are where these chips become your signature snack. Below are blends I rotate through that keep the snack interesting.
- Sea Salt & Cracked Pepper – Classic and simple; highlights the cabbage’s natural sweetness.
- Garlic-Parmesan (vegan option) – Garlic powder + nutritional yeast for a cheesy note without dairy.
- Smoky Paprika & Cumin – Adds depth and a faint smokiness that pairs well with roasted veggies.
- Spicy Chili-Lime – Chili flakes or cayenne with a squeeze of lime afterward (or lime zest before baking) for bright heat.
- Gourmet Herb Blend – Dried thyme, rosemary, and lemon zest for a grown-up profile ideal for pairing with richer mains.
To pair with your cabbage chips, consider serving them alongside creamy garlic chicken for a balanced meal.
Pro Tip for baked crispy cabbage chips: Adjust Time for Leaf Thickness
- Thin leaves finish faster: check 10–15 minutes earlier than the average time if your leaves are fragile or shredded.
- Thick or core-adjacent pieces need more time: give them extra minutes in the oven and place them toward the center of the baking sheet where heat is more consistent.
- Darker edges usually mean crispness — pull them when the edges are amber-brown rather than waiting for uniform color across the whole leaf.
- I recommend watching closely in the last 5 minutes; a minute or two can be the difference between golden and burnt.
Troubleshooting
- Floppy chips: you likely had too much overlap or leftover surface moisture. Try a rack or pat leaves dry first.
- Uneven browning: rotate the pan halfway through, or use a wire rack to promote airflow.
- Too dark but still soft: lower the temperature and lengthen the time so moisture has time to escape before edges char.
How to Store, Meal-Prep, and Serve Cabbage Chips
When I meal-prep these, I make a single batch and portion into airtight containers once completely cool. They keep best at room temperature for a day or two; beyond that they slowly lose crunch. A quick re-crisp in a hot oven or air fryer for a minute or two refreshes them nicely.
- Storage: Fully cool the chips, then store in a dry airtight container at room temperature. Avoid refrigeration — it softens them.
- Meal-prep strategy: make multiple batches and keep plain chips that you can season right before serving to vary flavors throughout the week.
- Serving ideas: pair with dips like hummus, herbed yogurt-style vegan dips, or use as a crunchy element on top of salads.
For a hearty option, consider making cabbage steaks as a complement to your crispy chips.
Frequently Asked Questions
Can I make cabbage chips without oil?
Yes! You can make oil-free cabbage chips by simply seasoning the cabbage leaves with salt and baking them without any oil. They may not be as crispy, but they’ll still be delicious.
What can I season my cabbage chips with?
You can experiment with various seasonings! Try adding spices like garlic powder, paprika, or nutritional yeast for a cheesy flavor. Feel free to get creative with savory, spicy, or gourmet combinations!
How do I store leftover cabbage chips?
Store any leftover cabbage chips in an airtight container at room temperature. They are best eaten within a few days, as they may lose their crunch over time.
Can I use a different type of cabbage?
Absolutely! While the recipe uses green cabbage, you can also use red cabbage or savoy cabbage for a different flavor and color.
What is the best way to ensure my cabbage chips come out crispy?
The key to crispy cabbage chips is to make sure they’re arranged in a single layer on the baking sheet and to bake them until they are golden brown at the edges. Adjust baking time based on the thickness of your cabbage leaves for the best crunch!
Baked Crispy Cabbage Chips
Ingredients
Method
- Preheat oven to 300F (150C). Place a wire rack inside a large baking sheet OR line the baking sheet with parchment paper.
- Cut away the center core of each cabbage leaf. Cut or tear the cabbage leaves into medium to large size pieces.
- Place the cabbage pieces in a large bowl. Drizzle with the oil and sprinkle with the salt. Use your hands to toss and combine, rubbing the oil and salt over the cabbage.
- Arrange the cabbage pieces on the prepared rack or parchment-lined baking sheet (it is fine if the leaves overlap a bit).
- Bake in the preheated oven for 30 to 35 minutes or until dry in appearance and deep golden brown at the edges. Cool completely on the rack or baking sheet. Eat!