I make these banana bars on foggy school-morning rushes and slow Sunday afternoons alike. They’re one of those recipes I keep coming back to because they come together fast, use the bananas I always seem to have on the counter, and everyone always asks for another piece. I’ll tell you the little habits I’ve learned that keep them soft and the icing perfectly nutty.
My kitchen usually smells like warm bananas and browned butter when these come out of the oven — a tiny, toasty aroma that pulls everyone into the room. I like to make them when I need a quick dessert or a portable snack for school pickups. The bars hold up well in a lunchbox and the icing softens into a slightly melty blanket if the bars are still warm.
Over the years I’ve tweaked small things — when to fold the batter, how long to brown the butter for the icing, and when to frost so the topping gets that soft, glossy finish. Stick with a few simple tips below and these will become one of your quick favorites too.
Why These Banana Bars with Brown Butter Icing Are Perfect for Busy Families
These bars are quick to prep and bake, and they use ingredients you probably already have. I love that they give a homemade feel without a lot of babysitting time; you can mix the batter, pop it in the oven, and move on to other tasks while it bakes.
- Speed: The batter mixes in minutes and the bake time is short, which is great for weeknight desserts or last-minute snacks.
- Pantry-friendly: Most ingredients are staples — sugar, flour, eggs, a little dairy — so you rarely need a special store run.
- Kid-friendly texture: The bars stay soft and moist, making them perfect for little hands and lunchboxes.
I’ll never forget the time I pulled a warm pan from the oven while juggling backpacks and shoes — the house smelled like comfort, and somehow that made the chaos easier. These are the kind of recipes that feel like a little win on busy days.
Everything You Need for Banana Bars with Brown Butter Icing
Below I’ve listed the main ingredients and a few tools that make the process smoother. I’m keeping this conversational — no exact measures here, because your own taste and pantry can adapt. If you like banana-forward treats, you might also enjoy a twist with chocolate in these banana chocolate chip bars.
- All-purpose flour – Provides structure; swap with a gluten-free blend if needed.
- Sugar – Sweetens and helps with browning; light or granulated works fine.
- Butter – Adds richness to the bars; brown a separate portion for the icing. Use plant-based butter as a dairy-free option.
- Sour cream (or yogurt) – Keeps the bars tender and moist; plain yogurt is an easy swap.
- Egg – Binds the batter; substitute a flax egg for an egg-free version.
- Very ripe bananas – The main flavor and moisture source; the riper the sweeter.
- Baking soda & salt – Leavening and flavor balance; don’t skip the salt, it brightens the banana notes.
- Powdered sugar & vanilla – For the icing; powdered sugar gives the smooth texture and vanilla lifts the flavor.
- Milk or non-dairy milk – Used to thin the icing if needed; plant milks work well for dairy-free versions.
- Baking pan and parchment – Line the pan so you can lift the bars out easily; foil works if you’re out of parchment.
The Secret to Soft, Moist Banana Bars
The texture comes down to a few simple things I always pay attention to: very ripe bananas, keeping ingredients at room temperature, and gentle mixing. That combination gives a tender crumb that’s still sturdy enough to hold the icing without sogginess.
- Ripe bananas bring moisture and natural sugar — they keep the crumb soft and add flavor.
- Room-temperature butter and eggs blend more evenly into the batter, making the texture creamier.
- Mix just until combined — overmixing develops gluten and makes bars tougher.
When you bite into a well-made bar it should be soft and slightly springy, with a tight but tender crumb that gives way around the banana pieces.
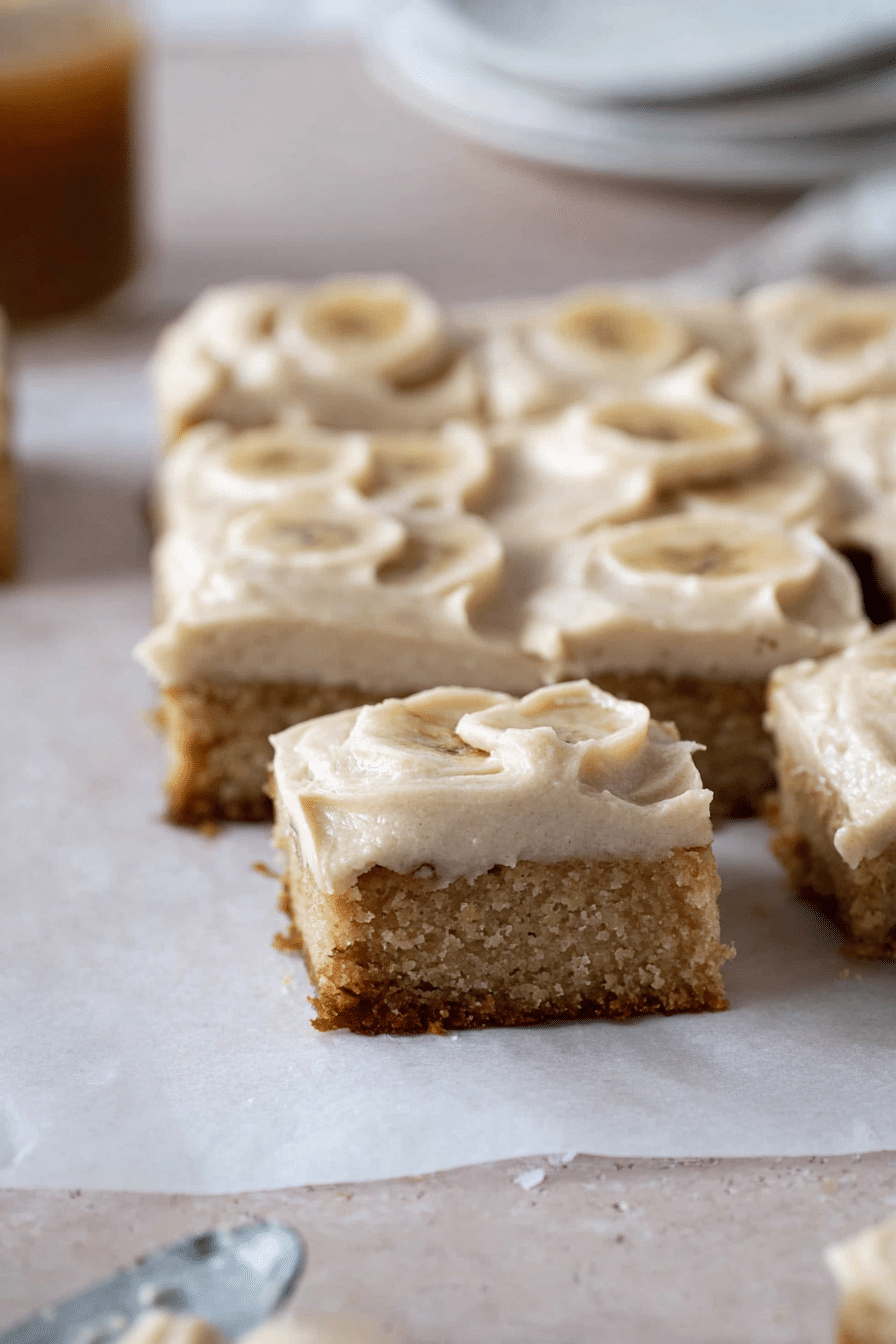
Why Brown Butter Makes the Icing So Nutty
Browning butter changes its flavor dramatically. As the milk solids toast they take on warm, toasty notes that read as a deep nutty flavor in the icing. That toasty edge plays beautifully against the sweet, smooth powdered sugar.
- Watch the butter as it melts: it will foam, then fall, then develop little brown flecks and a toasty aroma. Remove from heat right away to avoid burning.
- The browned bits are where the flavor lives — whisk them into the warm butter and then cool slightly before adding sugar so the icing stays smooth.
- Because brown butter is more flavorful, you can use a touch less sugar in the icing and still get a balanced result.
If you love brown butter notes elsewhere, try them in cookies too — they bring the same toasty depth to simple sweets like brown butter chocolate chip cookies.
How Ripe Bananas Change Texture and Sweetness
As bananas ripen, starches convert into simple sugars and the flesh softens. That’s why overripe bananas are perfect for baked goods — they’re sweeter and mash smoothly into the batter.
- Look for heavily freckled skins or mostly brown peels — those signal peak sweetness.
- If a banana is too underripe it won’t mash well and will give a chalkier texture rather than a moist one.
- Thawed frozen bananas work in a pinch — just drain excess liquid before mixing to avoid a watery batter.
When you press the banana it should feel soft and a little syrupy — that’s the texture you want to mash into the batter for the best flavor and moisture.
How to Make Banana Bars with Brown Butter Icing (Step-by-Step)
- Preheat your oven and line a square pan with parchment or foil so you can lift the bars out easily.
- Beat the sugar, sour cream (or yogurt), and softened butter until creamy; add the egg and mix until smooth.
- Stir in mashed very ripe bananas and vanilla until combined.
- Fold in the dry ingredients — flour, baking soda, and salt — just until there are no streaks of flour; avoid overmixing.
- Spread the batter evenly in the prepared pan and bake until the top is golden and a toothpick comes out with a few moist crumbs.
- While the bars cool slightly, brown a separate portion of butter in a saucepan, watching closely for nutty brown bits and a toasty aroma; pour into a heatproof bowl and whisk until smooth.
- Add powdered sugar and vanilla to the warm brown butter and whisk to a spreadable consistency, thinning with a splash of milk if necessary.
- Spread the icing over bars when they’ve cooled for about 10–15 minutes so the topping becomes slightly melty and glossy.
Notes: use a hand mixer if you want speed, or mix by hand for a gentler touch. If you don’t have parchment, foil sprayed with nonstick spray works. Oven temperatures vary — start checking a few minutes before the suggested time.
Pro Tip for banana bars with brown butter icing: Frost While Slightly Warm for a Soft, Melty Finish
- Frost the bars when they’re warm but not hot — about 10–15 minutes after coming out of the oven — so the icing softens slightly and sets to a glossy finish.
- If your icing firms too much, warm it gently before spreading so it glides on without tearing the crumb.
- For neat slices, chill briefly after the icing sets so you get clean edges, or warm a knife before cutting for a softer look.
How to Store and Reheat Banana Bars for Best Freshness
These bars keep well and are easy to refresh for serving. Follow these simple storage tips depending on how long you need them to last:
- Room temperature: Store in an airtight container for up to three days; keep them in a single layer or separated with parchment so the icing doesn’t stick.
- Refrigeration: Refrigerate to extend freshness for up to a week; bring to room temperature before serving for the best texture.
- Reheating: Warm gently in the microwave for a few seconds or reheat a slice in a low oven to regain that just-baked softness without melting the icing too much.
Serving Suggestions
These bars are flexible — serve them warm with simple add-ons to make a little moment special. Try a scoop of cold vanilla ice cream for dessert, or sprinkle chopped nuts on top of the icing for a crunchy contrast. If you want a drink pairing, a chocolate peanut butter banana smoothie makes a playful match for a brunch spread.
- Top each bar with a scoop of vanilla ice cream for a warm-and-cool dessert.
- Sprinkle chopped walnuts or toasted pecans over the icing for texture and extra nuttiness.
- Drizzle a little melted dark chocolate for a richer finish.
- For gatherings, arrange on a platter and garnish with thin banana slices or a dusting of powdered sugar.
These small touches make the bars feel special at potlucks or family dinners without adding much prep time.
Variations and Dietary Swaps
- Gluten-free: Use a 1-to-1 gluten-free flour blend or try almond flour for a denser, nuttier bar.
- Dairy-free: Swap in plant-based butter and a non-dairy milk for the icing; use yogurt alternatives for the sour cream.
- Egg-free: Use a flax egg or a commercial egg replacer to bind the batter.
- Mix-ins: Fold in chopped walnuts, pecans, or dark chocolate chips for texture and flavor variety.
- Healthier twist: Try a version with oats and less sugar like these banana oatmeal bars if you want more whole-grain texture.
Troubleshooting
- If your bars come out dry, I usually check that my bananas were ripe enough and that I didn’t overbake them — a few moist crumbs on a toothpick is the target.
- If the icing is grainy, it was likely too hot when the powdered sugar was added — let the brown butter cool slightly before whisking in the sugar.
- If the brown butter tastes burnt, that means it cooked past the toasty stage; start over and remove from heat as soon as the bits turn golden and smell nutty.
- If the icing won’t spread, thin it with a small splash of milk and warm gently so it becomes spreadable without melting the bars.
Frequently Asked Questions
Can I use frozen bananas for this recipe?
Yes, you can use frozen bananas! Just make sure to thaw them completely and drain any excess moisture before mashing.
How do I store leftover banana bars?
Store leftover banana bars in an airtight container at room temperature for up to three days. You can also refrigerate them to extend freshness.
Can I make the frosting ahead of time?
While it’s best to frost the bars just before serving, you can prepare the brown butter ahead of time and store it in the refrigerator. Reheat gently before mixing in the sugar.
What can I substitute for sour cream?
You can substitute sour cream with plain yogurt or buttermilk for a similar texture and flavor.
Are there any egg alternatives for this recipe?
Yes, you can use a flax egg (1 tablespoon ground flaxseed mixed with 2.5 tablespoons water, let it sit for 5 minutes) or a store-bought egg replacer.
Banana Bars with Brown Butter Icing
Ingredients
Method
- Preheat the oven to 375F and line an 8x8 baking dish with parchment paper.
- In a large bowl, beat together sugar, sour cream, butter, and eggs until creamy. Blend in mashed bananas and vanilla extract.
- Add flour, baking soda, and salt. Stir until just combined and spread the batter evenly into the pan.
- Bake for 20 to 25 minutes or until golden brown. Let cool slightly and remove from the pan using the parchment.
- Brown the butter in a medium saucepan over medium-high heat until brown bits form. Pour into a heat-proof bowl.
- Whisk in powdered sugar and vanilla until smooth.
- Spread the icing on the bars once they have cooled for 10-15 minutes.