Valentine’s Day is the kind of holiday that invites small, thoughtful gestures — handwritten notes, a bouquet, and yes, sweet treats made by hand. I’ve always believed that the best gifts are the ones you can taste, the ones that carry the warmth of a kitchen and the little mishaps that happen while you’re making them. Growing up, Valentine\’s was less about fancy restaurants and more about the peanut butter cups my mom would tuck into my lunch box — simple, sticky, and utterly comforting. That memory is exactly why I developed these Chocolate Peanut Butter Valentine\’s Hearts: they feel personal, they travel well, and they taste like a hug.
Why You’ll Love These Chocolate Peanut Butter Hearts
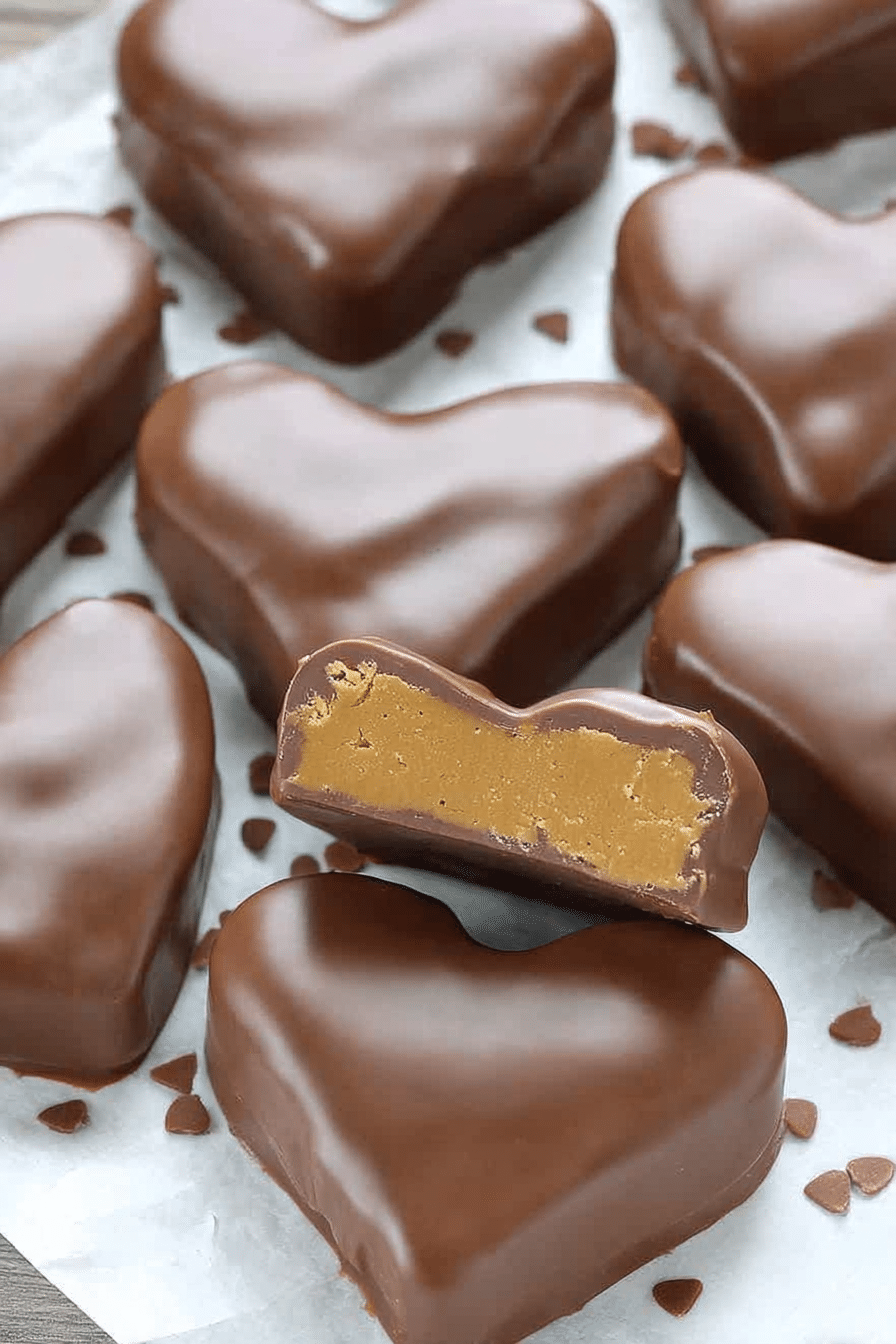
There\’s a reason the chocolate-and-peanut-butter pairing is a classic: you get that deep, slightly bitter cocoa with a creamy, salty peanut center. These hearts are small but indulgent — the exterior snaps or melts depending on the chocolate you use, and the center is soft, slightly dense, and luscious. I make these when I want something that looks fancy without fuss. They travel well in small boxes and are great to hand out to friends, schoolmates, or coworkers.
If you’re a fan of rich chocolate desserts, you won’t want to miss our vegan chocolate brownie sundae, which perfectly complements these chocolate peanut butter hearts.
Ingredients Overview
- Peanut butter – the star of the filling; choose creamy for a smooth, moldable center or crunchy if you want a little bite.
- Unsalted butter – adds silkiness and helps the peanut butter set without being rock hard; room temperature for easier mixing.
- Brown sugar – gives a touch of molasses flavor and moisture that makes the filling more interesting than straight powdered sugar.
- Vanilla extract – lifts the overall flavor and rounds out the peanut notes.
- Salt – a pinch sharpens the sweetness and makes the chocolate and peanut butter sing together; taste as you go.
- Powdered sugar – the binder for the filling; it sets the texture and keeps the hearts scoopable and slightly crumbly, not wet.
- Chocolate (or candy coating) – the shell: dark chocolate for contrast, milk for sweet comfort, or candy coating for a glossy, easy dip.
Explore the versatility of peanut butter in our banana peanut butter oatmeal bars, perfect for a nutritious snack or breakfast option.
Step-by-Step Instructions
Below is the tested method I use every time I make these. I include small timing notes, what I noticed while cooking, and troubleshooting tips that saved me the first few times I made them.
- Prep: Line an 8 x 8 inch dish with parchment paper, leaving an overhang so you can lift the whole slab out later. This is a tiny step but it makes cutting so much cleaner — trust me, scraping sticky peanut butter from the pan is no one\’s idea of romantic.
- Make the peanut butter filling: In a mixing bowl stir together the peanut butter, melted unsalted butter, brown sugar, vanilla, and a pinch of salt until the brown sugar dissolves into the fats. The mixture looks glossy and a little loose at first — that\’s normal. Gradually add powdered sugar until the mixture becomes tacky and holds its shape. You want it soft but not sticky; when pressed it should hold an impression.
What I noticed: if your peanut butter is cold straight from the fridge, the mixture will refuse to come together. Let the peanut butter come to room temperature or warm gently for 10 seconds in the microwave. If you accidentally add too much powdered sugar and the filling is crumbly, a teaspoon of milk or an extra teaspoon of butter restores creaminess.
- Press into the pan: Press the peanut butter mixture into the prepared dish and smooth the top with a spatula or your palms (a piece of parchment on top prevents sticking). Aim for a layer about 1/2 inch thick. I like this thickness because it gives a perfect peanut-butter-to-chocolate ratio in every bite.
- Chill to set: Place the slab in the freezer until firm enough to cut — usually 30–45 minutes. Working from the freezer makes cleaner cuts and prevents melting when you handle the shapes.
- Cut hearts: Once firm, lift the slab using the parchment overhang and place it on a cutting board. Use a small heart-shaped cookie cutter to cut out hearts and arrange them on a parchment-lined tray. Gather scraps, knead them briefly, re-press, and cut more hearts to minimize waste.
Pro tip: keep a small bowl of hot water nearby to dip your cutter into between cuts; a warm cutter gives a cleaner edge, especially if the filling begins to soften.
- Freeze the hearts until firm: This makes dipping cleaner. I usually freeze for another 15 minutes so the center is firm but not rock solid — that way the chocolate adheres without cracking the peanut center.
- Melt the chocolate: Chop chocolate into small, uniform pieces for even melting or use a candy coating for ease. I melt chocolate in a heatproof bowl over barely simmering water (double boiler method) and stir until smooth. If the chocolate looks grainy or seizes, it likely got a splash of water — remove from heat and add a small spoonful of warm cream to smooth it out. For a glossy finish, you can temper chocolate, but for home gifting I usually add a teaspoon of neutral oil or coconut oil to the chocolate to thin and gloss it slightly.
- Dip each heart: Work with only a few hearts at a time so they stay cold. Use a fork to lower a heart into the melted chocolate, spoon more chocolate over it if necessary, then lift and tap the fork gently against the bowl to remove excess chocolate. Transfer to parchment and let set. If you want a drizzle effect, let the hearts set fully, then use a small piping bag or a fork dipped in melted white chocolate to decorate.
Observation: The sound is delightful — a soft clink when the fork taps the bowl, and a slight whisper of chocolate setting as the room cools. The first time I dipped, I had too many hearts on the counter and they started to sweat; lesson learned: chill them in batches.
- Storage: Store in the fridge for short-term use or in the freezer for longer storage. They keep best in an airtight container separated by parchment to prevent sticking.
Nutritional Information and Health Benefits
Per the tested recipe yield of about 20 hearts, one heart contains approximately 243 calories, 14.1 g fat, 26.2 g carbohydrates, and 4.2 g protein. These are rich little bites, so a single serving is best enjoyed as a treat rather than a snack replacement.
Health notes: natural peanut butter provides a decent amount of plant-based protein and heart-healthy monounsaturated fats. Dark chocolate contributes antioxidants (flavonoids) and can be lower in added sugar, depending on the bar you choose. Powdered sugar and candy coating add refined sugars, so if you\’re watching intake you can reduce the sweetener slightly in the filling or choose a higher-cocoa dark chocolate which is less sweet. Moderation is key: one or two hearts alongside a meal or as a shared dessert keeps these treats fitting into a balanced diet.
Creative Packaging Ideas for Gifting
Packaging turns a homemade treat into a present. I like using small kraft boxes lined with waxed paper and a scattering of dried rose petals for Valentine\’s. For a rustic look, wrap stacks of three hearts in parchment tied with twine and a small handwritten tag. If you\’re making a lot, use mini cupcake liners in a compartmentalized tray so the chocolates don\’t stick together.
Tips from my experience: add a small silica gel packet if you\’re shipping to keep moisture at bay (but mention it\’s not food). Label the box with the date and a short storage note: “Keep refrigerated — best within 1 week; freezer up to 1 month.” If you\’re gifting to children, bright tissue and a heart sticker make the presentation playful.
Flavor Variations and Customizations
This recipe is forgiving and loves to be played with. Here are flavors I tested and liked:
- Sea salt finish – sprinkle a tiny pinch of flaky sea salt on top of warm chocolate for a salon-style contrast.
- Spiced – add a pinch of cinnamon or a tiny grind of cayenne to the filling for warmth and surprise.
- Different nut butters – almond or cashew butter will change the flavor profile but keep the same technique. For allergies, sunflower seed butter works well but may be slightly more oily.
- Chocolate types – dark for less sweet, milk for classic creaminess, or white chocolate to make pink-dyed drizzle pop for Valentine\’s visuals.
- Stuffed centers – press a small dollop of jam or a caramel drop into the center before freezing for a filled surprise.
For more peanut butter inspiration, try making peanut butter yogurt bark as a fun variation!
Frequently Asked Questions
Can I use crunchy peanut butter instead of creamy?
Yes, you can use crunchy peanut butter for added texture! Just keep in mind that it will change the consistency slightly.
How long do these chocolate peanut butter hearts last?
They can be stored in the fridge for about a week or in the freezer for up to a month. Just make sure they’re in an airtight container!
What chocolate should I use for dipping?
You can use any good quality chocolate, like dark, milk, or white chocolate, or even chocolate candy coating for easy melting.
Can I adjust the sweetness of the hearts?
Absolutely! You can decrease the amount of powdered sugar or use alternative sweeteners to adjust the sweetness to your liking.
Are there any ingredient substitutions for allergies?
Yes! You can substitute peanut butter with almond or sunflower seed butter if you’re allergic to peanuts. Just keep in mind that the flavor will change slightly.
Conclusion and Final Thoughts
Making these Chocolate Peanut Butter Valentine\’s Hearts feels like handing someone a little piece of your kitchen: it\’s personal, sweet, and imperfect in the best way. Over the years I\’ve found this recipe forgiving — it tolerates small measurement tweaks and different chocolates — but the technique of keeping the filling cold and working in small batches is what makes them look polished. Whether you make a few for a loved one or a dozen for a class exchange, these hearts are a satisfying project that reward a bit of patience with big flavor.
To keep the chocolate theme alive, check out our recipe for the best chocolate chip cookies as another delightful treat for your loved ones this Valentine\’s Day!
Final practical notes: yield is about 20 hearts per batch, prep time is roughly 30 minutes active plus chilling time, and total time including freezing is around 2 hours. Store in the fridge up to a week or freeze for up to a month. If you try them, tell me how the chocolate-to-peanut ratio worked for you — I always tweak mine depending on who I\’m gifting to. Happy making!
Chocolate Peanut Butter Valentine’s Heart
Ingredients
Method
- Line an 8 x 8 inch dish with parchment paper, leaving an overhang for easy lifting later; set aside.
- In a mixing bowl, stir together the peanut butter, melted butter, brown sugar, vanilla, and salt until the sugar dissolves. Gradually mix in the powdered sugar.
- Press the mixture into the prepared dish and smooth the top with a spatula or your palms to flatten into a layer about ½ inch thick.
- Place in the freezer until firm enough to cut.
- Once firm, line a tray with parchment paper and set aside.
- Using a small heart-shaped cookie cutter, cut out the hearts and arrange them on the tray. Gather any remaining batter, knead it, press it, and cut out additional hearts.
- Freeze until the hearts are firm.
- Melt the chocolate or candy coating and prepare another parchment-lined tray.
- Dip each heart into the melted chocolate using a fork to cover completely, gently tapping the fork to remove excess chocolate. Take only a few hearts from the freezer at a time to keep them firm while working.
- Store in the fridge or freeze for longer storage.