I remember the first time I pulled a sheet of chocolate chip cookies out of a hot oven and the house smelled like a bakery for the next hour. That warm, buttery aroma with pockets of melted chocolate is part of why these cookies have been a comfort food staple for generations. Chocolate chip cookies are one of those recipes that travel well across households and cultures — everyone tweaks them, defends their version, and claims theirs is best. The origin story, humble pantry ingredients, and endless variations have made these cookies a cultural icon: an accessible dessert that still feels special.
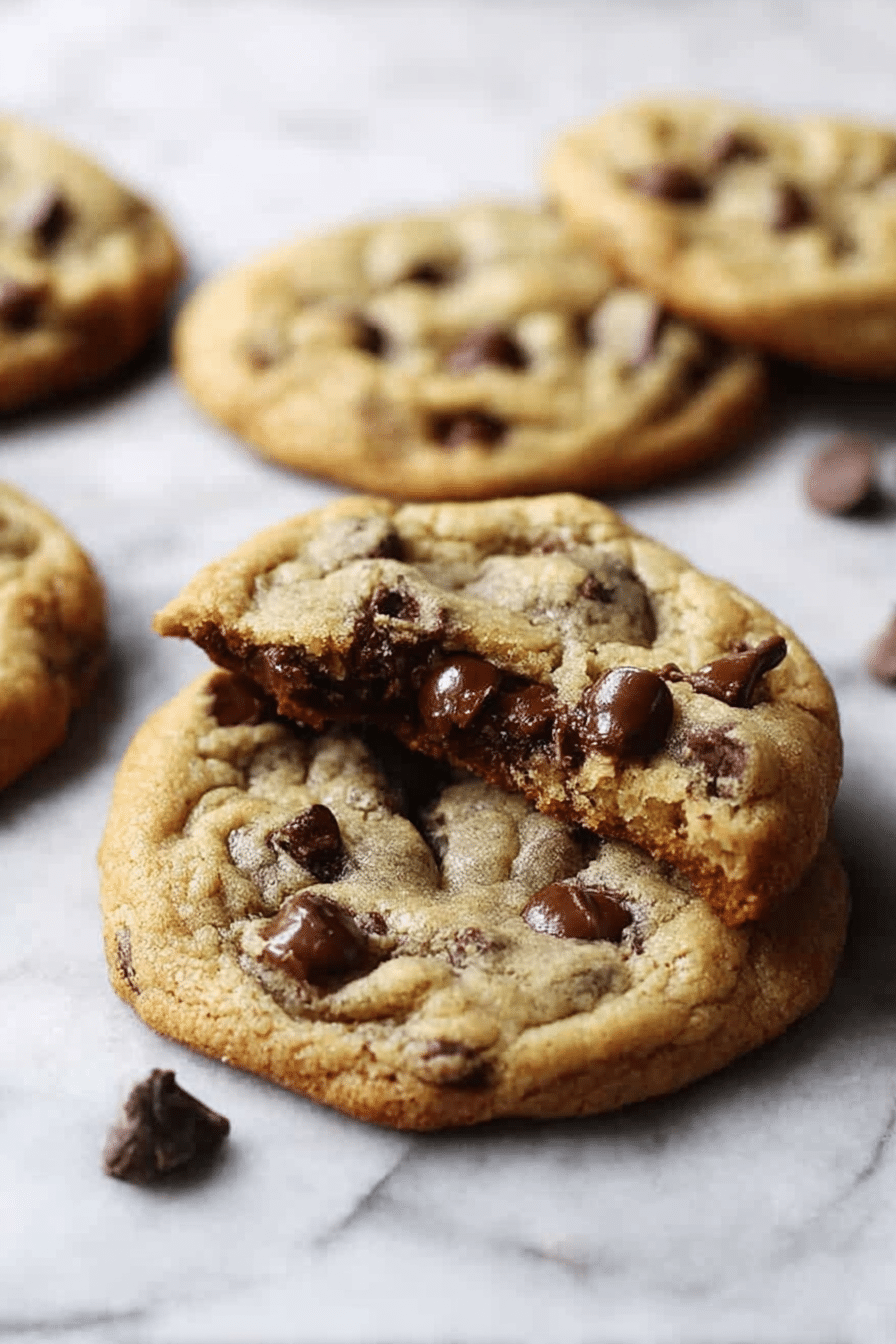
I make these cookies when I want something reliably satisfying — busy weeknights, a weekend baking session with the kids, and when friends swing by unexpectedly. Over the years I’ve adjusted the technique until I had a version that rarely fails: cold butter cubes for slightly puffed centers, a ratio of brown to white sugar for chew and shine, and a short bake so the centers stay soft while the edges crisp just a bit. Below I walk you through everything I learned while testing and living with this recipe so you can make them at home and know what to expect.
Ingredients for the Best Chocolate Chip Cookies
- Cold butter – cut into cubes; gives structure and slightly thinner cookies when worked into the batter carefully.
- Brown sugar – adds moisture, chew, and a deep caramel flavor from the molasses.
- White sugar – helps with spreading and crisp edges; balances the brown sugar.
- Eggs – bind the dough and add lift; room temperature eggs incorporate more smoothly.
- Vanilla – a little goes a long way; enhances the chocolate and overall flavor.
- Flour – all-purpose works well; a touch of cake flour makes them a bit softer if you have it.
- Cornstarch – makes the cookie tender and slightly cakier in the center without being bready.
- Baking soda – gives the cookies lift and helps with spread and browning.
- Salt – essential for balance; it brightens the sweetness and deepens the chocolate flavor.
- Chocolate chips – semi-sweet is classic; mixing in milk chocolate gives a creamier, sweeter bite.
Step-by-Step Instructions
- Preheat and prep: If you won’t be chilling the dough, preheat your oven to 400°F. I always check my oven with a thermometer — my oven tends to run hot, so when it does I preheat to 385°F instead. Light-colored baking sheets give the most even bake; dark pans will brown the bottoms faster.
- Cream the butter and sugars: In a large bowl, cream the cold butter cubes with the brown sugar and white sugar for about 4 minutes until the mixture is light and fluffy. This sounds long if the butter is cold, but with the cubes and a paddle or a sturdy wooden spoon the sugars start to soften the butter and create air pockets that help the cookies rise slightly. You’ll notice the mixture go from dull to pale and slightly glossy.
- Add eggs and vanilla: Mix in the eggs and vanilla for about 1 minute more until just combined. The batter should be smooth; don’t overmix once the eggs are added or you’ll develop more gluten.
- Dry ingredients: Stir in the flour, cornstarch, baking soda, and salt. Mix just until everything is combined — you should still see a few streaks of flour disappear under the dough. Fold in the chocolate chips with a spatula so they stay intact and evenly distributed.
- Chill (highly recommended): If you have the time, wrap the dough tightly and chill for 24 hours. Chilling firms up the butter, which slows spread and concentrates the flavors. I usually do this the night before a cookie run, and the smell the next day when I scoop the dough is noticeably deeper and more caramel-forward.
- Scoop and bake: If you’re not chilling, start scooping the dough onto prepared baking sheets lined with parchment or silicone mats. Space the cookies at least 2 inches apart. Bake 8–11 minutes, or until the edges are just turning a light golden color but the centers still look soft. They will continue to set on the hot pan.
- Rest and transfer: Remove the sheet from the oven and let the cookies sit for 5 minutes before transferring them to a cooling rack. This resting time helps them finish cooking gently and prevents tearing when you move them.
Yield: About 18 cookies. Timing: active prep ~15 minutes, bake time 8–11 minutes, chill time optional (24 hours for best results).
Key Baking Tips for Perfect Cookies
Small technique changes make a big difference. These are the steps that saved me from flat, greasy, or overbrowned cookies during testing.
For an easy and delightful variation, check out our cool whip cookies that are fun and quick to make!
- Cold vs softened butter: Using cold butter cut into cubes seems counterintuitive, but it slows how much the fat melts during creaming and gives slightly puffier centers. If you use softened butter instead, reduce creaming time and expect a slightly different spread.
- Measuring flour: Spoon and level your flour or weigh it. Too much flour makes dry, cakey cookies; too little makes them spread thin. If your dough looks very sticky, it’s probably correct; it firms up when chilled.
- Cornstarch role: The cornstarch tenderizes the crumb, giving a soft center without making the cookie cakey. Don’t skip it unless you’re out — it’s a quiet hero here.
- Don’t overbake: Pull them when the edges are set and the center still looks slightly underdone. Out of the oven they look soft but will firm up as they cool to a tender, chewy texture.
- Pan color matters: Light-colored cookie sheets reflect heat and lead to even browning. Dark pans speed browning, which can give overly crisp bottoms.
- Salt is not optional: A pinch of salt in the dough and a light sprinkle of flaky sea salt on top after baking lifts the whole cookie and balances sweetness.
- Chill for flavor: If you have 24 hours, chilling improves texture and flavor dramatically. The dough’s flavors meld, and the cookies bake up with better depth and chew.
- Cookie scoops save time: Use a medium cookie scoop for even cookies and predictable bake times.
Troubleshooting Common Baking Issues
- Problem: Cookies spread too thin. Likely causes are too-warm butter, too little flour, or a hot oven. Fixes: Chill the dough for at least 30 minutes, check your oven temperature with a thermometer, and make sure you measured flour properly (spoon into the cup and level off or weigh).
- Problem: Cookies are dry or crumbly. Too much flour or overbaking is usually to blame. Reduce flour slightly next time, shorten bake time by a minute or two, and make sure you don’t overmix after adding the flour.
- Problem: Bottoms brown too fast. Dark baking sheets or an oven that runs hot are typical culprits. Switch to light-colored pans, lower the oven temperature a bit (try 385°F), or bake on the middle rack. You can also place the sheet on a second rack to act as a heat shield.
- Problem: Cookies are too flat and greasy. This means the butter was too warm or there wasn’t enough structure from the flour or cornstarch. Chill the dough and add the cornstarch if you omitted it. Also ensure your baking soda is fresh; old leavening affects texture.
Delicious Variations for Everyone
If you’re looking for a refreshing twist, try our lemon raspberry cookies that are perfect for summer gatherings.
- Brown butter chocolate chip: Brown the butter for a nutty, toasty depth. Cool it before mixing so it doesn’t melt the sugars.
- Sea salt & dark chocolate: Use dark chocolate chunks and finish with flaky sea salt for a sophisticated sweet-salty bite.
- Oat and honey: Add rolled oats and a touch of honey for chew and rustic texture — reduce flour slightly to keep them tender.
- Nutty add-ins: Toasted walnuts or pecans add crunch and an earthiness that pairs beautifully with chocolate.
- Vegan option: Replace butter with a firm vegan butter, use a flax “egg” (1 tbsp ground flax + 2.5 tbsp water per egg), and choose dairy-free chocolate chips. The texture will be slightly different but still very satisfying.
- Gluten-free: Use a 1:1 gluten-free baking flour and add a teaspoon more cornstarch if needed; chill the dough and be gentle mixing to prevent crumbliness.
Equipment That Makes a Difference
- Oven thermometer – the single most useful tool for consistent results; ovens often stray 10–25°F from their set temperature.
- Stand mixer or hand mixer – speeds up creaming and ensures even distribution of butter and sugars, but a sturdy wooden spoon and elbow grease work fine too.
- Cookie scoop – for uniform cookies that bake at the same rate.
- Silicone mat or parchment – prevents sticking and gives even browning; skip greasing the sheet to avoid excess spreading.
- Cooling rack – critical for preventing soggy bottoms; cookies continue to set as they cool.
- Kitchen scale – for bakers who want precision; weighing flour and mix-ins produces the most consistent results.
Cultural History of Chocolate Chip Cookies
Chocolate chip cookies have a charming origin story. They were invented by Ruth Wakefield in the 1930s at the Toll House Inn when she chopped up a chocolate bar and mixed it into cookie dough, expecting it to melt into the dough. Instead, the chocolate held its shape and created pockets of melted chocolate — the rest is delicious history. The recipe was printed in newspapers and later became associated with a certain brand of chocolate that used the Toll House name.
From there, chocolate chip cookies rose to prominence in American kitchens and beyond. They’ve been a symbol of home baking — the kind of cookie you bring to a potluck, tuck into lunchboxes, or make to cheer someone up. Around the world, bakers have adapted the cookie to local tastes: swapping chocolates, adding nuts or spices, and even turning the dough into ice cream or tarts.
Chocolate chip cookies have inspired many desserts, including our delectable chocolate raspberry layer cake.
Conclusion and Serving Suggestions
These cookies are a reliable, flexible recipe that rewards small amounts of patience — especially the 24-hour chill. Expect warm, slightly crisp edges, tender centers, and rich pockets of chocolate. If you want the classic soft-and-chewy texture, pull them from the oven when the centers are still glossy and let them rest on the hot sheet. For crispier cookies, bake a minute or two longer.
Serve them warm with cold milk, dunk in coffee for a grown-up twist, or sandwich two together with a scoop of ice cream for a show-stopping treat. Leftovers keep in an airtight container at room temperature for up to 3 days, or freeze baked cookies for up to 3 months. You can also freeze unbaked scoops on a tray and bake straight from frozen, adding a minute or two to the bake time.
For more delicious options, explore more cookie recipes that can delight any crowd.
FAQ
- What makes these chocolate chip cookies the best?
These cookies use a perfect balance of brown sugar and white sugar, cold butter, and high-quality chocolate chips, ensuring a delightful flavor and texture! - Can I use different types of chocolate chips?
Absolutely! You can use semi-sweet chocolate chips or a mix of milk chocolate and semi-sweet for a richer taste. - How long should I chill the cookie dough?
For the best results, chill the cookie dough for at least 24 hours. This helps enhance the flavors and texture! - What is the ideal baking time for these cookies?
Bake the cookies for 8-11 minutes or until the edges are just turning golden. Let them sit for 5 minutes before transferring them from the cookie sheet. - Can I substitute any ingredients?
Yes! You can use all-purpose flour or a combination of all-purpose and cake flour. Just remember, high-quality ingredients yield the best cookies!
I’ve made these variations dozens of times — with brown butter for holiday batches, with chopped dark chocolate for a less sweet crowd, and with a little extra salt on top for a salty-sweet pop. Baking is a little science, a little patience, and a lot of tasting. Try the 24-hour chill at least once and you’ll notice the difference: the chocolate pockets taste more pronounced, the texture is more consistent, and the cookies feel like they came from a bakery right in your kitchen.
Happy baking — and if something doesn’t go right the first time, tell me what happened and I’ll help troubleshoot. There’s almost always a fix, and the dough is usually delicious enough to enjoy even if the cookies aren’t picture-perfect.
The BEST Chocolate Chip Cookies
Ingredients
Method
- Preheat oven to 400 degrees. Cream butter, brown sugar, and granulated sugar for 4 minutes until light and fluffy.
- Add eggs and vanilla, mixing for 1 minute longer.
- Stir in flour, cornstarch, baking soda, and salt until combined. Fold in chocolate chips.
- Chill dough for 24 hours if possible, or proceed to scoop onto baking sheets.
- Bake for 8-11 minutes until edges turn light golden. Let set for 5 minutes before removing.