I first made coffee jelly on a sticky afternoon when I wanted something that felt grown-up but didn’t require fuss. It came together in minutes, chilled beautifully, and carried that brisk coffee aroma that wakes up summer desserts. Since then I keep a tray in my fridge for unexpected guests and slow, sunlit afternoons.
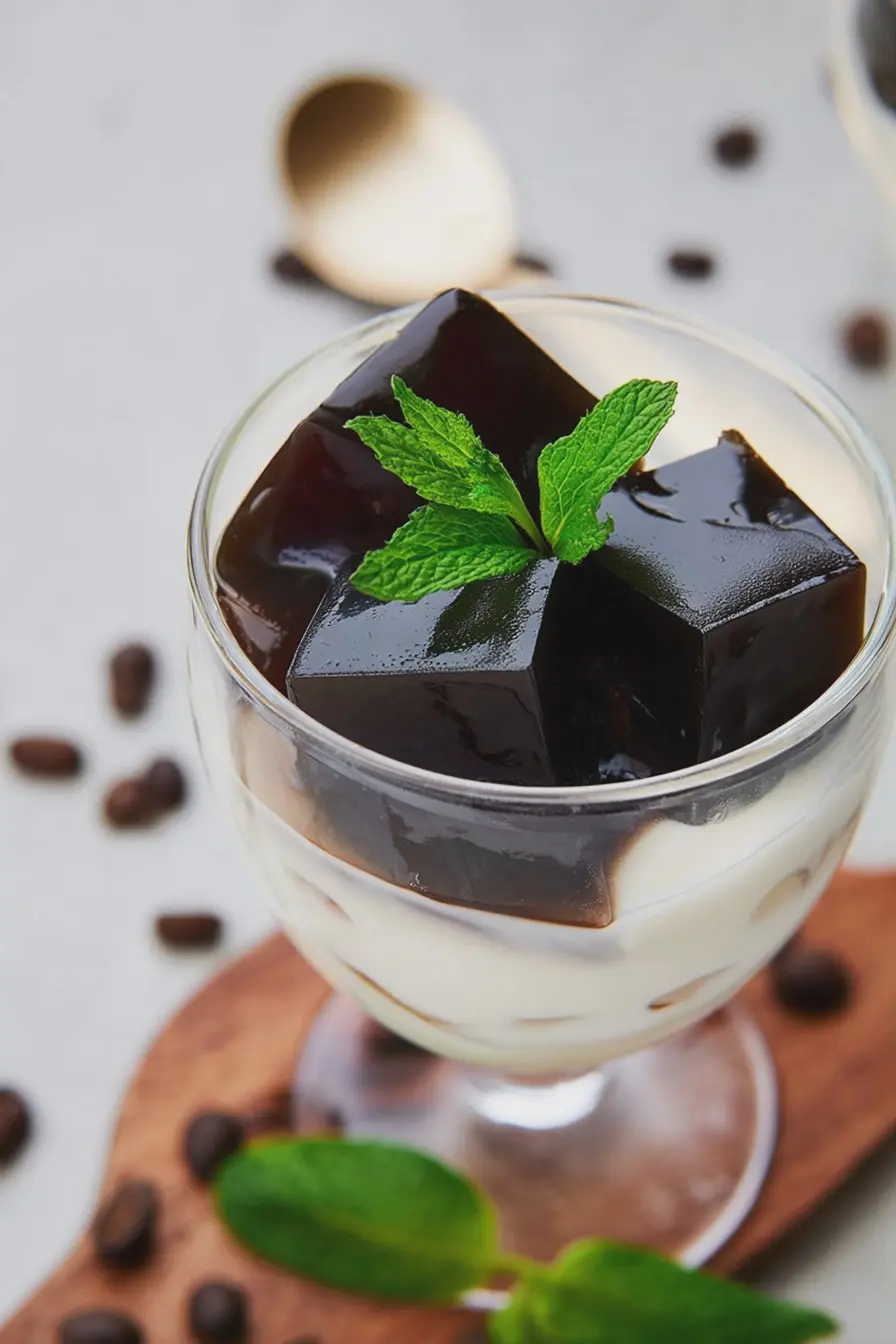
What I love is the contrast: glossy, slightly firm cubes that wobble when you nudge the spoon, paired with a velvety sweet cream. It feels special, but it’s the kind of dessert you can make between errands — no complicated equipment, just attention to a few key moments on the stove.
Over the years I’ve learned the small things that matter: the right coffee strength, gentle boiling for the agar, and how to unmold cleanly so every cube shines. I’ll walk you through those steps and give quick options if you want the dessert dairy-free or brighter with spices or citrus notes.
Everything You Need for Coffee Jelly
- Coffee – The backbone of the jelly. Use a coffee you enjoy drinking because its aroma and bitterness carry through. For a bolder result choose espresso-style or concentrated brew; for something gentler try medium roast or cold brew.
- Agar-agar (powder) – The plant-based setting agent that gives a firm, jiggly texture. It activates with heat, so it must be dissolved and brought to a simmer to set properly. Vegan-friendly and gives a cleaner cut than gelatin.
- Sugar (or sweetener) – Balances coffee’s bitterness. You can swap cane sugar for a less refined sugar, coconut sugar for a deeper flavor, or a liquid sweetener if you prefer.
- Sweetened condensed milk or sweet cream – For serving, the sweet cream softens the coffee’s edge and adds silkiness. Use a dairy-free condensed milk or oat cream for a vegan option.
- Optional flavor boosters – A splash of vanilla, a pinch of cinnamon, or a little cocoa powder can change the character subtly. Citrus zest brightens the finish.
The Secret to a Firm, Jiggly Coffee Jelly
Getting the texture right is mostly about precise heat and accurate agar use. Agar needs to dissolve fully and be heated to activate its gelling properties; if it’s under-heated the jelly won’t set properly, and if you overcook the mixture for too long you can dull the coffee’s aroma.
Think about the final wobble: you want cubes that hold their shape but still jiggle when lifted. That balance comes from measuring the agar carefully and bringing the coffee-agar mix to a rolling simmer while stirring so the powder dissolves evenly. I always let it cool to room temperature before refrigerating so the surface sets smoothly instead of trapping condensation.
Agar vs. Gelatin: Why Agar Works Here (and Vegan Notes)
Agar is derived from seaweed, so it’s naturally vegan and sets at room temperature; gelatin is animal-derived and offers a softer, more melt-in-your-mouth texture. For a clean, slightly firmer cube that holds up in glasses or cut into neat shapes, agar is ideal. If you prefer gelatin’s softer texture, you can substitute it, but you’ll need less gelatin by weight and it must be bloomed in cold liquid first rather than heated directly.
Adjustments when swapping: gelatin requires blooming (soak in cold liquid first) and won’t set as firmly at warmer serving temperatures; agar requires full dissolution and a brief boil to activate. For more insights on using agar-agar in desserts, check out our Agar-Agar Fruit Jelly.
Choosing Your Coffee and Sweetness: Flavor Tips
The coffee you choose dramatically affects the final dessert. If you like an assertive, bitter edge, use espresso or a concentrated brew; if you prefer something softer and more aromatic, a medium roast brewed a bit stronger than usual works well. Cold brew gives a mellow, rounded profile that plays nicely with sweet cream.
Adjust sweetness to taste — some people like a lightly sweetened jelly and a sweeter cream on top, while others prefer the jelly itself to be sweet. You can also add a tiny pinch of salt to the coffee mixture to heighten the flavors. For a refreshing pairing, try this with our Easy Iced Coffee or for a more unusual cold-brew twist, see the Blueberry Lavender Haze Cold Brew idea.
How to Make Coffee Jelly (Step-by-Step)
- Prepare your coffee so it’s very hot and well strained if needed; you want a smooth liquid free of grounds.
- Combine your sweetener and agar-agar powder with the hot coffee in a saucepan, whisking to disperse the agar evenly before heating.
- Bring the mixture to a gentle rolling boil while stirring; once it reaches a boil, simmer briefly until the agar is fully dissolved — you should not see granules or strings of powder.
- Remove from heat and pour into a mold or shallow pan. Let cool to room temperature so the surface doesn’t trap steam, then cover and chill until fully set.
- While the jelly sets, whisk together cream and sweetened condensed milk (or your vegan alternatives) and keep chilled until serving.
- To serve, unmold the set jelly, cut into cubes, and spoon into glasses or bowls. Drizzle with the sweet cream and enjoy immediately.
If you like exploring coffee desserts, you might also enjoy this variation on frozen sweets: Coffee Ice Cream Cake.
- Troubleshooting:
- If the jelly won’t set, it likely needs more agar or wasn’t heated enough; gently reheat with a little extra agar dissolved in warm liquid and re-pour.
- If the coffee tastes flat after boiling, add a splash more fresh-brewed coffee to the cream sauce to boost aroma when serving.
- If unmolding breaks the jelly, chill it longer and run a thin knife around the edge or briefly dip the mold’s base in warm water to release.
Pro Tip for coffee jelly: How to Get a Clean, Even Set
- I always strain the coffee into the pot to remove any sediment — it keeps the surface glassy and smooth.
- Measure your agar carefully; a little goes a long way. Use a small whisk while heating so the agar dissolves completely and evenly.
- Cool to room temperature before refrigerating; this prevents a foggy top and condensation, which can mar the shine.
- For neat cubes, chill the jelly until very firm, then use a sharp knife dipped in hot water between cuts for clean edges.
- If you want layered desserts, pour thinner layers and let each set fully before adding the next — I mark times on my phone so layers don’t sag.
Storage, Make-Ahead Plans, and Easy Variations
- Storage: Keep set coffee jelly covered in the refrigerator; it holds for up to a week but is best within a few days when the coffee aroma is brightest.
- Make-ahead: You can make the jelly a day ahead and keep the cream chilled separately. Assemble just before serving for the freshest texture.
- Classic serving idea: Cubes with sweet cream poured over in clear glasses — the contrast of dark jelly and pale cream is so pretty.
- Dairy-free variation: Use coconut condensed milk or sweetened oat cream in place of dairy condensed milk for a vegan-friendly version that’s still silky.
- Layered parfait: Alternate coffee jelly with whipped cream or coconut yogurt and toasted nuts for crunch.
- Spiced or citrus twist: Infuse the coffee with cinnamon or orange zest while brewing, then strain before adding agar for subtle aromatic notes.
Cultural Significance and History of Coffee Jelly
Coffee jelly has roots in Japan where it became a popular café and home dessert; it pairs well with the Japanese affinity for simple, elegant sweets that highlight a single flavor. The concept traveled and found variations across Asia, appearing in menus and home kitchens as a cool answer to hot weather. In many places it’s embraced not only for flavor but for its playful texture — the gentle wobble of the jelly contrasts with creamy toppings and crisp garnishes.
What keeps coffee jelly popular today is that it’s both nostalgic and modern: it calls to mind café counters and summer afternoons while being perfectly adaptable to contemporary tastes, from vegan tweaks to layered, photo-ready presentations for gatherings. I often bring a tray to summer get-togethers because it’s easy to portion, refreshing to eat, and always prompts compliments.
Frequently Asked Questions
What is coffee jelly?
Coffee Jelly (コーヒーゼリー) is a refreshing Japanese dessert made from coffee and agar-agar, which gives it a jiggly texture. It’s a sweet treat that’s perfect for summer!
Can I use gelatin instead of agar-agar?
While this recipe specifically uses agar-agar, you can use gelatin if you prefer. Just keep in mind that gelatin is not vegetarian or vegan, while agar-agar is.
How do I store leftover coffee jelly?
You can store leftover coffee jelly in an airtight container in the refrigerator for up to a week. Just make sure it’s fully set before you cover it.
Can I add flavors to my coffee jelly?
Absolutely! You can customize your coffee jelly by using different types of coffee or adjusting the sweetness by varying the sugar and condensed milk to suit your taste.
Is coffee jelly vegan?
Yes! This coffee jelly recipe is vegan-friendly because it uses agar-agar instead of gelatin and does not contain any animal products.
Coffee Jelly
Ingredients
Method
- To make the jelly, put the 55 grams evaporated cane sugar and 4 grams agar-agar powder into a pot and then add the 4 cups coffee. Put the pot on the stove and stir it while bringing it to a boil.
- When the mixture comes to a rolling boil, remove it from the heat and pour it into an 8 x 8-inch mold. Let this cool to room temperature, cover it, and put it in the refrigerator to fully set.
- To make the sauce, add the 1/2 cup heavy cream and 1/4 cup sweetened condensed milk to a bowl and stir the mixture together until it's evenly combined. Keep the cream chilled in the fridge until you're ready to serve it.
- When the coffee jelly has been set, unmold it by inverting it onto a cutting board. You can run a toothpick along one edge of the mold to release any suction that may be holding it in.
- Cut the coffee jelly into bite-sized cubes and serve it in glass cups or bowls, drizzled with the sweet cream.