The Naked Hibiscus Chocolate Cake My Guests Always Ask For
- Prep
- 30 min
- Cook
- 40 min
- Total
- 190 min
- Serves
- 12
- Calories
- 350 kcal
- Carbs
- 55.00 g
On this page12 quick jumps
TOC
12 quick jumps
Introduction
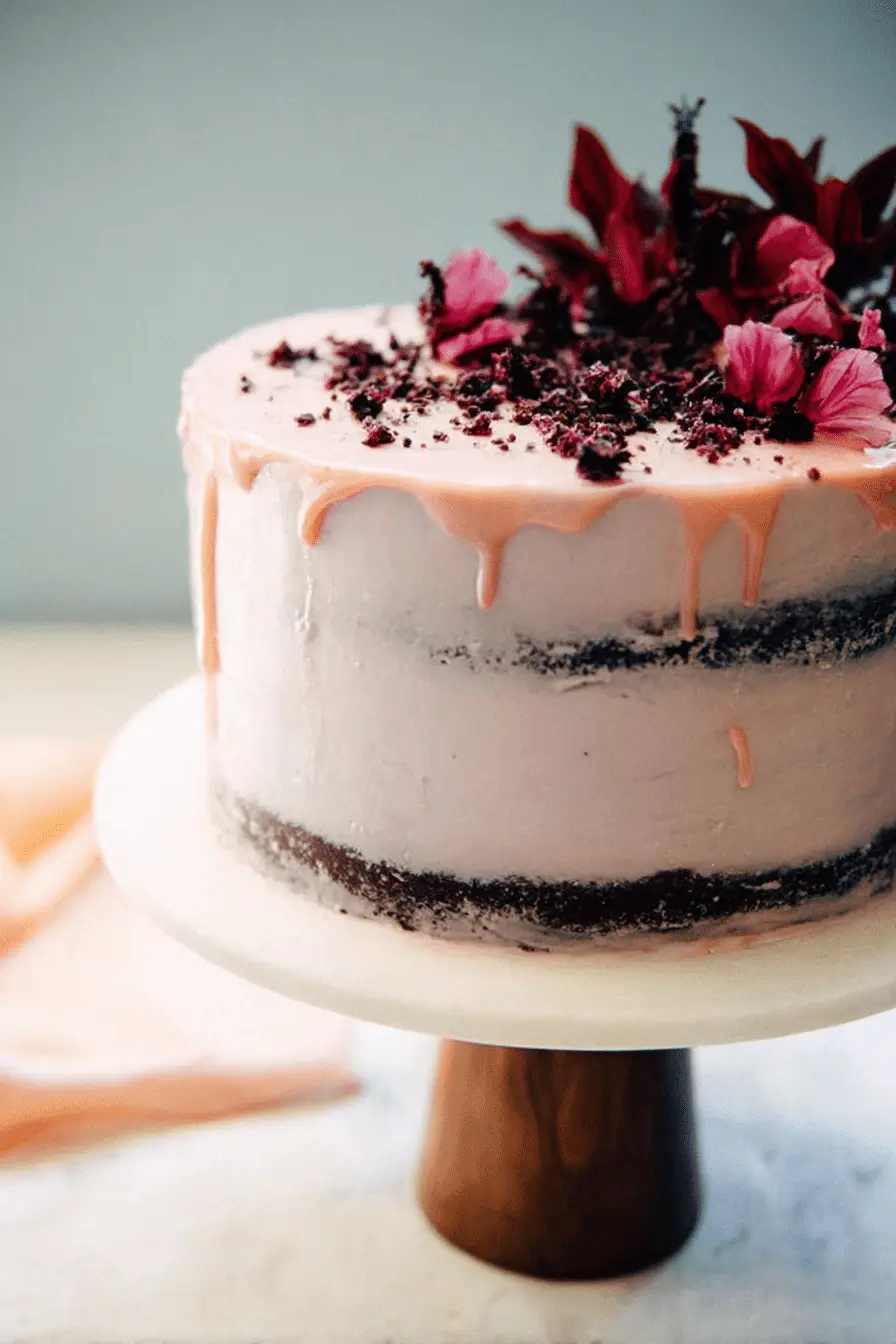
I made this naked hibiscus chocolate cake for a small anniversary dinner and it became the thing everyone kept talking about — not because it was fussy, but because the contrast felt so intentional: deep, tender chocolate layers framed by a pale pink hibiscus cream. I love recipes that look understated on the table yet read as carefully considered; this one is exactly that in my kitchen. It’s elegant, inviting, innovative — and strangely easy to carry off when you follow a few concrete techniques I rely on.

I remember listening to my family go quiet as the cake was sliced — that hush is my proof that the balance of tart hibiscus and rich chocolate works. The hibiscus adds a bright, almost citrus-like lift so the chocolate never feels heavy, and the naked finish keeps the texture front-and-center: you can see the crumb, the smear of frosting, the blush of pink against dark cake. That visual simplicity makes it perfect for birthdays, intimate celebrations, or whenever you want a dessert that reads as thoughtfully made.
I’ll show you everything I do in my kitchen to get the texture and flavor just right: how I steep the hibiscus, how I keep the layers ultra-moist, and which simple swaps let friends with dietary needs still enjoy the same memorable dessert. If you want guests to comment on presentation and then ask for the recipe afterward, this is the one I recommend.
Why this Naked Hibiscus Chocolate Cake belongs on your dessert table
The naked cake style reads as modern and effortless — the exposed layers look polished without hiding what’s inside. Visually, the pale hibiscus frosting set against dark chocolate is attention-grabbing; texturally, the tartness of hibiscus trims the chocolate’s sweetness so each forkful feels bright rather than cloying. I last served this for an anniversary where guests were balancing full plates and fatigue; the cake’s surprising lift and elegant profile kept people returning for slivers.
Sensory snapshot: imagine moist, tender crumbs that give slightly under the fork, a gentle floral-acid scent from the hibiscus tea, and a velvety frosting that’s just soft enough to smear but stable enough to hold. That contrast — dark, soft cake and luminous, slightly tart frosting — is why this belongs on a dessert table meant to impress without fuss.
Everything You Need for Naked Hibiscus Chocolate Cake
Use room-temperature dairy and eggs when the recipe calls for them so the batter emulsifies evenly; cold ingredients make the batter lumpy and the rise uneven. Choose a mixing bowl with good depth so you can scrape while mixing, and use a flexible heatproof spatula to fold and finish the batter. For the hibiscus infusion, a small stainless pot and a fine-mesh strainer will keep the liquid bright and clear.
- All-purpose flour – Provides structure; measure by feel and avoid over-packing to keep crumbs tender.
- Granulated sugar – Balances chocolate bitterness and supports a fine crumb.
- Unsweetened cocoa powder – The backbone of chocolate flavor; choose a Dutch-processed or natural based on your preference for depth versus brightness.
- Baking soda & baking powder – Leavening agents that give lift and a light crumb when combined correctly with acidic ingredients.
- Buttermilk – Adds acidity and tenderness; if you don’t have it, acidified milk keeps layers soft.
- Vegetable oil – Keeps crumbs moist in a way butter alone won’t; oil helps the cake stay tender after chilling.
- Eggs – Provide structure and richness; room temperature eggs incorporate more evenly.
- Hot coffee – Enhances chocolate without tasting like coffee; it deepens the chocolate notes and contributes moisture.
- Water – Used in small amounts to adjust batter viscosity and for steeping hibiscus.
- Dried hibiscus flowers – Give bright color, tartness and floral notes to the frosting (and can be used sparingly in the batter for an extra layer of flavor).
- Cream cheese & unsalted butter – Together they create a silky, tangy frosting that holds up when chilled.
- Confectioner's sugar – Sweetens and stabilizes the frosting; sifted for a glossy, lump-free finish.
- Kosher salt – Balances sweetness and sharpens chocolate and hibiscus notes.
What can I use instead of dried hibiscus flowers? If you can’t find dried hibiscus flowers, you can try using hibiscus tea bags or creating a similar flavor with another fruity herbal tea. I sometimes keep hibiscus tea bags on hand for quick infusions.
How hibiscus complements chocolate: flavor science in plain terms
Hibiscus brings acidity and a bright, tart character that cuts the natural sweetness and richness of chocolate. Acidity in food sharpens perception of other flavors; in this cake, it makes the chocolate taste deeper and less one-dimensional. The floral and slightly fruity aromatics of hibiscus round out chocolate’s roasted notes so the finish is cleaner and more interesting.
In my experience, adding a small amount of hibiscus into the frosting — and, if you like, a whisper in the batter — creates layers of harmony rather than standing out as a novelty. I’ll often taste the steeped tea and adjust; if it’s too tart, a touch more sugar in the frosting softens it without hiding the floral tone. Imagine picking up the cake and smelling a floral lift that nudges you toward the next forkful: that’s the effect hibiscus has on chocolate.
The secret to ultra-moist chocolate layers
Moisture comes from technique as much as ingredients. I rely on oil and buttermilk for tender crumbs, hot coffee to bloom the cocoa and deepen flavor, and precise measuring to avoid a dry result. One overlooked trick is chilling the layers before you attempt any finishing: a cold cake handles better and loses less moisture while you frost.
- Use hot coffee in the batter to bloom the cocoa — it deepens chocolate flavor and slightly loosens the batter for a moist crumb.
- Measure flour by spooning into the measuring cup or weighing; over-packed flour is the most common cause of a dry cake.
- Don’t overmix once you combine wet and dry — stop when just combined to retain air and tenderness.
- Cool the baked layers in their pans briefly, then turn out and chill wrapped; I always chill my layers for easier handling and neater assembly.
- When slicing, use a long serrated knife and warm it under hot water between slices for clean edges that don’t compress the crumb.
How do I prevent my cake layers from becoming dry? Chilling the cake layers before frosting and using buttermilk or adding a little extra oil can help maintain moisture. I add an extra minute of rest time after the cake comes out of the oven before turning it out to avoid steam loss and tearing.
Vegan & gluten-free swaps that actually keep the flavor
Yes — you can make this cake work for different diets without losing the core chocolate-and-hibiscus character. I’ve tested several swaps and the key is to replace function, not just ingredients: match moisture, structure and acidity so the end result feels familiar.
- Egg substitutes (vegan) – Flax eggs or aquafaba both mimic binding; aquafaba gives extra lift while flax offers richer mouthfeel. I prefer aquafaba when the crumb needs more spring.
- Plant-based milk & cultured alternatives – Use a tangy plant-based yogurt or add a little vinegar to non-dairy milk to mimic buttermilk’s acidity.
- Vegan butter/margarine – Choose a block-style vegan butter for frosting stability; it behaves most like dairy butter when creamed with cream cheese alternatives.
- Gluten-free flour blend – Use a blend formulated for cakes that contains a binder; expect a slightly different crumb but compensate with an extra tablespoon of oil or a touch more liquid for softness.
- Taste notes – Gluten-free versions can be drier or crumblier; I add a simple syrup brushed onto layers or a touch more hibiscus tea in the frosting to keep the mouthfeel lively.
Can I make this cake vegan? Yes! You can substitute eggs with flax eggs and use a plant-based milk instead of buttermilk. Additionally, choose a vegan butter for the frosting. I’ve had success with a flax-and-aquafaba hybrid when I want both binding and lift.
How to Make Naked Hibiscus Chocolate Cake (Step-by-Step)
- Preheat the oven and prepare two round cake pans with nonstick spray and parchment to ensure smooth release.
- Whisk together your dry components until evenly distributed so the cocoa and leaveners are uniform; this is the foundation of an even rise.
- In a separate bowl combine wet components — the acidic liquid, oil, eggs and vanilla — and whisk gently so the mixture is homogenous but not aerated excessively.
- Add the wet to the dry at low mixer speed, stirring until just combined; then pour in hot coffee and finish mixing on low to ensure an even batter without overworking the gluten.
- Divide batter into your pans and bake until a skewer comes out with a few crumbs; the centers will spring back when gently pressed.
- Cool in the pans briefly, then turn out to a rack and cool completely. Wrap the layers and chill for a couple of hours to firm them for frosting.
- Make a concentrated hibiscus infusion, strain, and cool. Beat cream cheese and butter until fluffy, then gradually add confectioner’s sugar and the hibiscus liquid until the frosting reaches a pale pink and a smooth, spreadable consistency.
- Assemble the cake by sliding chilled layers together with a thin coating of frosting between them; keep the naked sides exposed and finish with a small spoonful of frosting on top and any simple garnish you like.
Troubleshooting — common issues I see in my kitchen when making this cake:
- If the batter is too thin after adding the coffee: stop adding liquid and give it a brief rest; oven temperatures vary and sometimes you need less liquid.
- If the cake sinks at the center: it was likely underbaked or the oven door was opened too early; bake until the skewer shows a few moist crumbs and resist opening the door in the first half of baking.
- If the frosting is too runny: chill the bowl briefly and beat again, or add a little more sifted confectioner’s sugar to reach spreadable thickness.
- If the hibiscus flavor is too sharp: stir in a touch more frosting base or a small pinch of extra sugar and re-taste; hibiscus strength varies by source.
Pro Tip for naked hibiscus chocolate cake: Infusing hibiscus for balanced tartness
Steeping hibiscus correctly makes the difference between a bright, floral lift and an off-putting bitterness. I always taste the tea before I add it to frosting and adjust the steep time accordingly.
- Bring water to a full boil, remove from heat, then add hibiscus and steep for a short, controlled time — over-steeping can bring astringency.
- Strain immediately and cool the infusion; use the strained liquid as the only source of hibiscus flavor in your frosting so you control intensity consistently.
- Slowly drizzle infused liquid into the frosting while you beat; stop when the pink hue and tartness feel balanced to your palate.
- If you want a whisper of hibiscus in the cake layers themselves, macerate a small portion of dried hibiscus in the hot coffee briefly, strain, and use that coffee in the batter for an integrated note without altering texture.
How to Store, Chill and Serve — plus easy variations
Storage is straightforward but important for preserving texture: keep the cake covered and chilled; the frosting firms and protects the crumb, while the naked sides stay appealing. How can I store the Naked Hibiscus Chocolate Cake? You can store the cake in the refrigerator for up to a week. Just make sure it's covered to keep it fresh!
When serving, remove the cake from the fridge a short while before slicing so the frosting softens slightly and the crumb warms for best flavor. Garnish ideas: scatter a few edible hibiscus petals, a few thin citrus zests, or whole berries for color and freshness.
Variations
- Swap the cream cheese frosting for a stabilized whipped ganache with a touch of hibiscus syrup for a glossier finish and different mouthfeel.
- Add a thin layer of jam or hibiscus syrup between layers for extra moisture and a brightness that plays well with chocolate.
- For a citrus lift, add finely grated orange zest to the frosting and a small squeeze of fresh juice to the hibiscus infusion.
Serving suggestion: present the cake on a low pedestal so guests can see the exposed layers; a small offset spatula swipe across the top keeps the look intentionally undone and elegant.
Frequently Asked Questions
Can I make this cake vegan?
Yes! You can substitute eggs with flax eggs and use a plant-based milk instead of buttermilk. Additionally, choose a vegan butter for the frosting.
How can I store the Naked Hibiscus Chocolate Cake?
You can store the cake in the refrigerator for up to a week. Just make sure it's covered to keep it fresh!
What can I use instead of dried hibiscus flowers?
If you can't find dried hibiscus flowers, you can try using hibiscus tea bags or creating a similar flavor with another fruity herbal tea.
How do I prevent my cake layers from becoming dry?
Chilling the cake layers before frosting and using buttermilk or adding a little extra oil can help maintain moisture.
What special occasions is this cake ideal for?
This beautiful cake is perfect for birthdays, anniversaries, or any gathering where you want to impress guests with a unique dessert!
Ingredients
- 1 3/4 cupsall-purpose flour ((8.75 ounces))
- 2 cupsgranulated sugar ((14 ounces))
- 3/4 cupunsweetened cocoa powder ((2.25 ounces))
- 2 teaspoonsbaking soda
- 1 teaspoonbaking powder
- 1 teaspoonkosher salt
- 1 cupbuttermilk ((8 ounces))
- 1/2 cupvegetable oil ((4 ounces))
- 2 largeeggs (at room temperature)
- 1 teaspoonpure vanilla extract
- 1 cupfreshly brewed hot coffee
- 1/2 cupwater ((for hibiscus tea))
- 2 tablespoonsdried hibiscus flowers
- 8 ouncescream cheese (at room temperature)
- 1/2 cupunsalted butter ((1 stick // 4 ounces), at room temperature)
- 3 1/2 cupsconfectioner's sugar (sifted)
- a pinchkosher salt
Instructions
- 1
Preheat the oven to 350°F. Prepare two 8 inch round cake pans by spraying generously with cooking spray and lining the bottom of each pan with parchment paper circles. Spray the top of each parchment circle and set aside.
- 2
In a large mixing bowl, combine flour, sugar, cocoa powder, baking soda, baking powder, and salt. Mix on low speed until thoroughly combined.
- 3
In a separate bowl, whisk together buttermilk, oil, eggs, and vanilla until just combined.
- 4
Slowly add the wet ingredients to the dry ingredients. Add hot coffee and mix until just combined. Scrape the bowl to ensure batter is mixed well.
- 5
Pour batter into prepared pans and bake for 35 to 40 minutes. Allow cakes to cool in pans for 30 minutes before turning out onto wire racks to cool completely.
- 6
Chill the cooled cakes wrapped in plastic for at least 2 hours before frosting.
- 7
Prepare hibiscus tea by boiling water and steeping dried hibiscus flowers for at least 10 minutes. Strain out the flowers.
- 8
In a mixer, beat cream cheese and butter until fluffy. Gradually add confectioner's sugar until fully incorporated. Add salt and mix. Slowly drizzle in hibiscus tea until frosting is a pale pink.
- 9
Frost the cooled cake with hibiscus cream cheese frosting.
Recipe Card
The Naked Hibiscus Chocolate Cake My Guests Always Ask For
Keep it handy for later, send it to someone cooking with you, or open the clean print view.
- Prep
- 30 min
- Total
- 190 min
- Serves
- 12
You might also like
The Mocktail My Guests Ask For — Lychee Italian Soda With Blue Tea
May 20, 2026
How I Perfected Delicate Lychee Rose Macarons with Real Lychees
May 20, 2026
The Coconut-and-lime Jelly Bowls My Guests Always Ask For
May 20, 2026
The Homemade Treat My Kids Beg For: DIY Honey Lemon Gummy Bears
May 20, 2026
Reviews
Be the first to review this.