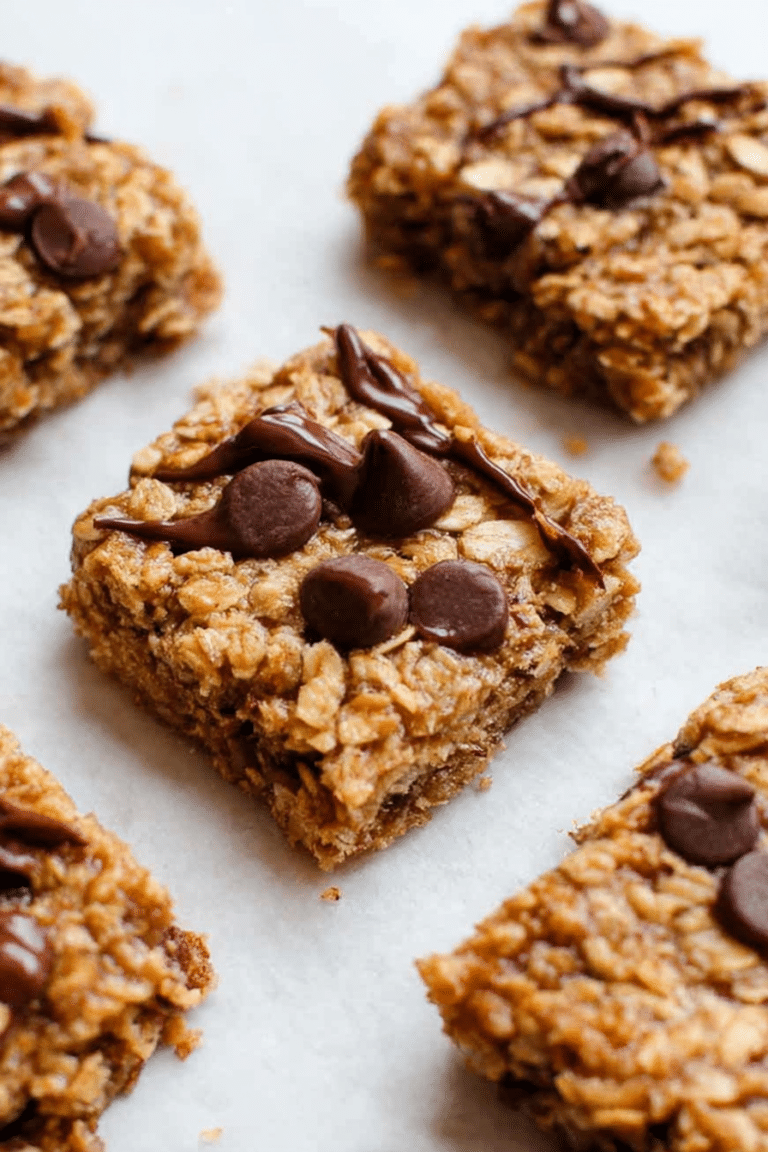
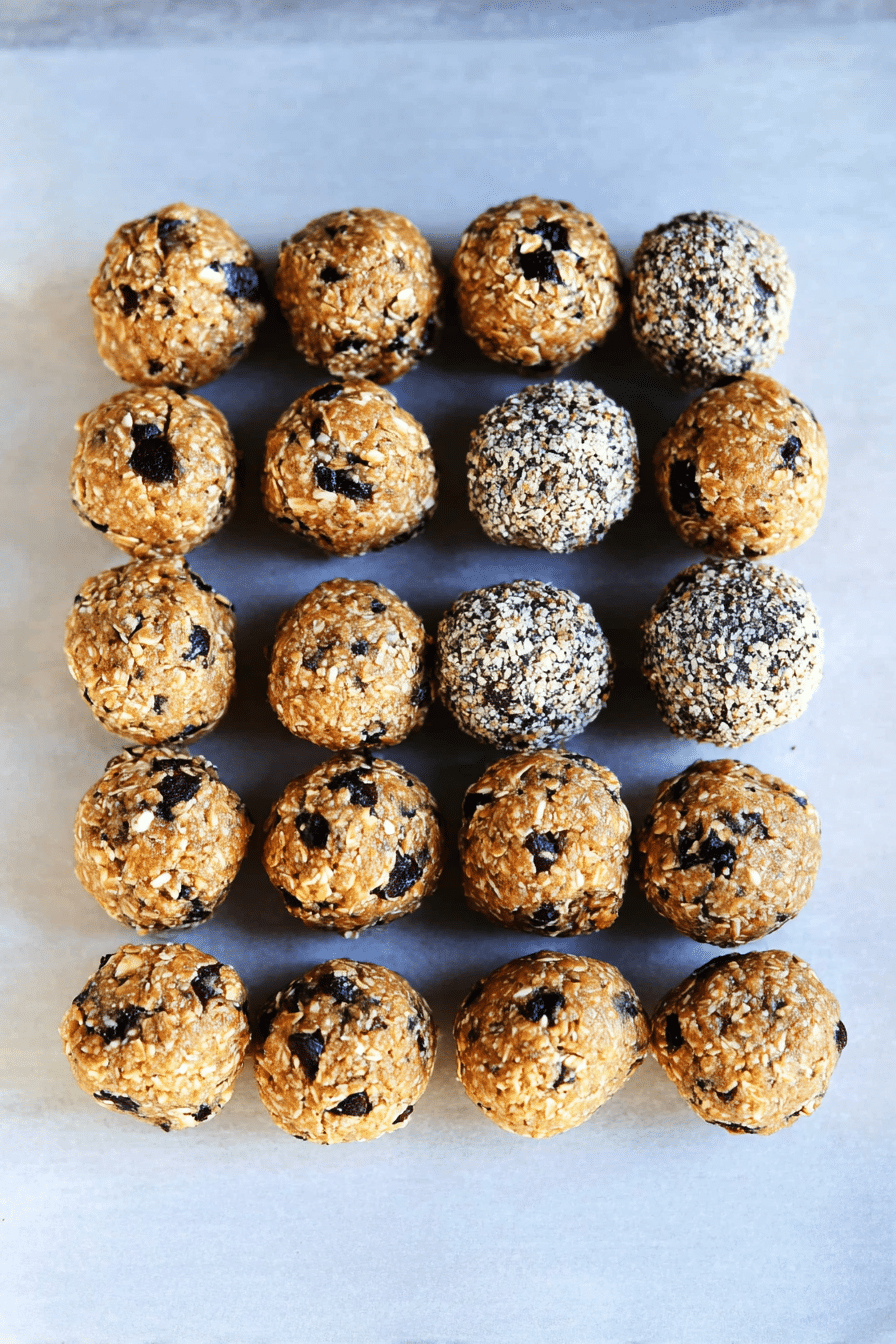
Protein balls have been one of my kitchen go-tos for years — the kind of recipe I make when I want something satisfying, portable, and not fussy. I first started making these on hectic mornings when I needed a grab-and-go breakfast for the kids and myself, and they quickly became the snack I bring to the gym, to road trips, and to afternoon meetings. They’re small, but they carry a lot of flavor and texture: a soft, slightly sticky center, the little pop of chocolate chips, and that nutty, toasty scent when you warm one for a few seconds.
I’ve learned a few simple truths by actually making these dozens of times: the type of protein powder you use changes the texture a lot, a touch of salt transforms sweetness into something more grown-up, and these won’t be crunchy like a cookie — they’re soft and spoonable, meant to be chewed, savored, and tucked into a lunchbox. Below I’ll walk you through why they work, how to make them reliably, and ways to customize them so they fit your pantry and your life.
Benefits of Protein Balls
Protein balls are one of those snacks that quietly do a lot for you. They combine protein, healthy fats, and fibre in a portable package, which helps regulate blood sugar and keeps you full longer than a sugary bar. After a workout I’ll eat one with a banana and feel good about the recovery — the protein helps with muscle repair, and the carbs give a gentle energy top-up.
They’re also hugely convenient: mix, roll, and refrigerate — then you’ve got a week’s worth of snacks in one go. For people juggling busy schedules, athletes needing post-exercise fuel, or anyone wanting to curb late-afternoon cravings, these are a practical solution.
One more note from my kitchen: they’re forgiving. If you run out of one ingredient, there’s usually a pantry-friendly swap that still gives you a great result.
For another nutritious option, try our Banana Peanut Butter Oatmeal Bars, which complement the benefits of protein balls.
Ingredients for the Perfect Protein Balls
- Quick-cook oats – provide bulk, chew, and a whole-grain base that holds everything together; use certified gluten-free if needed.
- Protein powder – adds the protein punch and affects texture; choose whey or plant-based depending on preference.
- Nut butter (peanut or almond) – provides healthy fats, creaminess, and helps bind the mixture.
- Liquid sweetener (maple syrup or honey) – sweetens and moistens; feel free to adjust to taste.
- Chia seeds – tiny texture and fiber boost; they also absorb moisture and help firm the balls.
- Cinnamon – warms and rounds out flavors; optional but recommended.
- Salt (a pinch) – balances sweetness and brings out deeper flavors.
- Water – added sparingly to reach the right dough-like consistency.
- Mini chocolate chips – for pockets of melty chocolate and a treat-like finish; dairy-free chips work well.
For a fun and delicious twist, check out our Quick Monster Cookie Protein Balls recipe that is a favorite among snack lovers.
Step-by-Step Instructions
This is the exact recipe I use most weeks — it’s no-bake, takes about 10 minutes of hands-on time, and yields roughly 22 balls. I’m including the precise measurements here so you can recreate what I made in my kitchen.
- Prep: Line a large baking pan with parchment paper. I like to leave a little corner of the parchment hanging over the edge so it’s easy to lift the tray into the fridge.
- Mix dry: In a large mixing bowl combine 1 cup quick-cook oats (certified gluten-free if needed), 1 cup vanilla protein powder, 1 tablespoon chia seeds, 1/4 teaspoon cinnamon, and a pinch of pink Himalayan salt. Stir these so the protein powder isn’t clumpy — I usually whisk them once to get an even base.
- Add the binders: Add 1/2 cup peanut butter (or almond butter), 1/3 cup maple syrup (or honey), and 1 tablespoon vanilla extract to the dry mix. At first it looks way too dry — don’t panic. Use a sturdy spoon or your hands; the nut butter will coat the oats and protein powder and start to come together.
- Adjust moisture: Add 1 tablespoon water at a time (I usually end up using 1 to 3 tablespoons total, depending on the protein powder). The goal is a soft, slightly sticky dough that holds when you press it. If it’s crumbly, add another teaspoon of water or a drizzle more nut butter. If it’s too wet and won’t roll, add a spoonful of oats or a little extra protein powder.
- Stir in mix-ins: Fold in 1/2 cup dairy-free mini chocolate chips. If you add dried fruit instead, chop it small so it distributes evenly.
- Portion and roll: Using a tablespoon cookie scoop, scoop out the dough onto the lined sheet. Roll each scoop gently between your palms until smooth. If your hands are warm and the mixture sticks too much, dampen them slightly or chill the tray for 10 minutes before rolling the rest.
- Set: Place the rolled balls back on the parchment and chill in the refrigerator to firm up for at least 20–30 minutes before transferring to an airtight container. They’re soft straight from the bowl but set up nicely in the fridge.
- Store: Store in an airtight container in the refrigerator for up to one week, or freeze for longer-term storage (see storage section for details).
Yield: about 22 protein balls. Prep time: ~10 minutes. No baking required.
Storage Tips for Protein Balls
I always make a double batch and freeze half. Here’s my practical system from years of meal prep:
- Refrigerator: Keep balls in a single layer or with parchment between layers in an airtight container. They stay best for up to 1 week.
- Freezer: Freeze on a single tray until solid, then transfer to a labeled, dated freezer bag or container. They’re great for up to 3 months.
- Thawing: Pop frozen balls in the fridge overnight or sit at room temperature for 20–30 minutes. Do not microwave from frozen — it makes them greasy and can alter texture.
- Labeling: I always write the date on the container. With snacks like this, freshness matters for texture more than safety.
Customizations and Flavor Variations
One of the best things about protein balls is how adaptable they are. Here are combinations I’ve tested and loved (and the small mistakes I made when trying them):
- Tropical – coconut flakes, chopped dried pineapple, and chia seeds. The coconut adds chew and the pineapple adds brightness. If you use big pineapple chunks, they can make the balls too wet, so chop finely and pat them dry.
- Chocolate-Orange – cocoa powder, orange zest, and dark mini chips. I learned to zest carefully — the white pith is bitter and can ruin the balance.
- Matcha-Lime – matcha powder, a squeeze of lime, and chopped pistachios for color and crunch. Matcha can be dry and slightly bitter; add a touch more sweetener if needed.
- Nutter-Free – use sunflower seed butter or tahini for nut-free households. The texture is slightly silkier and may need less added water.
- Savory-style – I’ve experimented with a cheese-forward savory bite (think herbs, shredded hard cheese, and finely chopped sun-dried tomato). These are more of a novelty and will not be sweet — expect a different shelf life and refrigerate them promptly.
If you’re a chocolate lover, you won’t want to miss our delicious Chocolate Protein Balls that make a delightful variation.
Nutritional Breakdown
Here’s the straightforward breakdown I use to plan snacks. For the base recipe above, the approximate nutrition per ball (one of 22) from my calculations is:
- Calories: ~104 kcal
- Protein: ~5 g
- Fat: ~5 g
- Carbohydrates: ~11 g
How ingredients change the numbers: swapping peanut butter for almond butter slightly shifts the fat profile (more monounsaturated fats with almond), using a higher-protein powder (or adding a scoop more) raises the protein per ball, and adding chia or flax increases fiber and omega-3s. Adding chocolate chips increases sugar and calories, while replacing chips with chopped nuts increases fat and texture without adding as much sugar.
Micronutrients you’ll pick up include iron from some protein powders and seeds, magnesium from nut butters, and small amounts of B vitamins from oats. If you want a truly targeted nutritional change (more protein, less sugar), adjust the protein powder and sweetener quantities accordingly.
For more high-protein snacks, check out our High Protein Egg White Bites that are perfect for muscle recovery and energy boosts.
Serving Suggestions
I rotate how I eat these depending on the day:
- Post-workout: Pair a protein ball with a small banana or a cup of plain yogurt for a quick recovery snack.
- Breakfast addition: Crumble one into a smoothie bowl or yogurt for texture and flavor.
- Snack box: Pack two with an apple and a handful of carrot sticks for a balanced mini-meal.
- Dessert-style: Warm one for 10 seconds in the microwave and serve next to a scoop of frozen yogurt — they turn almost truffle-like.
FAQ
Are protein balls actually healthy?
Yes! Protein balls are a great healthy alternative to sugary snacks. They can provide an energy boost thanks to their protein, healthy fats, and fiber content.
How do I make protein balls stick together?
If your protein balls aren’t sticking together well, try adding a bit more moisture. Just add a teaspoon of water at a time until the mixture holds together nicely.
What kind of protein powder should I use for protein balls?
Whey or casein protein powders work best for protein balls. A blend of both typically yields the best consistency and taste.
Can I customize my protein ball recipe?
Absolutely! Feel free to mix in dried fruits, seeds, or spices to create your own unique flavor combinations. Get creative!
How should I store my protein balls?
Store your protein balls in an airtight container in the refrigerator for up to a week, or freeze them for longer shelf life.
Conclusion
Making protein balls at home is one of those small, satisfying habits that pays off. They’re quick to make, forgiving of pantry substitutions, and scale well for meal prep. Over the years I’ve learned which protein powders yield the best texture, how a little salt improves flavor, and why chilling the dough for a few minutes can save a sticky rolling session. Try the base recipe exactly once, then play — swap nut butters, change mix-ins, and adjust sweetness until they’re yours. Share them with friends, tuck them into lunchboxes, or keep them all to yourself. Either way, you’ll have a reliable, nutritious snack that fits into a busy life and tastes like it was made with intention.
Protein Balls Recipe
Ingredients
Method
- Line a large baking pan with parchment paper.
- In a large bowl combine the oats, protein powder, peanut butter, maple syrup, chia seeds, cinnamon, and a pinch of salt and mix well.
- Add 1 tablespoon at a time of water until the consistency is like a dough and all the oats are coated. Mix in the chocolate chips.
- Using a tablespoon cookie scoop, scoop out the dough onto the cookie sheet. Roll each ball of the dough into smooth balls and set back on the parchment paper.
- Store in the refrigerator in an airtight container for up to 1 week.
Notes