I’ve been making hummus for years, and this roasted red pepper version became my go-to when I needed a quick, crowd-pleasing dip that still tastes thoughtful. In my kitchen it takes about 25 minutes from start to finish when I use pantry chickpeas and a quick broil or char on the burner. The result: a vivid, silky hummus with a gentle smokiness and bright lemon lift that never feels heavy.
I like this recipe because it’s forgiving: small tweaks to lemon, oil, or spice change the personality of the dip without breaking it. When the peppers hit the food processor, the kitchen fills with the warm scent of roasted pepper and garlic — that aroma signals the payoff for very little effort. I often make a double batch to stash in the fridge for lunches, sandwiches, or an easy appetizer at short notice.
Because the steps are minimal and most of the heavy lifting happens in the blender, this recipe fits right into a busy weeknight or a last-minute get-together. I’ve included tips below for texture and flavor adjustments so you can customize it easily based on what you have on hand.
Keep reading for everything from ingredient choices and quick troubleshooting to smart make-ahead tips that help this hummus earn a regular spot in your fridge.
Why This Roasted Red Pepper Hummus Is Perfect for Busy Cooks
This recipe is designed to save you time without skimping on flavor. The big wins for busy cooks are predictable: a short active time, mostly pantry ingredients, and flexible finish options that make it useful for meals across the week. Sensory-wise, you’ll notice the sweet, slightly charred aroma of roasted peppers, the creamy mouthfeel from tahini and oil, and a bright pop from fresh lemon.
Specifically, expect about 25 minutes total when you use canned chickpeas and a quick method to roast peppers. Minimal chopping, a single appliance (your food processor or blender), and an easy clean-up make this a reliable choice when you’re pressed for time but still want something that looks and tastes special on the table.
Everything You Need for Roasted Red Pepper Hummus
- * Chickpeas – The creamy base and main source of fiber and plant protein; canned chickpeas save time while cooked dried chickpeas give slightly creamier texture.
- * Roasted red bell peppers – Provide sweetness, color, and smokiness; roasting concentrates sugars and boosts vitamin C availability.
- * Tahini – Adds sesame richness and a silky mouthfeel; contributes healthy fats and calcium.
- * Garlic – Adds pungent depth and aroma; raw garlic gives a sharp bite that mellows slightly once blended.
- * Extra virgin olive oil – Builds creaminess and carries flavor; use it for a glossy finish and heart-healthy monounsaturated fats.
- * Lemon juice – Brings brightness and acidity that balances the richness and enhances other flavors.
- * Cumin and smoked paprika – Provide warmth and a smoky backbone; smoked paprika reinforces the roasted pepper’s charred notes.
- * Cayenne (optional) – A small amount gives heat without masking the pepper’s sweetness; capsaicin can also slightly boost metabolism.
- * Salt & black pepper – Essential for seasoning and unlocking the flavors of other ingredients.
How to Make Roasted Red Pepper Hummus (Step-by-Step)
- Char or roast the peppers: place them under a hot broiler or over a gas flame until skins blister and blacken. Transfer to a bowl, cover to steam for a few minutes, then peel, seed, and roughly chop.
- Combine ingredients: add rinsed chickpeas, roasted peppers, minced garlic, tahini, olive oil, lemon juice, cumin, smoked paprika, and optional cayenne to your food processor or blender.
- Blend until smooth: run the processor, scraping down the sides as needed. Stop and taste at intervals so you can adjust seasoning and texture.
- Adjust consistency: if the hummus is too thick, add cold water or a little extra olive oil and blend again until you reach a silky consistency.
- Final seasoning: add salt and freshly ground black pepper to taste; more lemon adds lift, more smoked paprika adds depth, and a drizzle of olive oil at the end adds richness.
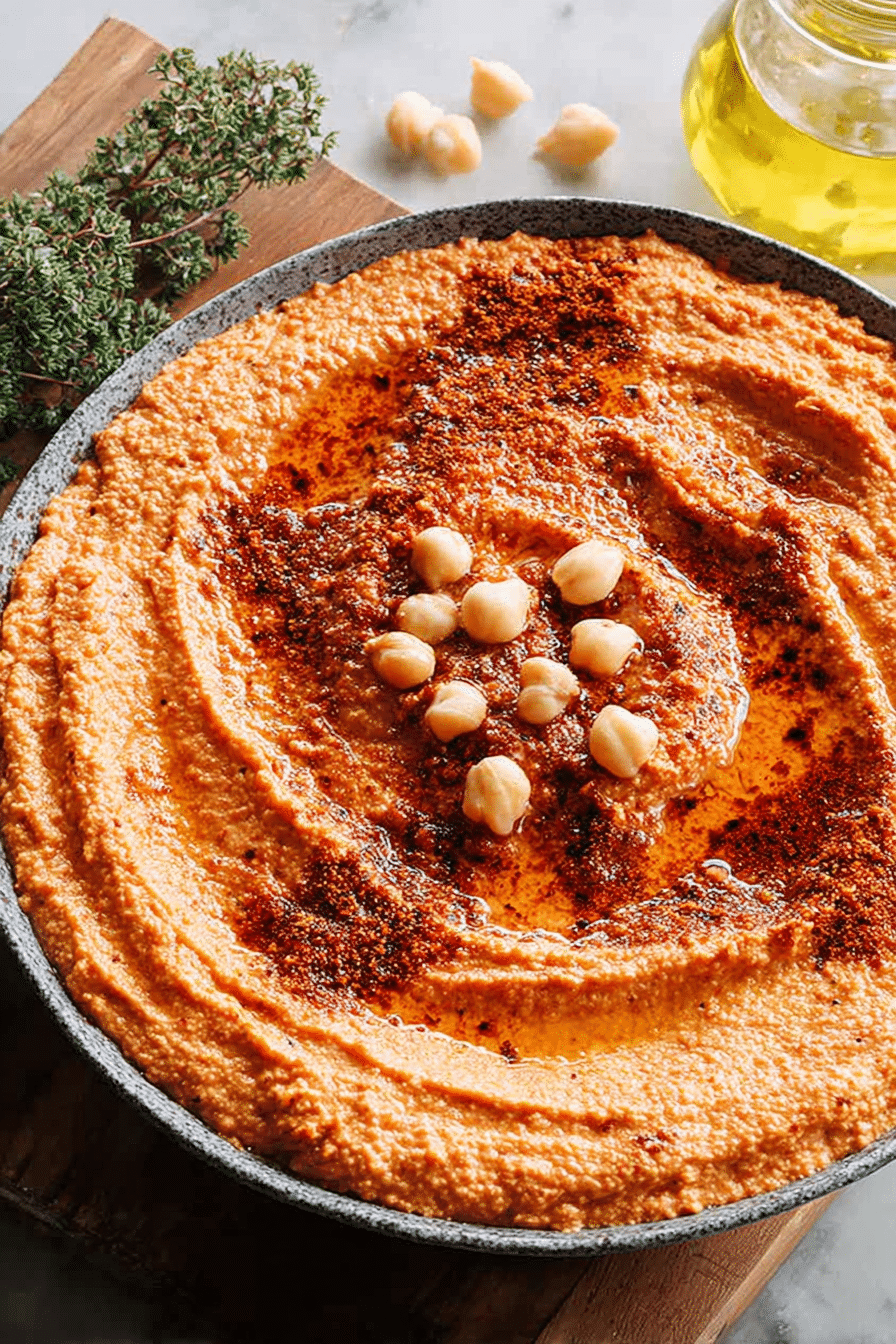
- Serve: transfer to a bowl, smooth the top, drizzle olive oil, and sprinkle smoked paprika or fresh herbs as garnish.
Troubleshooting
- I’ve found that if your hummus tastes flat, a squeeze more lemon and a pinch more salt brightens it immediately.
- If the texture is grainy, run the blender longer and add a tablespoon of cold water at a time—cold water helps suspend the fats and give a creamier mouthfeel.
- When peppers still have skins or bits, make sure they steamed long enough before peeling; the steam loosens the charred skin and prevents gritty pieces.
Canned vs. Cooked Chickpeas: Which Makes Better Hummus?
Canned chickpeas are a huge time-saver and produce very good hummus with minimal effort — great for weeknights and last-minute entertaining. They’re already tender and predictable, which keeps the active time low. If you use dried chickpeas cooked from scratch, the hummus often becomes even silkier because you can simmer them until they start to fall apart; some people add a pinch of baking soda while simmering to break down the skins for an ultra-smooth finish.
On the homemade vs. store-bought question: store-bought hummus can be convenient, but homemade lets you control salt, oil, and spice levels and customize texture and flavor. For busy cooks who want both speed and quality, canned chickpeas in a homemade recipe hit the sweet spot.
The Secret to a Super-Smooth Texture
The creaminess comes from three things working together: properly cooked or well-rinsed canned chickpeas, creamy tahini, and the right blending technique. Olive oil and tahini provide fat that creates a smooth mouthfeel; emulsifying those fats with liquid (cold water or lemon juice) helps achieve a silky texture. Blending time is crucial — the longer you pulse and scrape, the smoother the result.
For a scientific note: briefly steaming or simmering cooked chickpeas can help loosen skins and soften their interior, and adding a small amount of cold water while blending helps suspend oils and gives the hummus that luxurious, velvety consistency.
Why Roasting Red Peppers Changes the Flavor
Roasting concentrates the peppers’ natural sugars and produces browning reactions that deepen flavor. You’ll notice a shift from raw, grassy notes to something sweeter, slightly smoky, and more complex. Caramelization of sugars and other browning reactions create those savory, slightly sweet compounds that make the hummus taste richer and more layered. Aromatically, the kitchen fills with a toasted, sweet-pepper scent that signals the pepper’s transformation.
Pro Tip for roasted red pepper hummus: Boost Nutrition Easily
- I often stir in a handful of baby spinach or a few squeezed leaves of kale before blending for extra iron and vitamins— the color is subtle but the nutrient boost is real.
- Add toasted seeds (pumpkin or sunflower) on top for extra zinc and crunchy texture without changing the core recipe.
- Swap part of the olive oil for plain Greek-style yogurt if you want more protein and a slightly tangy finish; I do this when I want a lighter, protein-forward dip for lunches.
Easy Variations for Spicy, Nut-Free, or Lower-Fat Versions
- Spicy: Increase cayenne or add a spoonful of harissa or your preferred hot sauce to taste; smoked chili flakes also pair well with the roasted pepper.
- Nut-free/No Tahini: Use extra olive oil and a spoonful of sunflower seed butter or simply increase the lemon and garlic for brightness—these keep the creaminess while avoiding sesame.
- Lower-fat: Reduce the oil and fold in a little plain low-fat yogurt after blending for a lighter texture with preserved creaminess.
- Herbed: Blend in fresh basil or parsley for a bright herbal note that complements the sweetness of the peppers.
How to Store, Serve, and Make-Ahead Roasted Red Pepper Hummus
Store hummus in an airtight container in the refrigerator for up to a week; the flavors continue to meld, and a light stir before serving restores the texture. For longer storage, freeze hummus in portions (I like ice cube trays) and thaw in the fridge overnight. Note that freezing may slightly change the texture, so use frozen hummus more for cooked dishes or spreads than for a centerpiece dip.
Serving ideas beyond pita and crudités: use the hummus as a spread for sandwiches and wraps, dollop it onto roasted grain bowls, or thin it slightly with water and use it as a quick pasta sauce. It’s also excellent as a flavor-packed base for baked fish or roasted vegetables.
If you want to make this ahead, roast the peppers a day in advance and keep them chilled; blend everything shortly before serving for the freshest flavor and best texture.
Frequently Asked Questions
Can I use dried chickpeas instead of canned?
Absolutely! If you prefer using dried chickpeas, soak them overnight and cook them until tender before adding them to your hummus.
How do I make hummus creamier?
To achieve a creamier texture, blend your hummus longer and consider adding a little cold water or additional olive oil until you reach your desired consistency.
Is there a way to make this hummus spicier?
Yes! You can add more cayenne pepper or even a dash of hot sauce to give it an extra kick of heat.
How should I store leftovers?
Store your roasted red pepper hummus in an airtight container in the refrigerator for up to a week. Just give it a good stir before serving again.
What can I serve with this hummus?
This hummus is great with pita bread, fresh vegetables, or crunchy crackers. You can also use it as a delicious spread in sandwiches or wraps.
Roasted Red Pepper Hummus
Ingredients
Method
- If using fresh peppers, place them directly over an open flame on a gas stove or under a broiler, turning occasionally until the skins are blackened and blistered (about 10-15 minutes). Transfer the roasted peppers to a bowl, cover with a plate or plastic wrap, and let them steam for 5 minutes. Once cool enough to handle, peel off the charred skins, remove the seeds, and roughly chop the peppers.
- In a food processor or blender, combine chickpeas, roasted red peppers, garlic, tahini, olive oil, lemon juice, cumin, smoked paprika, and cayenne pepper. Blend until smooth, stopping to scrape down the sides as needed.
- If the hummus is too thick, add 1-2 tablespoons of cold water or more olive oil until you reach the desired consistency.
- Add salt and black pepper, then blend again. Taste and adjust seasoning as needed, more lemon juice for brightness, more smoked paprika for depth, or an extra drizzle of olive oil for richness.
- Transfer the hummus to a serving bowl, smoothing the top with a spoon. Drizzle with olive oil, sprinkle with smoked paprika, and add optional garnishes like fresh parsley or toasted pine nuts.
- Serve with warm pita, fresh veggies, or crunchy crackers. It also makes a delicious spread for sandwiches or wraps.