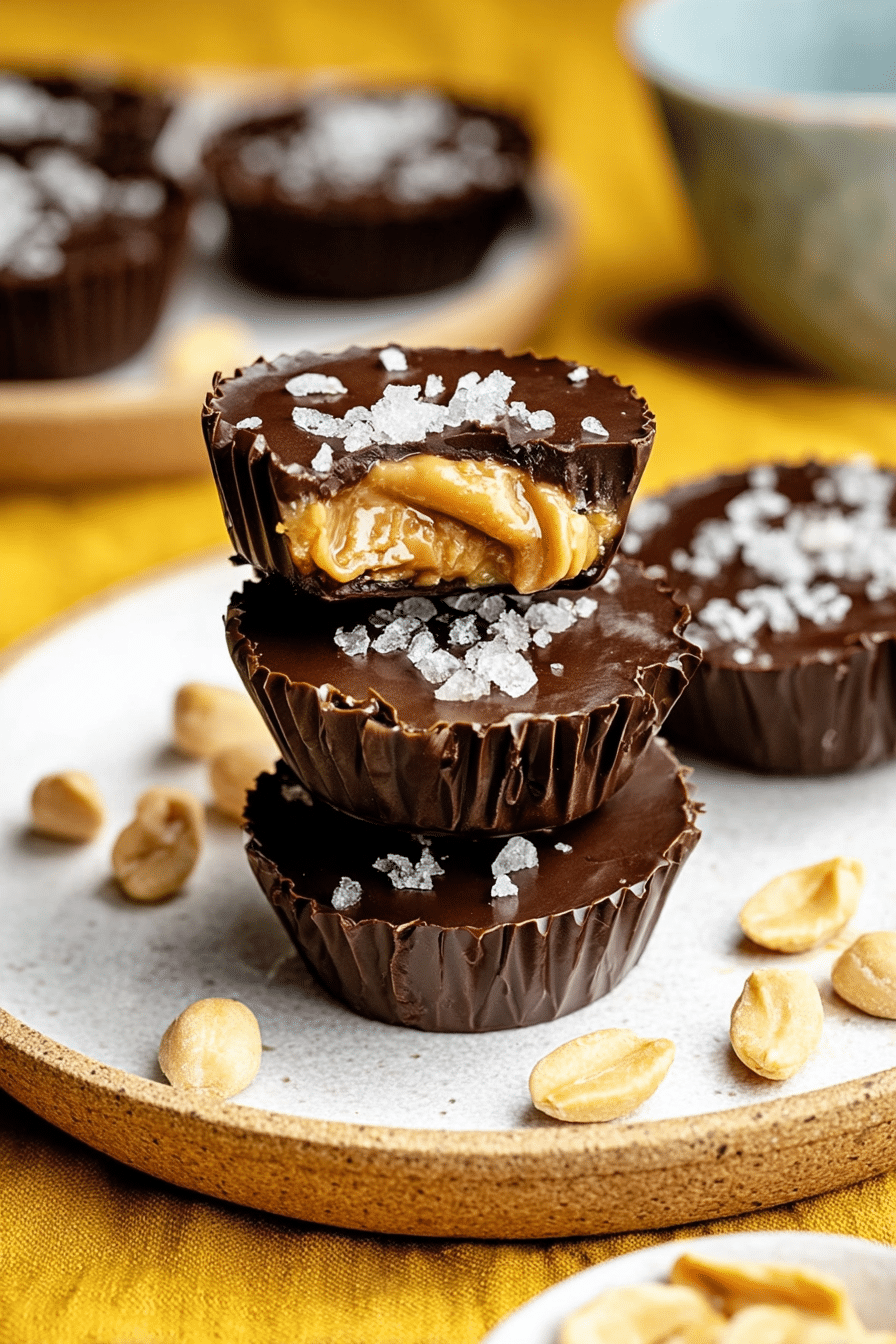
I make these salted chocolate peanut butter banana cups when I need a quick, satisfying snack that feels special without much fuss. I like how they come together with just a few pantry staples and no oven—perfect for afternoons when you’re short on time but want something a bit indulgent. The chilled chocolate shell snaps against a creamy nutty center and a tender banana bite, which is exactly what I reach for when I want a small, portable treat.
These cups live in my freezer, ready to grab when someone needs a quick sugar hit that still feels a little wholesome. I often make a batch on a weekend and portion them into liners so they’re easy to pack for lunches or to pull out after a workout. The contrast of glossy chocolate, creamy peanut butter, and fresh banana is simple but reliable.
I paid attention to assembly tricks over the years—how cold chocolate behaves, how warm filling can melt a shell, and how sliced banana texture changes in the freezer. Those little adjustments save time and keep the final cups neat and consistent. If you like a similar, protein-packed snack, try our Chocolate Peanut Butter Protein Balls for another delicious option.
Why these Salted Chocolate Peanut Butter Banana Cups are perfect for busy, healthy snacking
These cups fit a busy routine because they require minimal hands-on time and no baking. You prepare a few components, assemble, and let the freezer do the rest. The banana adds natural sweetness and a fresh texture that keeps each bite from feeling overly rich. Keep a stash in the freezer and you can have a single-portion treat without overindulging.
Visually, the glossy chocolate and a sprinkle of flaky sea salt make them look like a treat you might buy—but they’re homemade and ready faster than a takeout run. Smell-wise, expect the warm roast of chocolate when you melt it and a nutty aroma as you mix the filling. The crisp snap of chilled chocolate followed by a smooth, creamy interior is the reason I keep making them.
Everything You Need for Salted Chocolate Peanut Butter Banana Cups
- 70% dark chocolate – Provides a deep chocolate flavor and a firmer shell; swap to milk chocolate if you prefer sweeter cups.
- Natural creamy peanut butter – Gives the filling a nutty richness and creamy mouthfeel; choose a brand with a simple ingredient list for best flavor.
- Pure maple syrup – Adds balanced sweetness and helps the filling hold together without becoming gritty; honey or a liquid sweetener works as a swap.
- Virgin coconut oil – Loosens the peanut butter slightly so the filling spreads; replace with a neutral oil or omit if your nut butter is already very runny.
- Banana – Fresh slices add natural sweetness and a soft texture contrast; pick a banana that’s ripe but still firm for best results.
- Chopped peanuts – Add crunch and visual contrast; use roasted or honey-roasted for an extra flavor pop.
- Flaky sea salt – A finishing sprinkle that lifts the chocolate and nut flavors.
- Tools – Mini muffin pan, mini liners, microwave-safe bowls (or a heatproof bowl for a double boiler), a small spoon for spreading, and a freezer with flat shelf space.
The secret to the perfect shell: choosing and melting chocolate
Choose a high-quality chocolate with a higher cocoa percentage if you want a less sweet, sturdier shell. Higher cocoa content yields a firmer snap when frozen and a richer chocolate flavor that balances the sweetness of the banana and maple.
When melting, work in short intervals and stir between bursts. This prevents scorching and keeps the chocolate smooth and glossy. The aroma while stirring should be warm and cocoa-forward; if it smells burnt, you’ve overheated it.
Chocolate thickness matters: a thin coating will harden quickly but may be fragile, while a thicker coating gives you better structure for biting into. If your melted chocolate seems too thick to spread, add a tiny amount of neutral oil and stir until glossy and pourable.
How to keep the peanut butter filling creamy (and simple swap-ins)
- Mix your peanut butter with a little liquid sweetener and a touch of melted coconut oil to create a silky, spreadable filling. If the mixture is stiff, a brief warm-up in the microwave or a warm water bath will loosen it without overheating.
- For texture control, don’t overheat the peanut butter—warm it just enough to stir easily so it doesn’t become oily.
- Swap-ins: almond or cashew butter for a different nut profile; sunflower seed butter as a nut-free alternative. For a sugar-free option, use a liquid erythritol syrup or a zero-calorie liquid sweetener that won’t crystallize the filling.
- When forming the filling, keep it slightly thicker than you want in the finished cup because freezing firms it up; you should still be able to press chopped nuts into it so they stay put when covered in chocolate.
For another delightful peanut butter treat, consider making Peanut Butter Rice Krispie Treats that are equally satisfying!
How to Make Salted Chocolate Peanut Butter Banana Cups (Step-by-Step)
- Line a mini muffin pan with liners so assembly is quick and cleanup is minimal.
- Melt your chocolate slowly in short bursts, stirring until completely smooth and glossy so it spreads easily into liners.
- Drop a spoonful of melted chocolate into each liner and tilt or use a small spoon to push the chocolate up the sides to form a shell; pop the pan in the freezer for a short set so the shell firms.
- Stir together the peanut butter, maple syrup, and melted coconut oil until the texture is creamy and spreadable; warm slightly if needed to reach the right consistency.
- Spoon a portion of the peanut butter filling into each chilled shell and press in a few chopped peanuts for crunch.
- Top each filled cup with a banana slice that’s firm and not overly ripe so it holds its shape when frozen.
- Cover each cup with more melted chocolate, smooth the tops, then freeze until fully set.
- When fully frozen, remove from the pan, sprinkle with flaky sea salt, and store in the freezer layered with parchment to prevent sticking.
Troubleshooting
- If the chocolate won’t firm up, chill the pan in the freezer briefly before filling and ensure your freezer is cold enough.
- If the filling is oily or separated, warm gently and whisk to recombine; add a tiny bit more maple syrup or coconut oil to smooth it out.
- If banana slices turn too brown, use slightly firmer slices and assemble just before freezing; a quick squeeze of lemon on the slices can slow browning without changing flavor much.
- I learned that working quickly when placing banana slices prevents the shell from softening—fast hands here make for cleaner cups.
Pro Tip for salted chocolate peanut butter banana cups: freezer-first method for clean assembly
- Make the initial chocolate shells and pop them into the freezer for a short firming period before adding the filling; this creates a durable surface that’s easier to layer without smudging.
- Assemble in stages on a flat tray so the pan goes straight into the freezer between stages—this keeps the banana from softening the shell and helps you maintain tidy edges.
- Work with slightly chilled tools (spoons or a small offset) so stray melted chocolate doesn’t drip and create messy edges.
- Handle the frozen cups with clean, dry hands so salt and chopped nuts stick where you want them and presentation stays neat.
How to Store, Make-Ahead & Pack These Cups for Grab-and-Go Snacks
Store these cups in an airtight container in the freezer for up to two months; separate layers with parchment or wax paper to prevent sticking. For short-term snacks, you can keep them in the refrigerator for a day or two, but they’ll soften and lose that satisfying snap.
To pack for lunches or snacks, place a few into a small insulated container with an ice pack to keep them firm until you want to eat one. Check for signs of freezer burn or rancid oil smells before serving—if the chocolate smells stale or the peanut butter has an off aroma, discard the batch.
Easy Variations: Vegan, Sugar-Free, and Nut-Free Options
- Vegan: Use dairy-free chocolate and a plant-based nut butter, and swap maple syrup with a vegan-certified liquid sweetener if needed; the technique is the same and the texture remains creamy.
- Sugar-free: Replace maple syrup with a liquid erythritol syrup or other zero-calorie liquid sweetener that stays liquid when chilled; test a small batch to ensure the texture is right.
- Nut-free: Use sunflower seed butter or soy nut butter as a direct replacement for peanut butter; toast and chop seeds for a similar crunchy finish.
- Flavor twists: Add a pinch of cinnamon to the filling, use honey-roasted peanuts for extra sweetness, or swap banana slices for thin strawberry rounds for a different fruit note. For a fun banana-chocolate variation, check out Chocolate Covered Banana Pops.
Conclusion: These cups are one of those recipes I fall back on when I want a small, satisfying treat that travels well and stores easily. With a few technique notes—chill the shells first, keep the filling smooth, and use firm banana slices—you’ll get tidy, tasty cups every time.
Frequently Asked Questions
Can I use a different type of chocolate for this recipe?
Absolutely! You can use milk chocolate or dark chocolate based on your preference. Just be sure to adjust the sweetness if you’re using milk chocolate.
How long can I store these banana cups?
You can store the salted chocolate peanut butter banana cups in an airtight container in the freezer for up to 2 months. Just make sure to separate layers with parchment paper.
Can I make these cups vegan?
Yes! Use dairy-free chocolate and ensure your peanut butter is free of added sugars or oils. The cups will still be delicious!
What can I substitute for peanut butter?
You can replace peanut butter with almond butter, cashew butter, or sunflower seed butter for a nut-free option!
How do I know when the chocolate is melted properly?
Melt the chocolate in 30-second increments, stirring in between until it’s smooth and fully melted. It should not be too hot; just warm enough to stir easily.
Salted Chocolate Peanut Butter Banana Cups
Ingredients
Method
- Line a mini muffin pan with 9 mini liners.
- Melt the chocolate and spread it in the liners, then freeze for 5-10 minutes.
- Make the peanut butter filling and spoon it into the hardened chocolate cups.
- Top with sliced banana and cover with more melted chocolate, then freeze until solid.
- Sprinkle with flaky sea salt and enjoy!