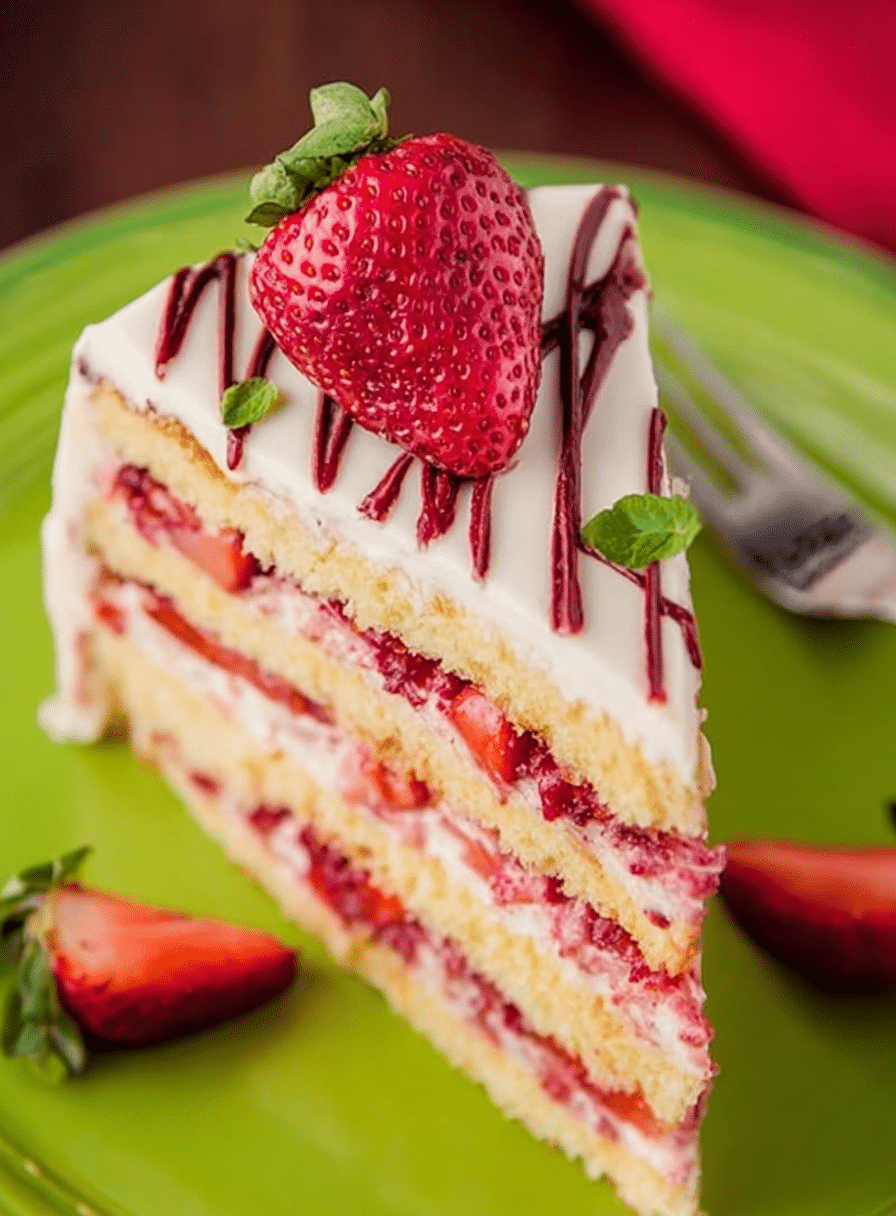
I’ve been making versions of this strawberry layer cake for years when I want a dessert that looks like it belongs at a celebration and still tastes like a sunny afternoon. I love the contrast of light, sponge-like cake, tangy cream cheese frosting, and ribbons of fresh strawberry puree—my guests often ask for the recipe before the last slice is gone.
When I bake this cake in my kitchen I pay close attention to the strawberries and the egg-whipping stage—those are the moments that make the difference between a pretty cake and a memorable one. I’ll share the little habits I use so your cake rises tall, slices cleanly, and stays moist for days.
I want this to feel approachable: you don’t need fancy equipment to get professional-looking results. With a few careful steps and a little patience, you’ll have a centerpiece that reads elegant and tastes like summer.
Why This Strawberry Layer Cake Is Perfect for Entertaining
This cake makes a statement on any dessert table: tall, ribboned layers of blush-colored strawberry and pale cream cheese frosting are both festive and sophisticated. The strawberry flavor feels seasonal and fresh, and the texture balance—airy cake, creamy frosting, and bright fruit—keeps every bite interesting. Whether you’re hosting a casual brunch or a formal dinner, the cake adapts: dress it simply for a rustic gathering or garnish it with flowers and chocolate for a more elegant look.
Everything You Need for Strawberry Layer Cake
Gathering ingredients and tools first keeps the process calm and confident. Use the best strawberries you can find and make sure your eggs and dairy are at the right temperature before you begin.
- Eggs – Bring to room temperature so they whip to maximum volume.
- Sugar – Provides structure and helps with browning; can be adjusted slightly for taste.
- All-purpose flour – The backbone of the sponge; avoid overworking to keep the cake light.
- Heavy cream – For a stable, whipped component in the cream cheese frosting.
- Cream cheese – Adds tang and body to the frosting; soften at room temperature for a smooth finish.
- Fresh strawberries – For puree and decoration; choose the best you can find for bright flavor.
- Chocolate (optional) – Melt for a drip or decorative curls if you want contrast and drama.
Tools checklist:
- Baking pans and parchment for lining the bottoms.
- Stand mixer or electric hand mixer for whipping eggs and frosting.
- Food processor or blender for the strawberry puree.
- Thin spatulas and a cake leveler or serrated knife for trimming layers.
- Turntable and offset spatula if you plan to frost smoothly.
Consider making some classic strawberry jam to pair perfectly with this cake or use it within the layers.
The Secret to Picking Ripe Strawberries
Great strawberries are the foundation of a memorable cake. Look for even color, a firm-but-yielding texture, and a strong sweet aroma—the scent will tell you more than appearance alone. Local berries often have deeper flavor because they’re allowed to ripen longer; store-bought varieties can be perfectly fine if they smell sweet and feel juicy when gently squeezed.
- Color and firmness: Choose berries that are fully red from tip to stem and firm with a slight give.
- Smell: A fragrant, sweet scent at the stem end indicates good flavor.
- Inspect for bruises: Avoid soft spots or dark bruises that will add excess moisture to the puree.
- Handling: Keep them cool and use them within a day or two for the best taste; rinse just before using.
Why Egg Temperature and Whipping Matter for Fluffy Layers
The air you beat into the eggs is the leavening that creates tall, feather-light layers. Room temperature eggs trap more air and reach a greater volume when whipped; cold eggs slow the process and yield a denser crumb. The length and speed of whipping control the batter’s texture—too little and the cake will be flat; too much when folding in flour and you risk collapse.
- Room temperature eggs incorporate more air—set them out about 30 minutes before you begin.
- Whipping time: Beat until the mixture is visibly thicker and pale; this is when it holds ribbons and lifts the batter.
- Folding technique: Use a gentle, wide motion to fold in flour so you keep the incorporated air intact.
How to Make Strawberry Layer Cake (Step-by-Step)
- Prepare pans: Grease and line only the bottoms with parchment; avoid greasing sides to keep the cake edges clean and even.
- Whip eggs and sugar: In a mixer, beat room-temperature eggs with sugar on high until 3–4 times in volume and pale in color—this is the lift you want.
- Fold in flour: Sift flour and fold gently with a spatula, scraping the bowl to avoid pockets but stopping as soon as it’s combined to preserve air.
- Bake layers: Transfer batter to prepared pans and bake until the tops are golden and a toothpick comes out clean; timing will depend on pan size and oven.
- Repeat for remaining layers: If you only have one pan, bake layers sequentially; make sure each layer cools completely before handling.
- Puree strawberries: Pulse strawberries in a food processor until a chunky applesauce consistency, or simmer briefly to concentrate (see Pro Tip section).
- Make frosting: Beat softened cream cheese with sugar until smooth, then add chilled heavy cream and whip until fluffy and spreadable.
- Trim and slice layers: Once cooled, level domed tops and slice each layer if required to create multiple thin layers for better structure and even distribution of filling.
- Assemble: Place the bottom layer on your serving plate, spread a portion of strawberry puree, add frosting, and continue stacking in alternating layers (see Layering & Stacking section for stability tips).
- Finish and chill: Frost the outside, decorate, and chill briefly to set the frosting before serving.
Troubleshooting (from my kitchen):
- If the batter deflates while folding, I usually stop and let it rest for a few minutes, then finish folding slowly to avoid overworking.
- If layers come out too dark at the edges, lower the oven temperature slightly and extend the bake time to cook more evenly.
- If the strawberry puree is too runny and seeps into the cake, reduce it (see Pro Tip below) or use a thin layer of frosting as a barrier between cake and puree.
Layering & Stacking: Building a Stable, Pretty Cake
- Level each cake layer so they stack evenly; a cake leveler or serrated knife gives the neatest results.
- Spread fillings thinly and evenly—too much wet filling will make the layers slide.
- Chill between major assembly steps: Firm chilled layers are easier to handle and less likely to shift when you apply the final coat of frosting.
- Use a central support for very tall cakes: a single dowel or thick straw can help keep everything aligned if transporting.
- Work on the serving plate: assemble the cake where it will be served to avoid heavy lifting once it’s layered.
Pro Tip for strawberry layer cake: Reduce Strawberry Puree to Thicken
Turning fresh strawberry puree into a slightly concentrated spread improves stability and brightens flavor. I often make a double batch and keep extra for spreading on slices or stirring into whipped cream.
- To thicken: Gently simmer the puree until it reduces and thickens slightly—watch it closely so it doesn’t scorch.
- Cool before using: Reduced puree firms up as it cools and is much easier to spread between layers.
- Use a cornstarch slurry sparingly if you need immediate thickening for a pouring consistency.
- Leftover uses: Stir into yogurt, spoon over pancakes, or swirl into a simple cheesecake filling.
Decoration Ideas: Fresh Fruit, Chocolate, and Edible Flowers
Decorations should enhance the cake’s freshness. I like clusters of halved strawberries and small chocolate curls for contrast, or a ring of edible flowers for a romantic look. For a lively dessert table pairing, try a bright, fruit-forward drink—this easy strawberry smoothie works beautifully alongside the cake.
- Fresh fruit: Use whole or halved berries on top for an immediate seasonal impression; brush lightly with warmed jam for shine.
- Chocolate: Melt and drizzle for a delicate drip, or make curls for texture and color contrast.
- Edible flowers: Scatter small blossoms around the base or nestle them among strawberries for a refined, garden-fresh presentation.
- Frosting finishes: For a smooth finish, chill the crumb-coated cake then use an offset spatula and turntable; for a rustic look, use the back of a spoon to create swirls and peaks.
How to Store, Make-Ahead, and Easy Variations
Plan ahead for less stress on the day of your event. You can bake layers in advance, freeze or refrigerate them, and assemble the cake the day you plan to serve. If you’re looking for dessert companions or alternate menus, try a strawberry cheesecake for a make-in-advance option or a strawberry rhubarb crisp as a seasonal side dessert.
- Storage: Keep the assembled cake covered and refrigerated; it holds well for up to three days. Bring to room temperature before serving for best flavor.
- Make-ahead: Bake layers 1–2 days ahead and wrap tightly; make frosting and puree the day before and store separately.
- Freezing: Individually wrap layers and freeze for up to one month; thaw in the refrigerator before assembling.
Variations (bulleted for easy scanning):
- Lower-sugar option: Reduce sugar in the puree and frosting and add a touch of vanilla to balance flavor.
- Dairy-free: Use a stable dairy-free cream and softened dairy-free cream cheese substitute for the frosting.
- Shortcake-style: Skip the cream cheese frosting and layer with whipped cream for a lighter finish.
- Chocolate-strawberry: Fold a small amount of cocoa into one layer for a two-tone cake that’s visually striking.
Frequently Asked Questions
How do I choose the best strawberries for this cake?
Look for strawberries that are bright red, firm, and sweet-smelling. They should be slightly shiny and have a fresh green stem attached.
Can I make this cake ahead of time?
Yes! You can bake the layers a day in advance and assemble the cake the day you plan to serve it. Just keep the layers wrapped tightly in plastic wrap to maintain freshness.
What’s the difference between room temperature and cold eggs when baking?
Room temperature eggs whip more easily and incorporate more air, which helps create a fluffy cake. Cold eggs can result in a denser texture.
How should I store leftover strawberry layer cake?
Store any leftovers in an airtight container in the refrigerator for up to three days. Before serving, let it sit at room temperature for about 15 minutes for the best flavor.
Can I use frozen strawberries for the puree?
Yes, you can use frozen strawberries. Just make sure they are thawed and drained of excess liquid before blending for the puree.
Strawberry Layer Cake
Ingredients
Method
- Grease and line only the bottom of a 9x13" cake pan with parchment paper (line 2 pans if you have 2). Best not to line or grease the sides.
- In the bowl of an electric mixer, whisk together 6 eggs and 1 cup sugar on high speed for 10 min until 3-4 times in volume.
- Sift in 1 cup all-purpose flour and gently fold in until no clumps remain. Don't overwork the batter.
- Transfer to lined baking pan and bake until top is golden and toothpick comes out clean (17-20 min).
- Remove baked cake from the pan and let it cool to room temperature.
- Cut strawberries into halves or quarters, pulse in a food processor until chunky applesauce consistency.
- Beat cream cheese and 3/4 cup sugar until smooth then add 1 cup heavy whipping cream and beat until fluffy.
- Cut each cooled cake layer in half. Layer with strawberry puree and cream, and repeat to finish with cream on top.
- Decorate the top with fresh strawberries and chocolate.