Some of my clearest kitchen memories are of the long table at my grandmother’s house, plates steaming and everyone reaching for the golden, cheese-filled shells she made every Sunday. I still make this dish the way she taught me: simple, honest ingredients, a little patience, and a baking pan full of comfort. When I pull the foil back and the cheese bubbles up, the whole room seems to breathe easier.
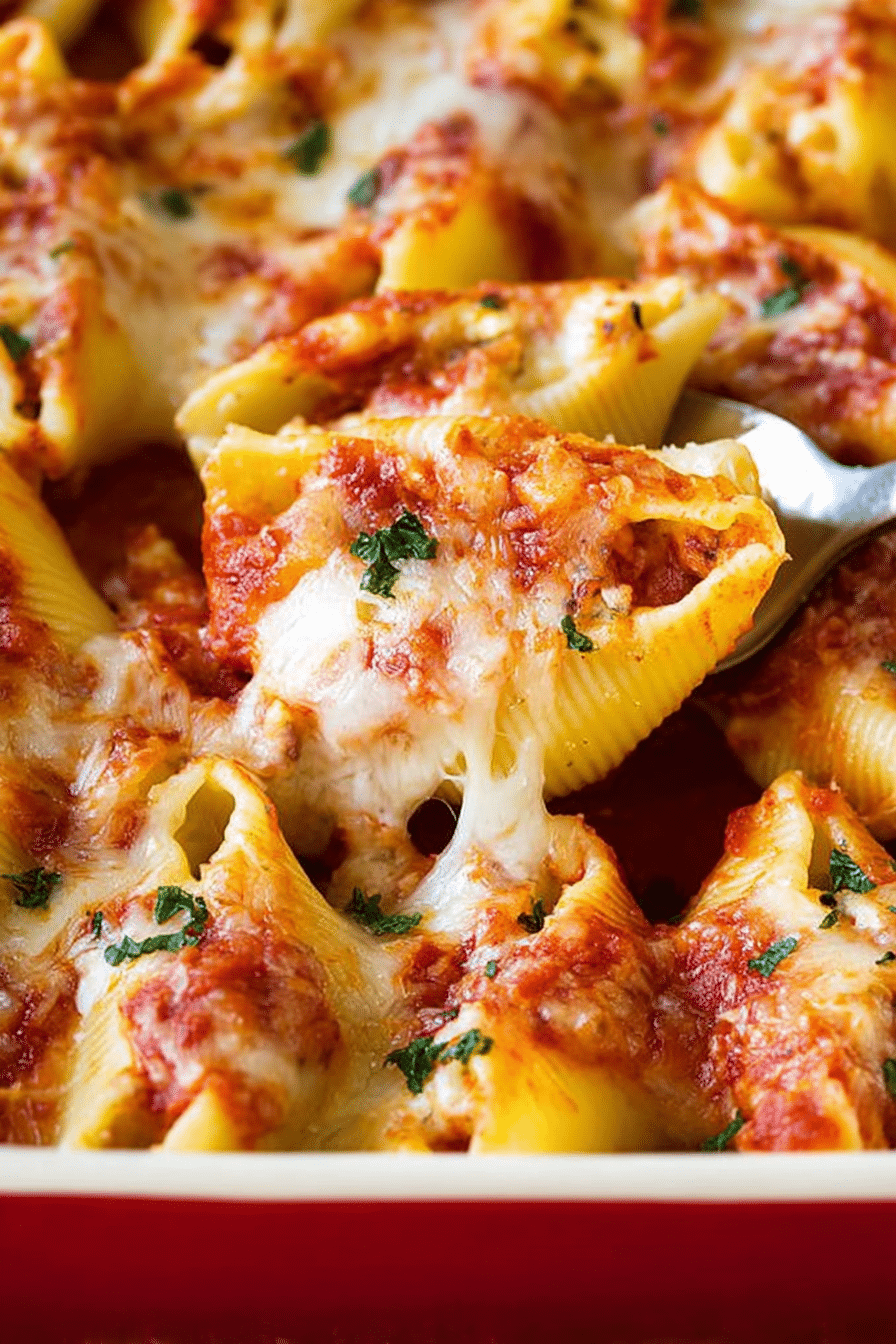
What keeps me returning to this recipe is how the textures come together — the tender shell holding a silky ricotta center and the way a bright tomato sauce cuts through the richness. It’s a meal that asks for conversation: pass the bread, pour another glass, tell one more story. That convivial feeling is the reason I make stuffed shells whenever friends or family are coming over.
I’ll be honest: the first few times I made these I had shells that split and filling that oozed everywhere. Over the years I learned the small tricks that make it foolproof. Below I share those practical notes so you can make a pan that holds together, looks inviting, and tastes like tradition.
Why These Classic Stuffed Shells Bring the Family Together
Stuffed shells are a hands-on dish — they invite help from kids and adults alike. Filling shells becomes part of the evening’s rhythm: someone spoons the ricotta mix, another arranges them in the pan, and somebody always snags the end pieces. That ritual of working together is as much a part of the meal as the food.
The tradition of stuffed pasta in Italian households is about generosity; a single pan fills many plates. I find that the aroma of baking cheese and tomato sauce signals comfort and signals to everyone that it’s time to slow down. Keep the conversation warm and the plates near — this recipe is built for sharing.
Everything You Need for Classic Stuffed Shells
- Jumbo pasta shells – The vessel; choose shells labeled “jumbo” so they hold a generous scoop of filling. If you’re gluten-free, look for corn- or rice-based jumbo shells made for stuffing.
- Ricotta cheese – The backbone of the filling; opt for whole-milk ricotta for a creamier texture, or a drained, low-moisture version if you want a firmer filling. For a dairy-free swap, try a firm tofu blended with a little lemon and nutritional yeast.
- Mozzarella – Melting cheese for the topping and a bit in the filling for stretch and richness. Use low-moisture shredded for less water on the bake, or fresh mozzarella if you prefer a creamier finish.
- Parmesan – Adds salty, nutty depth to the filling; a good grating cheese makes a noticeable difference. For a vegetarian option, use a hard vegetarian alternative.
- Marinara sauce – The tomato base that keeps shells moist while baking. Use a chunky sauce for texture or a smoother sauce if you want a neater presentation.
- Egg – The binder that gives the filling structure so it doesn’t slide out of the shells during baking. For egg-free diets, a commercial egg replacer or a little blended silken tofu helps.
- Herbs and seasonings – Italian seasoning, fresh parsley, salt, and pepper bring the filling to life; fresh herbs brighten the finished dish.
- Cooking spray or olive oil – Keeps the pan from sticking and adds a light sheen to the finished shells.
The Secret to a Silky Ricotta Filling
I learned early on that the texture of the ricotta filling makes or breaks the dish. If it’s grainy or too wet, the shells won’t look or feel right after baking. I always taste and adjust the seasoning — ricotta can be surprisingly bland straight from the tub, so salt and pepper are non-negotiable.
- Give the ricotta a quick whisk to smooth out the curds before you mix in the other cheeses; that instantly makes the filling silkier.
- Use the egg to bind the mixture but don’t overwork it; mix just until combined so the filling stays tender rather than rubbery.
- Add a portion of mozzarella into the filling for creaminess and a smaller portion on top for that golden crust. A little grated parmesan folded in brings savory balance.
- If your ricotta seems watery, drain it briefly in a fine sieve or line a colander with cheesecloth and let it rest — you’ll get a thicker, richer filling that holds its shape.
How to Cook Shells So They Don’t Fall Apart
- Use a large pot and plenty of water so the shells can move freely; this reduces sticking and tearing.
- Salt the water well — it flavors the pasta. Bring the water to a rolling boil before adding shells.
- Boil the shells only until just al dente; they should still have a slight bite because they’ll finish cooking in the oven.
- Stir gently and infrequently once shells are in the pot to avoid breaking them; use a slotted spoon to transfer shells to a tray instead of dumping them.
- Spread cooked shells on a single layer on a lightly oiled baking sheet or a clean kitchen towel to cool. This makes filling them easier and prevents sticking.
Choosing the Best Cheese Mix — Tradition vs. Twist
Traditional stuffed shells lean on the trio of ricotta, mozzarella, and parmesan — that’s the classic profile: creamy, melty, and salty. If you want a subtle twist, swap part of the ricotta for a tangy fresh goat cheese, or fold in some shredded provolone for deeper flavor.
If you’re experimenting, think about texture first: softer cheeses increase creaminess, while firmer, aged cheeses add savory punch. Try mixing small amounts before committing to a whole batch so you can find a balance you and your family love.
How to Make Classic Stuffed Shells (Step-by-Step)
- Preheat your oven and prepare a baking dish with a thin layer of marinara on the bottom so shells don’t stick and each bite has sauce.
- Mix the ricotta, a portion of the shredded mozzarella, grated parmesan, Italian seasoning, egg, and salt and pepper until just combined; you want the filling smooth but still soft.
- Place a spoonful of filling into each cooled shell: hold the shell open with one hand and use a spoon to gently push the filling into the curve so it sits neatly without overstuffing.
- Arrange filled shells seam-side up in the prepared dish so they present nicely and hold the filling as they bake.
- Spoon remaining sauce evenly over the tops and sprinkle the remaining mozzarella so the shells finish under a blanket of cheese that melts and browns.
- Cover with foil for the first part of baking to steam the filling, then uncover to let the cheese take on color and a bit of texture on top.
- Let the dish rest a few minutes after baking so the filling firms slightly — it makes serving cleaner and keeps the shells intact on the plate.
Pro Tip for stuffed shells: Freeze Fully Assembled for Quick Dinners
- I assemble pans ahead of time and freeze them uncovered until solid, then wrap tightly. This prevents ice crystals and keeps the shells from sticking together in the freezer.
- When I bake from frozen, I add extra minutes to the covered baking time and remove the foil near the end so the cheese can brown without overcooking the filling.
- Portion pans into family-sized servings before freezing so it’s easy to pull just what you need for a quick weeknight meal.
How to Store, Reheat, and Swap Fillings
- Storage: Cool completely, then refrigerate in an airtight container for up to three days. For longer storage, freeze as described above.
- Reheating: For the best texture, reheat in the oven covered until warmed through; the microwave works in a pinch but can make the pasta softer.
- Swapping fillings: For a meat option, brown Italian sausage and fold it into the cheese mixture. For vegetarian protein, add spinach or roasted vegetables. For vegan shells, use dairy-free ricotta-style spreads and a plant-based mozzarella.
Troubleshooting
- If shells are splitting while you fill them, I let the shells cool longer on a towel and handle them with two fingers to support both sides as I spoon filling in.
- If the filling is too watery after baking, I drain the ricotta longer next time and reduce any fresh mozzarella in the filling.
- If the top browns too fast before the centers are hot, I tent the dish with foil and finish with a few minutes uncovered to preserve color without drying out.
Variations
- Spinach and ricotta — fold wilted, well-drained spinach into the filling for a classic green boost.
- Meaty version — add cooked Italian sausage or ground beef to the cheese mixture for heartier servings.
- Vegan option — use a firm tofu-based ricotta, nutritional yeast for cheesiness, and a dairy-free shredded cheese for the topping.
- Herbed lemon ricotta — stir a little lemon zest and fresh basil into the filling for a brighter flavor profile.
Pairing Suggestions for Sides or Salads That Complement Stuffed Shells
A simple green salad with a tart vinaigrette cuts through the richness and refreshes the palate. Garlic bread or a crusty loaf is perfect for sopping up extra sauce; choose a bread with a crisp crust so it doesn’t feel heavy beside the shells.
For beverages, a medium-bodied red with soft tannins pairs nicely — something that complements tomato and cheese without overpowering them. If you prefer nonalcoholic options, sparkling water with a squeeze of lemon keeps the meal feeling bright.
Frequently Asked Questions
Can I use different types of cheese for the filling? Absolutely! While the recipe calls for ricotta, mozzarella, and parmesan, you can experiment with other cheeses like goat cheese or cottage cheese for a unique flavor.
How do I prevent the pasta shells from breaking while cooking? Make sure to boil the shells in salted water until they are al dente, as they will continue to cook in the oven. Stir gently during cooking to avoid sticking.
Can I prepare the stuffed shells ahead of time? Yes! You can assemble the shells and freeze them before baking. Just cover them tightly and bake them straight from the freezer, adding a few extra minutes to the cooking time.
What’s the best way to store leftovers? Store any leftovers in an airtight container in the refrigerator for up to 3 days. Reheat them in the oven for best results or use the microwave for a quicker option.
What sides go well with stuffed shells? Stuffed shells pair wonderfully with a simple green salad, garlic bread, or steamed vegetables for a complete meal.
Classic Stuffed Shells
Ingredients
Method
- Preheat the oven to 375 degrees F. Coat a 9"x13" baking pan with cooking spray.
- Spread 1 1/2 cups of the marinara sauce in an even layer in the bottom of the pan.
- Place the ricotta cheese, 1 1/2 cups of mozzarella cheese, Italian seasoning, egg, salt, pepper and parmesan cheese in a bowl. Stir to combine.
- Fill each shell with the ricotta mixture and place in the baking dish.
- Spoon the remaining marinara sauce over the shells, then sprinkle the other 1 1/2 cups of cheese over the top.
- Cover the dish with foil. Bake for 20 minutes. Uncover the pan, then bake for an additional 10 minutes or until cheese is melted and starting to brown.
- Sprinkle with parsley, then serve.