I grew up with this kind of pie—things wrapped in pastry that smelled of butter and citrus as summer light slanted through the kitchen window. I still make it when the berries are at their peak: the simple, honest sweetness of ripe blueberries, brightened with a whisper of orange zest and tucked under a golden lattice. Baking it feels like a small ritual that gathers family around the table.
There’s nothing showy about the ingredients—just good butter, a bit of shortening for extra flake, and bright berries—but the result is reliably comforting. Over the years I’ve learned where novice bakers fumble (too-warm butter, overworked dough, a weeping filling) and how small adjustments can make each slice worth asking for seconds.
In the sections that follow I’ll walk you through what you need, the techniques that make the crust sing, a patient but forgiving approach to weaving a lattice, and a few simple swaps if you need them. This pie belongs at a summer table because it’s both celebratory and familiar — the kind of dessert that prompts stories as it cools.
Why this Blueberry Lattice Pie Belongs at Your Summer Table
Blueberries are at their sweetest in summer, and this pie showcases them simply: the fruit cooks down into a jewel-toned filling while the lattice lets steam escape and the crust bake evenly. Beyond flavor, this pie carries the kind of nostalgia that anchors gatherings—grandparents, children, neighbors coming by with a loaf of bread. I think of it as a dessert that makes a potluck feel like a family reunion.
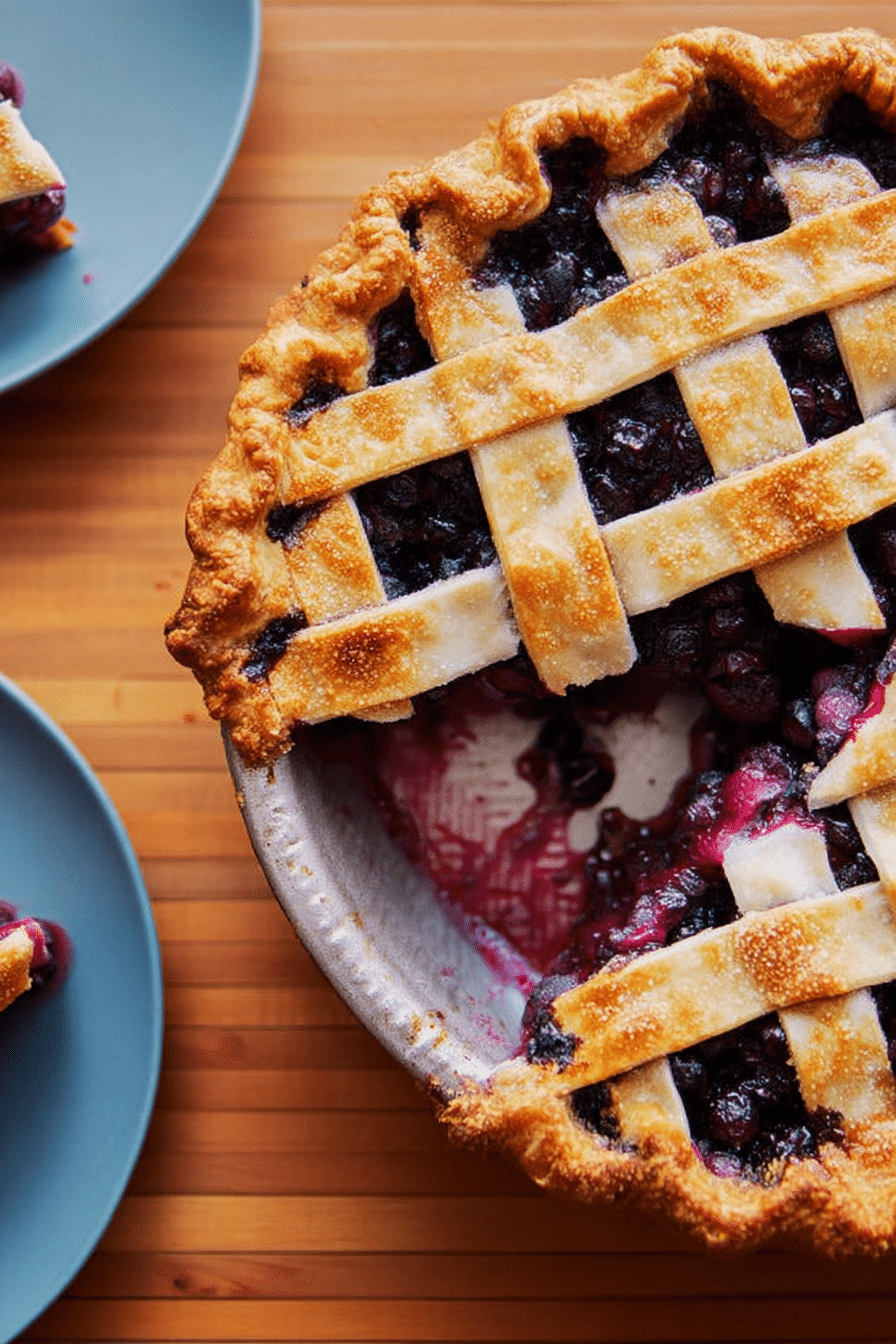
Visually, a golden-brown lattice framed with sugared edges reads like celebration: the contrast of deep blue filling and warm pastry is unmistakable. The aroma that rises as it bakes—brown butter notes, citrus, caramelizing sugar—pulls people toward the kitchen. Serve it at a backyard dinner or a picnic and you’ll see how quickly it becomes the evening’s anchor.
Everything You Need for Blueberry Lattice Pie
Below I describe the key ingredients and tools in plain terms so you understand each one’s role and how to swap things if necessary. If you only have frozen berries, that will work—just thaw and drain them well before you toss with the sugar mixture to avoid excess moisture.
- All‑purpose flour – The structural backbone of both crust and filling thickener; for a gluten‑free option use a 1-to-1 gluten‑free baking blend.
- Butter – Brings rich flavor and distinct flaky layers when kept cold; use unsalted for better control over seasoning, or a vegan butter for a dairy‑free version.
- Vegetable shortening – Adds tenderness and helps the crust hold its shape; you can substitute with additional cold butter if you prefer all‑butter pastry.
- Sugar – Sweetens the filling and adds a sparkled finish to the top crust; you can try coconut sugar for a deeper note, though color will be darker.
- Salt – Essential for balance; even the filling benefits from a pinch.
- Egg (for wash) – Gives the lattice a glossy, browned finish; for a vegan wash, brush with non‑dairy milk and a touch of maple syrup.
- Cinnamon & citrus zest – Cinnamon adds warmth; orange zest lifts the berries—if you don’t have orange, lemon zest makes a bright substitute.
- Blueberries – Fresh is best for texture and appearance; if using frozen, thaw and drain to prevent a watery filling.
- Tools – A rolling pin, a 9‑inch pie dish, a sharp knife or pastry cutter for lattice strips, a bench scraper or spatula, and a sturdy baking sheet to catch drips.
The Secret to a Flaky Butter‑Shortening Crust
I’ve made this pie enough times to know that texture is everything. The combination of cold butter and shortening is a deliberate choice: butter gives flavor and identifiable layers; shortening makes the dough easier to handle and yields a tender bite. The technique is less mysterious than it seems—it’s about minimal handling and protecting the tiny cold pockets of fat that steam during baking.
- Start with very cold fats and chilled equipment. Keep butter in small cubes and shortening chilled so it barely softens as you work.
- Cut the fats into the flour until the mixture resembles coarse meal with some pea‑size pieces visible; those bits of fat create flakiness when they melt in the oven.
- Use as little ice water as required to bring the dough together—press it, don’t knead it. A tacky but not sticky dough is the goal.
- Form the dough into a disk, wrap it and chill it for at least an hour. I always chill longer if I can; the dough firms up and is easier to roll without shrinking.
- When rolling, turn the dough frequently and add only a light dusting of flour. Too much flour makes the crust dry; too much warmth makes it tough.
Why Temperature Matters: Chilling, Dough and Oven Heat
Temperature governs several small successes in this recipe. Cold dough creates lift; a hot oven gives the initial burst of steam that puffs the layers; cooling the pie properly keeps the filling from running all over the plate. I can tell when someone skipped chilling—crusts that have shrunk or fillings that have turned soupy are usually temperature problems.
- Chill the dough before rolling so it relaxes and holds its shape; cold fats remain solid and deliver flakiness.
- Preheat the oven well: start at a higher temperature to set the crust and then lower the heat so the filling finishes without burning the edges.
- Keep your kitchen cool while working—if your hands or counter warm the dough, pop it back into the fridge for a few minutes.
- After baking, allow the pie to cool on a rack so the filling can set; warm slices tend to bleed out, while properly cooled slices hold their shape.
Weaving the Lattice: A Simple Step‑by‑Step Guide
Making a lattice looks impressive but it’s fundamentally forgiving. Take your time with the strips and don’t worry if edges are uneven—rustic is charming and the flavor is unchanged. Below are clear, actionable steps to achieve a classic lattice and a few troubleshooting pointers if the dough resists.
- Roll the top dough into a rough rectangle and trim the ends so the strip widths are consistent. Use a ruler or the width of a rolling pin as your eye‑guide.
- Cut strips of even width using a sharp knife or a pastry wheel; transfer them to the pie by rolling them gently around the rolling pin if they’re soft.
- Lay half the strips parallel across the filled pie with equal spacing. Fold back every other strip halfway and lay a perpendicular strip, then unfold the folded strips over it to create the woven pattern.
- Continue alternating—folding strips back and layering perpendicular strips—until the lattice is complete, then trim excess dough at the rim.
- Crimp or flute the edges to seal; a bench scraper helps press the bottom and top crusts together without stretching.
- Troubleshooting: if strips tear, patch them with a small bit of dough and press to seal. If the dough gets sticky, chill the assembled pie briefly before egg‑washing and baking.
How to Make Blueberry Lattice Pie (Step‑by‑Step)
The steps below follow the arc of preparation from chilled dough to finished pie. I’ll use visual cues and timing guidance so you know when each stage is ready. Follow them with patience—pie rewards a calm, measured approach.
- Prepare the crust dough and chill it until firm to the touch. Divide and chill the two portions separately so one is ready for the top while the other forms the shell.
- Preheat your oven to a high starting temperature so the crust sets quickly once it hits the heat.
- Mix the sugar, cinnamon and citrus zest with the blueberries in a large bowl until the fruit is evenly coated; if you must use frozen berries, thaw and drain them first to remove excess moisture.
- Roll the bottom dough and fit it into your pie dish without stretching; a little slack prevents shrinking while baking.
- Pour the blueberry filling into the prepared shell, mounding slightly in the center to account for settling.
- Roll the top dough, cut even strips and weave the lattice as described above. Trim, flute the edges and give the top a gentle egg wash; sprinkle a bit of sugar for sparkle.
- Bake at the higher temperature for an initial period to brown the crust, then reduce the heat so the filling thickens without overbrowning the pastry. Watch the lattice edges and shield with foil if they darken too quickly.
- Cool the pie on a rack to allow the filling to set; slicing too soon will yield runny wedges. I usually wait until it’s warm rather than piping hot.
Pro Tip for blueberry lattice pie: Prevent a Soggy Bottom
Keeping the bottom crust crisp takes small, sensible steps. Below are the tactics I rely on every time I make this pie—pack them into your routine and you’ll be rewarded with a crisp base.
- Bake the pie on the bottom oven rack for stronger heat at the base; this helps the bottom brown and crisp.
- Use a glass or ceramic pie dish if you have one—glass conducts heat to the center more evenly and can reduce a soggy middle.
- Don’t overload with overly wet berries; if using frozen, thaw and drain thoroughly or toss with a light coat of extra flour or cornstarch to absorb excess juices.
- Let the pie cool enough for the filling to thicken before slicing—this is one of the simplest ways to avoid runniness.
- Optionally, blind‑bake the bottom crust for a short time before adding the filling if you prefer a very crisp shell.
Easy Variations and Pairings for Blueberry Lattice Pie
This pie adapts well to small twists—additions that keep the classic spirit while giving you room for creativity. Below are accessible variations and serving ideas, laid out so you can pick based on dietary needs or flavor preferences.
- Vegan crust: swap butter for plant‑based sticks and use vegetable shortening or a vegan shortening alternative; use a non‑dairy milk wash.
- Gluten‑free crust: use a reliable 1-to-1 gluten‑free flour blend with xanthan gum included, and keep the dough slightly cooler to avoid crumbling.
- Herb accents: fold a small amount of finely chopped fresh basil or mint into the filling for a subtle, savory lift.
- Citrus changes: swap orange zest for lemon zest if you want a brighter, more tart note.
- Toppings and pairings: serve with vanilla ice cream, a spoonful of whipped yogurt, or a dollop of lightly sweetened crème fraîche; a drizzle of lemon cream complements the berries beautifully.
How to Store and Reheat Blueberry Lattice Pie
Proper storage keeps your pie tasting fresh for days and makes reheating straightforward. I rely on a few simple habits so each leftover slice is almost as good as the first.
- Room temperature short term: If you plan to eat the pie within a day, keep it loosely covered at room temperature to preserve the crust’s texture.
- Refrigeration: Store covered in the refrigerator for up to several days; bring slices to room temperature or warm gently before serving.
- Reheating: Warm individual slices in a moderate oven for a few minutes to restore crispness—avoid the microwave if you want to keep the crust from softening.
- Freezing: You can freeze a fully assembled unbaked pie or baked slices; wrap tightly to prevent freezer burn. Thaw overnight in the refrigerator and refresh in a warm oven before serving.
Frequently Asked Questions
Can I use frozen blueberries for this pie?
Yes, you can use frozen blueberries! Just make sure to thaw and drain them to avoid excess moisture in the pie.
How can I avoid a soggy bottom crust?
To prevent a soggy bottom crust, ensure that your pie is baked on the bottom rack and consider using a glass pie dish for better heat conduction.
What can I use instead of orange zest in the filling?
You can substitute the orange zest with lemon zest for a slightly different flavor, or leave it out if you prefer a more classic blueberry taste.
Is there a way to make the pie crust ahead of time?
Absolutely! You can prepare the pie crust in advance, wrap it tightly in plastic, and refrigerate it for up to 2 days before using.
What are some good toppings to pair with blueberry lattice pie?
Vanilla ice cream, whipped cream, or a dollop of crème fraîche are all delicious options to complement your blueberry lattice pie!
Blueberry Lattice Pie
Ingredients
Method
- To make the crust, combine the flour, 2 teaspoons of sugar and salt in a large bowl. Use your fingers to rub in the butter and shortening until the mixture resembles coarse meal. Gradually mix in just enough ice water to form a ball. Flatten into a disk, wrap in plastic, and refrigerate for 1 hour.
- To make the filling, preheat the oven to 400 degrees. Combine the sugar, cinnamon, flour, and orange zest. Toss the blueberries with the sugar mixture.
- Divide the dough in half, roll out and fit one half into a 9-inch pie plate. Pour in the filling. Roll out the other half, cut strips, and weave into a lattice top. Seal and crimp the edges, brush with egg wash, and sprinkle with sugar.
- Bake for 30 minutes, then reduce the temperature to 325 degrees and bake for an additional 20 minutes or until browned. Cool on a rack before serving.