I make nachos every time I host—it’s the one dish that turns a group of strangers into a circle of snack-happy friends. I love how simple assembly becomes a centerpiece: a wide, colorful platter of chips, bubbling cheese, and bright toppings that invites everyone to dig in. The first time I served a tray like this, people kept circling back for more, and I learned which little adjustments make the biggest difference.
I remember the first batch I overcooked—the chips lost their crisp and the whole tray felt heavy. After a handful of live-test parties in my kitchen, I refined the timing and layering so each bite keeps its crunch while still offering that melty, savory hit. I’ll share those exact habits here so your platter comes out impressive and reliably delicious.
When I prepare these for a crowd, I measure, prep, and set a simple staging area: toppings in small bowls, the skillet hot and ready, and a large, light-colored baking sheet to show off the cheese. You’ll find that a little planning turns nacho assembly into an easy, show-stopping moment rather than a last-minute scramble.
Why These Nachos Are Perfect for Parties
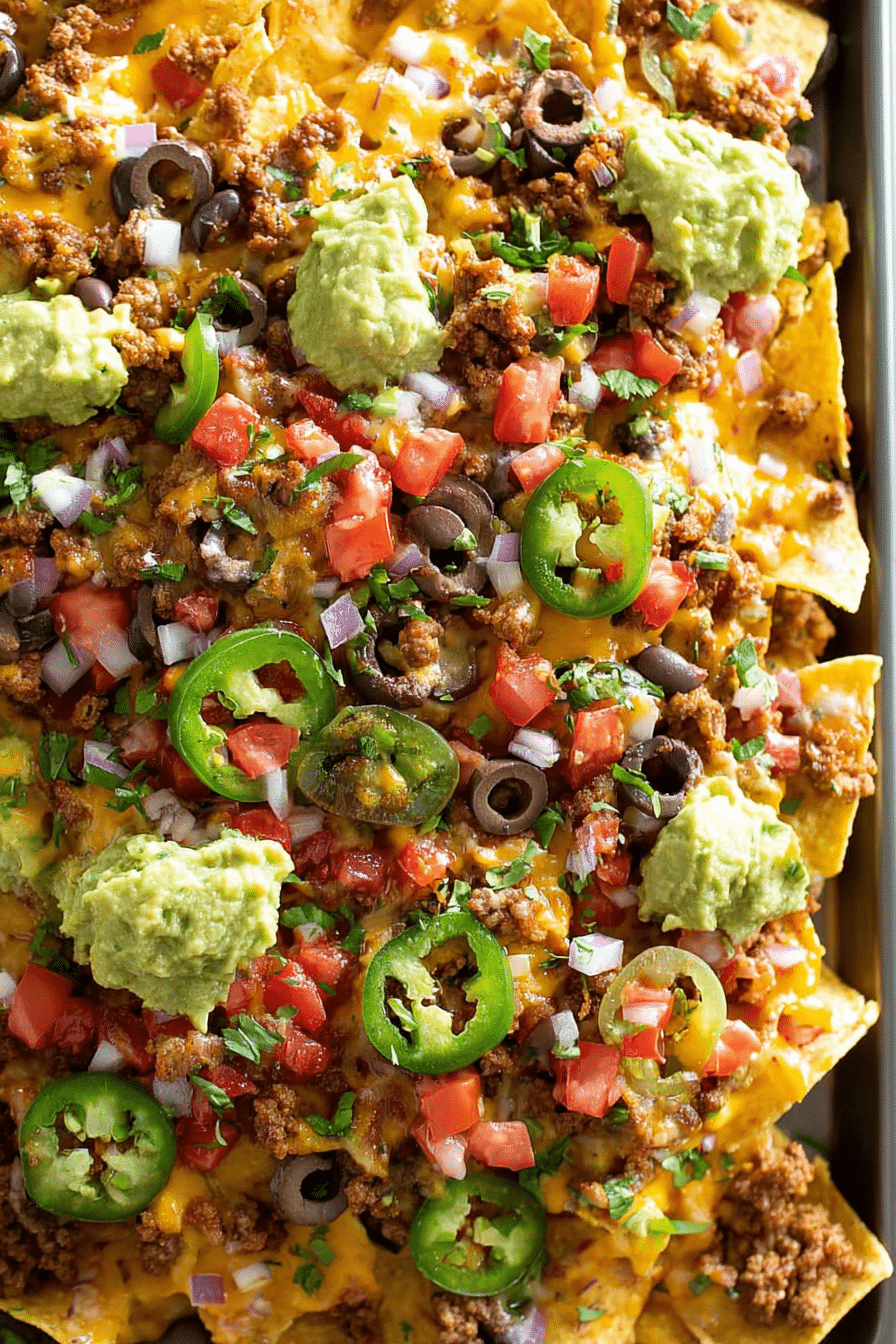
Nachos are inherently social: they’re shareable, easy to scale, and endlessly adaptable to different tastes at the table. I rely on this platter when I want one dish that satisfies meat lovers, veggie fans, and picky eaters alike. The visual impact of glossy melted cheese punctuated with red tomatoes, green cilantro, and jalapeño slices makes them irresistible before anyone even takes a bite.
Sensory note: imagine the warm, savory aroma of seasoned beef lifting through a room, the sight of bubbling cheese, and the satisfying crunch as the first chip breaks. These elements draw guests over and keep conversation flowing—perfect for casual gatherings and big game nights.
Everything You Need for Nachos Recipe
Below are the essential ingredients and tools I reach for every time I make nachos. I stick to must-haves so the process is streamlined; you can add optional extras once the base is solid. Prep tip: shred your cheese and dice vegetables ahead so assembly moves quickly.
- Ground beef – The savory backbone; substitute with ground turkey, chicken, or plant-based crumbles if you prefer.
- Garlic – Adds warmth and depth to the meat.
- Taco seasoning – Brings the classic spice profile; you can mix your own blend to control salt and heat.
- Refried beans – Adds creaminess and helps layers adhere.
- Tortilla chips – The platform for everything; pick sturdy, thicker chips for a crowd tray.
- Melting cheese – Use a mix of cheeses for stretch and flavor (more on this below).
- Bell peppers, onions, jalapeños, tomatoes – Freshness and color; add after baking where appropriate to maintain brightness.
- Black olives, green onions, cilantro – Finishing touches that add contrast in flavor and color.
- Guacamole, salsa, sour cream – Serve on the side so guests can customize each bite.
Tools I use: a large skillet for browning, a large light-colored baking sheet so you can see melting progress, a spatula for scooping, and small prep bowls for toppings.
Layering Secrets: How to Build a Crowd‑Ready Nacho Platter
Good layering is the difference between a tray that’s all sog and a tray that’s all crunch. I always think of layers as a rhythm: chip, cheese, scatter of mix-ins, repeat. That rhythm gives you crunch, melt, and pockets of flavor across the entire sheet.
- Start with an even, single layer of chips so each has space for cheese to cling.
- Spoon the meat-and-bean mix in dollops across the chips—this prevents puddling and spreads flavor.
- Scatter cheese generously between and over chips so melting is consistent; use a mix of a good melter and a flavorful cheese for balance.
- Add fragile fresh toppings (tomatoes, scallions, cilantro) after baking to preserve color and texture.
- Troubleshooting: If chips are soggy, you likely layered too many wet ingredients directly under the chips or baked too long. I recommend keeping saucier elements like salsa and sour cream off until serving and timing the bake so the cheese melts but the bean/meat layer doesn’t weep.
Balancing Heat and Freshness: Toppings That Sing
Toppings are where you personalize the platter—heat, texture, and brightness all come from what you pile on top. I aim for contrast: something creamy, something acidic, something spicy, something crisp. That combination keeps the palate interested across many chips.
- Spicy options: sliced jalapeños, pickled peppers, or a few dashes of hot sauce for those who want heat.
- Creamy choices: guacamole, dollops of sour cream, or a drizzle of crema to temper the spice.
- Bright finishes: a squeeze of lime, chopped cilantro, and fresh tomatoes added right after baking.
- Cheese ideas: try a blend that includes a good melter and a punchy cheese for flavor contrast.
- Health-conscious topping adaptations: swap guacamole for smashed avocado with lime instead of mayo-based dips, use extra pico-style salsa rather than heavy cheese for some sections, or add pickled red onions for brightness with fewer calories.
Healthier Swaps That Keep the Flavor
You don’t have to give up flavor to lighten the tray. Over the years I’ve learned a few straightforward swaps that preserve the indulgent feel while trimming calories or accommodating dietary needs.
- Use dairy-free melting cheese for a vegan-friendly tray; pick a brand that lists melting as a feature.
- Swap fried chips for baked tortilla chips or crisped veggies (thin-sliced and roasted) as a lower-fat base.
- Replace or stretch ground beef with high-protein alternatives like shredded chicken, turkey, or seasoned lentils for a vegetarian option.
- Lean into bright, low-calorie toppings: pico de gallo, pickled jalapeños, roasted corn, and lots of fresh herbs.
How to Make Nachos Recipe (Step-by-Step)
- Measure and prep all components first so assembly is fast and clean—dice vegetables, shred cheese, and heat your skillet.
- Brown the ground beef in a hot skillet, drain excess fat, add garlic and seasoning, then a splash of water to create a saucy coating; simmer until thickened.
- Stir the refried beans into the meat mixture until evenly combined and warmed through; remove from heat and keep warm.
- Lay half of your chips on a large baking sheet, distribute half the meat-and-bean mixture in scoops, and sprinkle with a portion of the shredded cheese.
- Top with the remaining chips, meat mixture, and finish with the remaining cheese so the top layer browns and bubbles evenly.
- Add peppers, jalapeños, onions, and olives before baking so they roast slightly; reserve delicate items like tomatoes and cilantro for after the oven.
- Bake just until the cheese is fully melted and starting to bubble—overbaking invites sogginess.
- Remove from oven, add fresh tomatoes, green onions, cilantro, and a generous scoop of guacamole; serve with bowls of salsa and sour cream.
Pro Tip for nachos recipe: Prevent Soggy Chips with Layering and Timing
- Use a light-colored baking sheet so you can judge melting and browning quickly without overcooking.
- Layer chips and cheese so every chip gets a chance to melt into the cheese; cheese acts as a moisture barrier when placed between chips.
- Spoon meat mixture in dollops instead of spreading it thinly to prevent moisture from pooling on chips.
- Reserve juicy toppings (salsa, sour cream, diced tomatoes) until after baking to preserve chip crispness.
- Serve immediately—nachos are at their best the moment cheese is melted and toppings are freshly added.
- I learned to slice jalapeños thin for heat without overwhelming a bite; thicker slices can make pockets soggy.
How to Store, Reheat, and Make-Ahead Nachos (Plus Easy Variations)
Leftover nachos can still be delicious with the right approach. Store components separately when possible so you can reassemble and reheat for a refreshed bite later. Below are best practices and quick variations I use in my kitchen.
- Storage: Keep leftover chips and warmed topping mix separate in airtight containers. If everything is already combined, transfer to the fridge and try to remove any excess moisture before reheating.
- Reheating: Reheat in a preheated oven or under the broiler for a few minutes until cheese re-melts and chips crisp—this works far better than the microwave for texture.
- Make-ahead: Prep the meat-bean mix and chopped toppings in advance; build and bake just before guests arrive for peak texture.
Variations (bulleted for easy scanning):
- BBQ Chicken Nachos: swap seasoned beef for shredded BBQ chicken and add pickled red onions.
- Veggie Nachos: use roasted sweet potatoes, black beans, and a sprinkle of cotija or a dairy-free alternative.
- Breakfast Nachos: top with scrambled eggs, breakfast sausage, and a drizzle of chipotle crema.
- Nacho Salad Remix: turn leftovers into a composed salad—chop remaining chips and toss with greens, salsa, and a drizzle of lime.
Frequently Asked Questions
What can I use instead of ground beef? You can substitute ground turkey, chicken, or even lentils for a vegetarian option. Just adjust cooking times accordingly!
How do I keep nachos from getting soggy? Layer your chips between the meat and cheese, and serve immediately after baking. This helps maintain their crispiness!
Can I make nachos in the microwave? Yes, you can! Just layer your ingredients in a microwave-safe dish and heat for about 5 minutes or until the cheese melts.
What toppings can I add to my nachos? Feel free to get creative! Consider adding avocado, pickled jalapeños, or different types of cheeses to enhance flavor.
How should I store leftover nachos? Store them in an airtight container in the fridge. To reheat, place them in the oven instead of the microwave for the best results.
Nachos Recipe
Ingredients
Method
- Preheat the oven to 350° F. Measure all of the ingredients before beginning, the recipe goes super quick from there!
- Heat a large skillet over medium-high heat and add the ground beef. Cook and crumble for 7-10 minutes, or until the beef is brown and cooked through. Drain grease. Add the garlic and taco seasoning and stir in water. Bring to a boil until thickened, then reduce to a simmer. Stir in the refried beans until well combined and heated through. Remove and set aside.
- Spread half of the chips in an even layer on a large, light-colored baking sheet.
- Distribute half of meat mixture in scoops on top and along the sides. Sprinkle with half of the cheese.
- Top with the remaining chips, remaining meat mixture, and remaining cheese.
- Top with bell peppers, jalapenos, red onions, and black olives.
- Bake for 15 minutes, or until the cheese is completely melted.
- Remove from the oven and sprinkle with tomatoes, diced green onions and cilantro. Top with a generous scoop of guacamole and serve with salsa and sour cream!