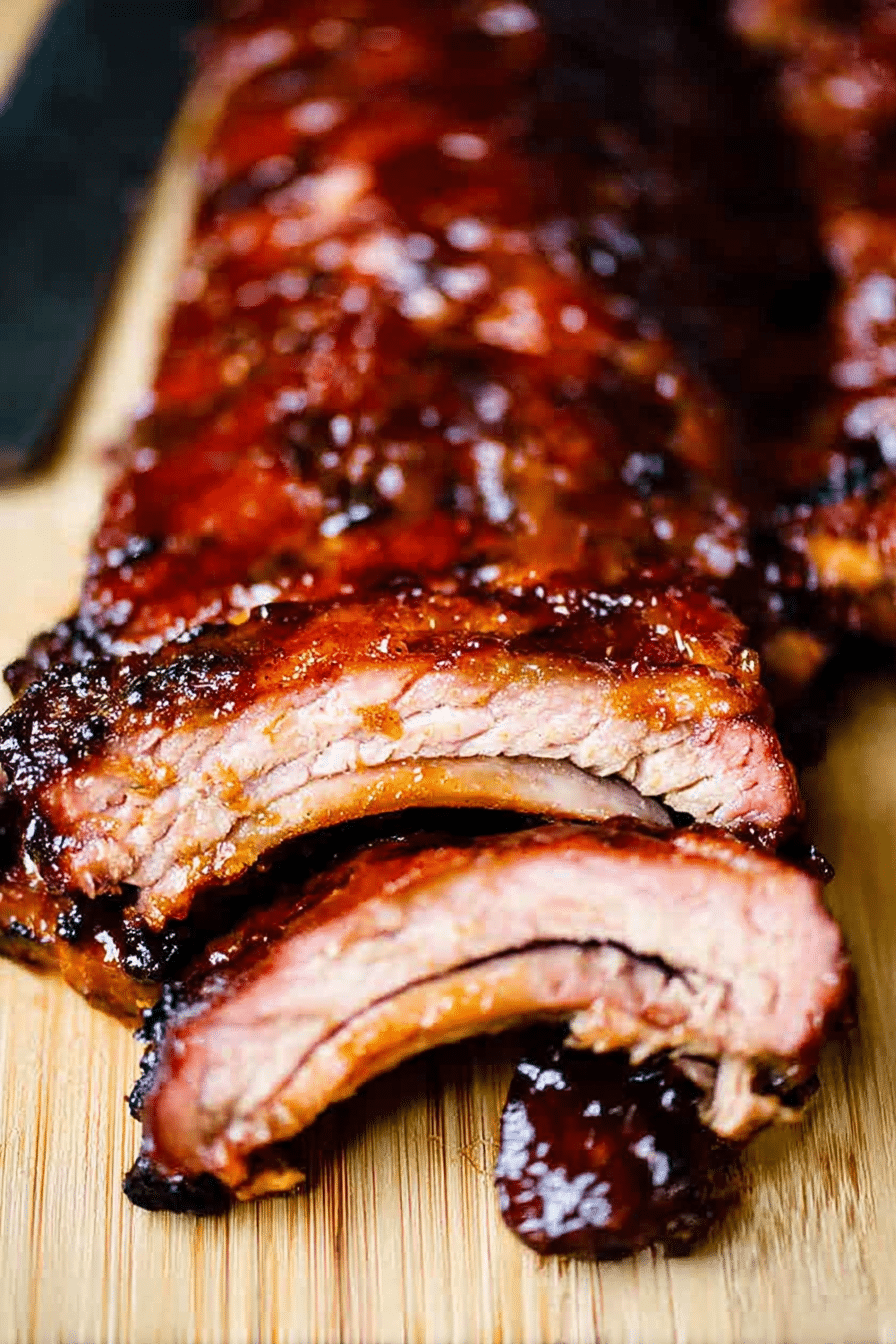
I’ve cooked hundreds of racks of baby back ribs for backyard parties and holiday tables, and what always wins is the same combination: a well-balanced dry rub, a patient low-and-slow cook, and a finishing brush of sticky sauce. The first time I nailed this balance, guests were actually hush-quiet as they ate — not from lack of conversation, but because the ribs were that good. That memory is why I keep making these ribs whenever I need a show-stopping main for a crowd.
In my kitchen I always start by getting the membrane off the back of the rack and massaging the rub into every crevice — that step matters more than most people realize because it lets spice and sweetness seep into the meat instead of sitting on top. Whether you’re grilling over coals or sliding racks into the oven, that upfront work makes the difference between dry, one-note ribs and plates of tender, flavorful meat that pull away from the bone with a gentle tug.
These ribs are designed to feed a crowd — the recipe yields plenty and scales easily — so you can spend more time greeting guests and less time fretting at the grill. Read on and I’ll walk you through what tools you need, how to tweak the rub for health or flavor, step-by-step cooking guidance, and the tricks I use when reheating or making ribs ahead for parties.
Everything You Need for BBQ Baby Back Ribs
Here’s a visual checklist so you don’t forget anything the day you host. Lay these tools and ingredients out before you start; it makes the process feel celebratory and under control.
- Tools – A sharp boning/paring knife for membrane removal; a large rimmed baking sheet or disposable foil tray; heavy-duty aluminum foil for wrapping; a reliable meat thermometer; long-handled tongs; and a brush for sauce. If you grill, have a two-zone setup and a spray bottle for flare-ups.
- BBQ Sauce – Pick a thick, tangy bottle for glazing or use a homemade ketchup-based or vinegar-forward sauce for contrast. I keep a bold, slightly sweet Kansas City–style sauce and a thinner Carolina-style vinegar sauce on hand.
- Spice Rub – A blend of brown sugar, smoked paprika, garlic and onion powders, salt, black pepper, and a touch of heat creates that smoky-sweet profile guests expect. You can vary it easily (see variations below).
- Racks of Ribs – Choose fresh or well-thawed baby back ribs with even meat coverage and minimal silver skin left on. I prefer racks that are similar in size so they cook evenly.
The Secret to Tender Ribs
Tender ribs are about technique more than tricks. I’ll be honest: early on I relied on temperature alone and missed the mark. Over the years I learned that slow collagen breakdown, rest, and controlled moisture are what make the meat pull away from the bone nicely.
- Slow, low heat breaks down collagen into gelatin, which gives the meat a silky texture and moist mouthfeel.
- Wrapping ribs during part of the cook traps steam and accelerates tenderizing without drying the surface — I usually wrap when the meat has set a beautiful crust.
- Rest the ribs briefly after cooking; juices redistribute and the meat stays juicy when you slice or pull it apart.
- When checking don’t rely only on a thermometer: look for meat that yields easily to a gentle pull at the bone and has a slight bend in the middle of the rack.
Choosing Between Oven, Grill, and Quick High-Heat Methods
Each method gives a different personality to the ribs. Think about what matters most for your gathering — ease and consistency, deep smoky flavor, or speed — and choose accordingly.
- Oven – Most reliable for even, hands-off cooking. It produces tender meat with a clean crust and is great when you’re cooking indoors or for a large group.
- Grill – Adds smoke notes and char that feel quintessentially barbecue. Indirect heat zones let you cook slowly while finishing over direct heat for caramelization.
- Quick high-heat – Best for smaller racks or when time is short; you get a faster crust but must watch closely to avoid drying. Not my top pick for feeding many guests, but useful in a pinch.
- Adjust your cook time based on method and rack size; grill for longer if you want more smoke, or bake if you want predictable tenderness with less babysitting.
Customize the Spice Rub (and Healthier Sugar/Salt Swaps)
Make the rub yours — I do. If you want to trim sugar or salt for dietary reasons, small swaps preserve the flavor without sacrificing the overall profile.
- Brown sugar – Adds caramel and helps form crust. Swap with coconut sugar or reduce the amount if you’re cutting back; the rub will still brown nicely.
- Smoked paprika – Gives a smoky backbone without a smoker. If you prefer less smoke, use regular paprika and add a touch of ground cumin for warmth.
- Cajun or chili powder – Adds heat and depth. Use a milder chili blend or omit for a gentler profile; a pinch of cayenne provides lift without overwhelming.
- Salt – Kosher or sea salt seasons the meat. For a lower-sodium option, reduce the salt and increase aromatic spices like garlic and onion powder so you don’t lose taste.
- Variations –
- Sweet & Smoky: Add extra brown sugar and smoked paprika for a dessert-like glaze.
- Herby & Mediterranean: Swap paprika for dried oregano and add lemon zest for a brighter rub.
- Asian-Inspired: Replace brown sugar with a touch of honey (or reduced amount) and add five-spice for an aromatic twist.
How to Make BBQ Baby Back Ribs (Step-by-Step)
- Start with clean, patted-dry racks. Use a sharp knife to loosen and remove the membrane on the bone side — this helps the rub penetrate and keeps the texture tender when cooked.
- Combine your dry rub and massage it onto both sides of each rack, pressing it into the meat so the sugar and spices cling.
- Wrap each rack tightly in foil and refrigerate for several hours or overnight so the flavors meld and the sugar draws moisture into the meat.
- If using a grill, set up indirect heat and keep a zone for direct searing. If baking, arrange racks on a foil-lined tray and bake low and slow until the meat is tender when tested.
- When the ribs are nearly tender, unwrap and brush both sides with your chosen BBQ sauce. Move to direct heat or under a broiler briefly to caramelize the glaze — watch closely so it doesn’t burn.
- Let the ribs rest for a short period before slicing between bones or serving whole to let juices settle and for cleaner presentation.
Sauces & Glazes: Beyond Store-Bought BBQ
Store-bought sauces are convenient, but small homemade tweaks can lift the dish: a splash of apple cider vinegar cuts through richness, molasses adds deep sweetness, and a bit of mustard or hot sauce can sharpen flavors. Try building a sauce with a base of ketchup or crushed tomatoes, add an acid (vinegar or citrus), sweetener (brown sugar or honey), and a salty component (soy sauce or Worcestershire) — then adjust spices to taste.
Regional ideas I turn to when I want variety: a vinegar-forward dip for a tangy counterpoint, a molasses-rich Kansas City style for coating, or a lighter, mustard-forward glaze if you’re serving with heavier sides. Brush sauces on at the end so they caramelize without burning.
Pro Tip for bbq baby back ribs recipe: Check for Tenderness, Not Just Temperature
- I always use feel and sight as my quickest indicators: the meat should give when you press it, and a gentle tug should pull the meat slightly back from the bone.
- Be patient — ribs will often need more time than a thermometer suggests to reach that velvety texture; if they’re not yielding, keep them wrapped and continue low-and-slow.
- If the surface is too soft and the bones wiggle excessively, you may have passed the sweet spot — pull sooner next time and lower the heat slightly.
How to Store, Reheat, and Make Ribs Ahead
- To store: cool ribs to room temperature, then wrap tightly and refrigerate in an airtight container for up to 3–4 days.
- To reheat without drying: wrap ribs in foil with a splash of broth, apple juice, or water and warm slowly in the oven until heated through; finish unwrapped under high heat or on the grill to refresh the glaze.
- Make-ahead planning: cook ribs up to the glazing step a day ahead, cool and store, then reheat and brush with sauce right before serving so the glaze tastes fresh.
Troubleshooting Common Cooking Mistakes
- Dry ribs: I used to over-sear early in the cook. Solution — keep heat low, wrap during the tenderizing phase, and add moisture when reheating.
- Uneven cooking on a grill: check for hot spots and rotate racks; establish a true indirect zone so the meat cooks without intense direct heat.
- Sauce burning: if your glaze chars before the meat is done, hold off glazing until the final minutes or use a thinner sauce for earlier basting.
- Too much fat on the plate: trim excess fat before cooking and drain accumulated fat from the tray periodically so flavors stay clean.
Serving suggestions: cut between the bones and serve the racks on a wooden board with pickled slaw, grilled corn, and extra sauce on the side so guests can help themselves. The visual of glazed racks and bright sides makes a table feel like a celebration.
Frequently Asked Questions
How can I make sure my BBQ baby back ribs are tender?
To ensure your ribs are tender, it’s important to cook them low and slow—whether you’re grilling or baking. Check for tenderness by gently pulling on the meat; it should come off the bone easily. Additionally, wrapping them in foil while they marinate in the refrigerator can enhance tenderness.
Can I use a different cooking method for the ribs?
Absolutely! You can bake them in the oven, grill them, or even use a quick high-heat method. Each method has its perks: baking can be more reliable for tenderness, while grilling adds that smoky flavor. Just be mindful of the cooking times and temperatures!
What if I don’t have all the spices for the rub?
No problem! You can customize the spice rub to your taste. Feel free to substitute or omit spices based on what you have on hand. For a healthier option, consider reducing the sugar or salt in the rub.
How do I store leftover ribs?
Store any leftover ribs in an airtight container in the refrigerator. They can last for up to 3-4 days. To reheat, you can use the oven, grill, or microwave, but for best results, warm them in the oven to keep the meat tender.
What are some good sauces to use besides BBQ?
While BBQ sauce is classic, you can explore other options like honey mustard, teriyaki sauce, or a chipotle glaze for unique flavors. Homemade sauces can also elevate your ribs to the next level!
BBQ Baby Back Ribs Recipe
Ingredients
Method
- Properly rinse ribs and pat dry with paper towels. Turn the rack of ribs bone side up. Using a sharp small knife, slip it between the membrane and the bone then remove the membrane.2/3 cup brown sugar
- In a plastic bag, shake together brown sugar, onion powder, garlic powder, cajun seasoning, black pepper, smoked paprika, kosher salt, cumin, chili powder, mustard powder and cayenne pepper until combined.2 1/2 tbsp onion powder, 2 1/2 tbsp garlic powder, 2 tbsp cajun seasoning, 4 tsp black pepper, 4 tsp smoked paprika, 2 tsp kosher salt, 1 tsp cumin, 1/2 tsp chili powder, 1/2 tsp mustard powder, 1/2 tsp cayenne pepper, Oil cooking spray
- Line a large baking sheet with non-stick foil and lay one of the racks of rib on top. Spray the outside of the rack with oil spray and massage the dry rub into each side. Cover with foil and refrigerate for at least 6 hours or overnight.2/3 cup brown sugar, BBQ sauce
- Oil the grill grates, place the ribs bone side down over indirect heat, and grill covered for 1.5 hours. Turn and grill for another 1.5 hours, checking periodically. After 3 hours, they should be tender, and if not, continue for 30 more minutes.2/3 cup brown sugar
- Transfer to direct heat, brush with BBQ sauce on both sides, and grill uncovered for 5-10 minutes before removing.
- Preheat the oven to 300°F. Bake ribs for 2.5 hours, then check for tenderness. If not tender, bake for an additional 30-45 minutes.2/3 cup brown sugar
- Drain excess fat from the ribs and apply BBQ sauce to both sides. Turn the oven on to broil and allow the sauce to stick before serving.