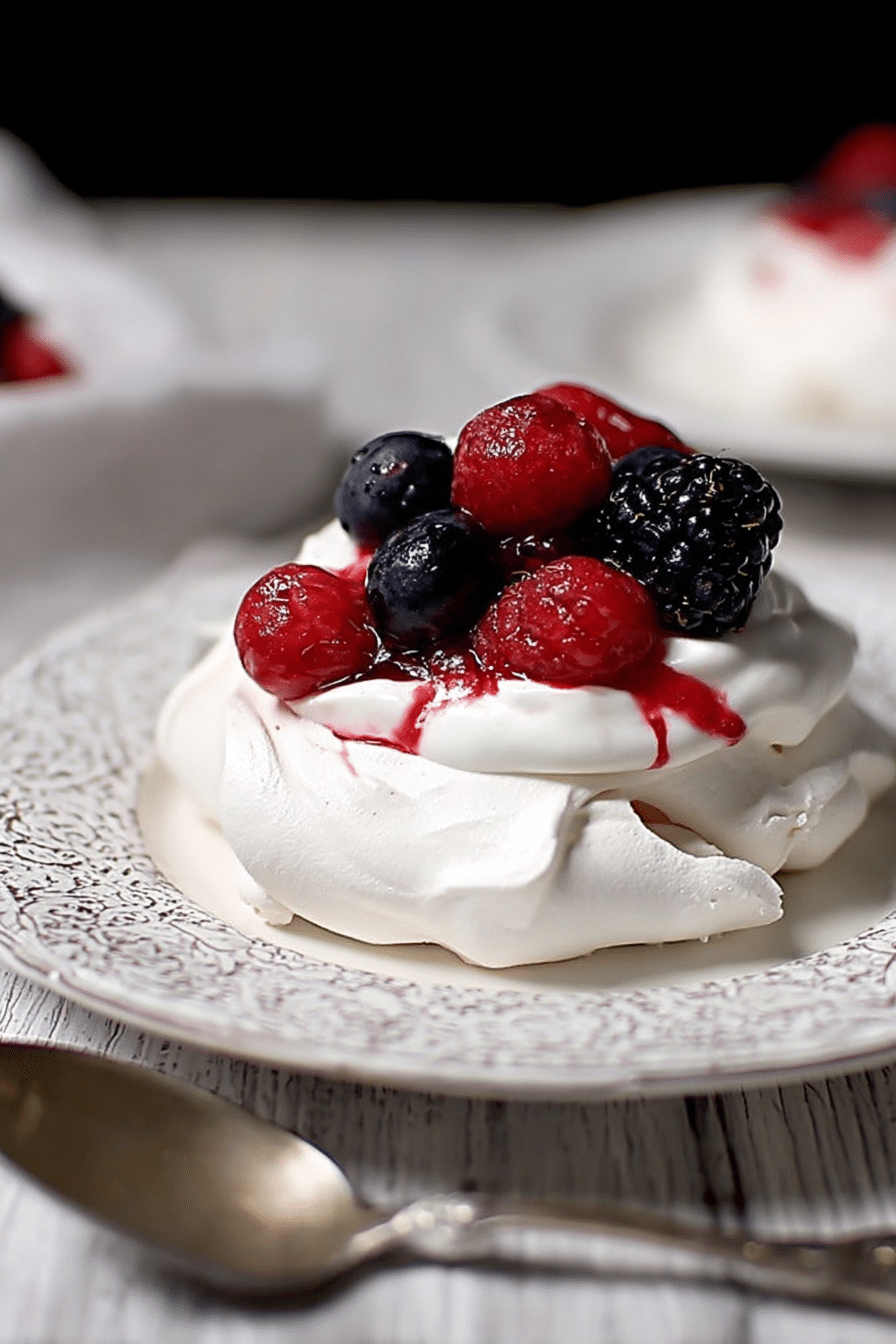
I fell in love with pavlova the first time I let a meringue cool slowly in a warm oven and then cracked it open to reveal a marshmallow-soft center. For years I refine this dessert for gatherings in my kitchen: it’s showy without being fussy, bright without being heavy, and wonderfully forgiving when you prepare the components ahead of time. When friends come for dinner, this pavlova becomes the exclamation point — a crisp white shell, folds of cream, and a scatter of jewel-toned berries that always earns an audible wow.
What I love most about this dessert is how much of it you can finish ahead of time. I make the meringues a day or even a week in advance and keep them tucked away in a cool, dry jar-like container. Then, minutes before guests arrive, I whip cream, toss berries with a touch of sugar to coax their juices, and assemble — it’s dramatic plating with almost no stress.
In this post I’ll walk you through everything that matters: the right berries for color and flavor, the small science behind a perfectly crisp shell and soft interior, and the timing tricks that keep the pavlova looking and tasting its best at the table. I’ll share practical troubleshooting from my own kitchen, and simple variations so you can make this dessert your signature when you host.
Why Mixed Berry Pavlova Is the Make-Ahead Dessert for Dinner Parties
Pavlova reads as elegant on a menu and looks spectacular on the table: an oversized meringue becomes a white canvas for colorful berries and a pillowy crown of cream. Making the shell ahead removes one of the biggest stressors of entertaining — last-minute baking — while letting you focus on plating and conversation. Visually, the contrast between the glossy shell and bright berries is irresistible; texturally, guests love the contrast between the crisp snap and the soft interior.
Prepare the meringues early and store them at room temperature so you can assemble just before serving. Toss the berries with a little sugar to bring out juices and shine; that syrupy gloss does more for presentation than any extra garnish. The assembly is quick enough to do in front of guests if you want a bit of theatre — but wise make-ahead planning means you’ll be relaxed while they applaud the finished plate.
Everything You Need for Mixed Berry Pavlova
Below I describe the ingredients and tools conversationally so you know each item’s purpose and sensible swaps. I avoid exact measurements here so you can scale or substitute as needed.
- Egg whites – The structure for the meringue; room-temperature whites whip to greater volume and a silkier texture. For a vegan option, see the Variations section below.
- Sugar – Stabilizes the foam and gives the meringue its glossy shell; superfine or caster sugar dissolves fastest. You can use a powdered version for an even smoother finish.
- Cream of tartar or acid – A tiny amount helps stabilize the egg-white foam and keeps peaks firm. If you don’t have cream of tartar, a few drops of citrus juice will help.
- Vanilla – Adds a warm, floral note to the meringue or whipped cream; try vanilla bean paste for a stronger flavor.
- Whipping cream – For the topping; whipping cream gives the best billowy texture. For a lighter option, use mascarpone folded into the cream for richness.
- Mixed berries – The flavor and color anchors: think strawberries, raspberries, blackberries, and seasonal extras. Frozen berries can be used in a compote-style topping if fresh aren’t available.
- Sugar for berries – A touch of sugar helps macerate the fruit and brings out juices that glaze the berries and add shine.
- Tools – A stand mixer or handheld electric mixer makes life easier for stable peaks; a large metal bowl and good spatula help you shape the nests. A baking sheet lined with parchment and an oven thermometer are indispensable for consistent results.
Choose the Right Berries: Sweetness, Texture, and Timing
Good berries are the difference between a pretty pavlova and a memorable one. Look for fruit that is ripe but not mushy: strawberries should be fragrant and firm, raspberries plump, and blackberries glossy. The balance of sweetness and acidity is key — sweeter berries marry well with whipped cream, while a touch of tart fruit gives the dish lift.
Seasonality matters. Summer berries will be at their sweetest and most visually perfect, while late-season fruit can be supplemented with small additions like a scattering of pomegranate arils or thin slices of kiwi for contrast. If you prefer a richer profile, add a few shaved bittersweet chocolate curls or a dusting of finely grated orange zest for aroma and color contrast.
The Secret to a Crisp Shell and Marshmallow Center
The ideal pavlova has a fragile, paper-thin crust and a tender, marshmallow-like interior. That texture comes from gentle whipping and patient drying. Below are the step-by-step techniques I use in my kitchen — follow them carefully and you’ll be rewarded with the perfect shell.
- Start with perfectly clean equipment; any grease will prevent egg whites from aerating properly.
- Bring the egg whites to room temperature before you begin so they whip to higher volume.
- Begin whipping at a low speed until foamy, then increase speed steadily; this encourages fine, stable bubbles rather than large, fragile ones.
- When soft peaks form, add acid (cream of tartar or a few drops of citrus) to stabilize the foam.
- Add sugar gradually — spoon by spoon or in a steady stream — allowing it to dissolve completely before adding more. Proper sugar incorporation is essential for a glossy, stiff meringue.
- Whip to stiff, glossy peaks; the mixture should feel satiny, not grainy. Test by rubbing a little between your fingers — if you feel sugar, keep whipping a bit longer.
- Shape mounds into individual nests with a slight well to cradle the cream and berries. Smooth the exterior for an elegant look or leave rustic peaks for a more casual presentation.
- Dry the meringues in a low oven until they look dry to the touch. Turn the oven off and allow them to cool completely inside — this slow cooling prevents sudden humidity changes that collapse the structure.
- Store fully cooled meringues in an airtight container at room temperature to maintain crispness until assembly.
Why Room-Temperature Eggs and Sugar Timing Matter
Egg-white temperature and how you add sugar are small details with outsize impact. Room-temperature whites whip more readily because the proteins unfold more easily, allowing a stable network of air bubbles to form. If the whites are cold, you’ll need to whip longer, which can overwork them and introduce large bubbles that pop during drying.
Adding sugar too quickly can deflate the foam or leave undissolved crystals that make the meringue gritty. I always add sugar slowly and only after soft peaks form, ensuring it dissolves into the protein matrix. Humidity is another variable: on very humid days the meringue will take longer to dry and may soften sooner. If your kitchen is humid, aim to make meringues on a dry day when possible, or extend the drying time and store them in a dry place.
How to Make Mixed Berry Pavlova (Step-by-Step)
Below is a straightforward, easy-to-follow sequence that breaks the process into clear stages so you won’t feel overwhelmed. Use these steps as your timeline when hosting: make meringues early, prepare berries the day of, and assemble just before serving.
- Prepare the meringue: Whip room-temperature egg whites with acid until foamy, then add sugar gradually and beat to stiff glossy peaks. Shape into nests on parchment and bake at a low temperature until dry; turn off the oven and let them cool completely inside.
- Store cooled meringues at room temperature in an airtight container if making ahead.
- About 20–30 minutes before serving, macerate the berries with a touch of sugar to release some juice and enhance shine; let them sit until juicy but not soupy.
- Whip the cream with a little vanilla and sugar to soft peaks; do not overwhip — you want a billowy, spreadable texture.
- Assemble: Place each meringue on a serving plate, spoon a generous cloud of whipped cream into the center, and pile on the macerated berries. Spoon any extra juices over the berries for a glossy finish.
- Garnish if you like with small herb leaves (mint or lemon balm), a light dusting of finely grated citrus zest, or a few tiny chocolate curls for contrast.
Pro Tip for mixed berry pavlova: Keep Meringues Crispy When Assembling
- Assemble no more than 15–20 minutes before serving to preserve the crisp shell.
- Layer a thin barrier: spread a small disc of whipped cream between the meringue and very juicy berries to slow moisture transfer.
- Reserve some berries and juices to add at the last moment so the outer shell remains dry.
- If humidity is high, serve meringues as individual pavlovas rather than a large shared one to minimize surface area exposed to moisture.
Pro-Tips, Troubleshooting, and Variations are presented as bulleted lists below for quick scanning.
How to Store, Make-Ahead, and Serve Mixed Berry Pavlova
Storage and timing make pavlova a host’s ally. Store cooled, dry meringues at room temperature in an airtight container — they will keep for up to two weeks if kept dry. Whip cream just before serving for the freshest texture; if you must make it earlier, stabilize with a small amount of mascarpone or a commercial stabilizer and keep refrigerated. Assemble at the last practical moment to retain the crisp shell and the visual contrast of fresh berries against white cream.
For make-ahead planning: bake meringues several days in advance, refrigerate or macerate berries the morning of, and combine components within an hour of serving so the pavlova looks as vibrant as it tastes. When plating, use wide shallow plates that allow the berries to spill over the edges for a dramatic, celebratory look.
Troubleshooting
- If your meringue is weeping (weeps small pools of sugar): I’ve found that this usually means sugar wasn’t fully dissolved — re-whip a bit longer next time and add sugar more slowly.
- If the shells are chewy instead of crisp: I leave the meringues in the cooling oven until completely cool; abrupt temperature changes can trap moisture and soften the shell.
- If the meringue cracks excessively: slightly under- or overbaked meringues can crack; aim for a dry surface but avoid any browning by keeping the oven low.
- If whipped cream turns watery quickly: don’t overwhip and serve promptly; for extra stability, fold in a spoonful of mascarpone.
Variations
- Vegan pavlova: use aquafaba (the liquid from canned chickpeas) whipped to stiff peaks in place of egg whites, and swap coconut cream for dairy cream.
- Tropical twist: swap some berries for thinly sliced mango, passion fruit pulp, or kiwi for bright acidity and color contrast.
- Luxe version: fold a little mascarpone into the whipped cream and finish with a drizzle of good-quality fruit coulis or a few shaved hazelnuts.
- Chocolate pavlova: fold a scant amount of cocoa powder into the meringue for a subtle chocolate shell and top with raspberries for classic pairing.
Frequently Asked Questions
What is a mixed berry pavlova?
A mixed berry pavlova is a light and summery dessert made of meringue, whipped cream, and a variety of fresh berries. It’s perfect for any occasion and can be easily assembled right before serving!
How can I ensure my pavlova has a crisp shell?
To achieve a crisp shell, make sure to bake the meringues at a low temperature and leave them in the oven until completely dry. Properly whipping the egg whites to stiff peaks also contributes to a well-structured pavlova.
Can I make mixed berry pavlova in advance?
Absolutely! You can prepare the meringues and store them in an airtight container at room temperature for up to two weeks. Just whip the cream and assemble the pavlova shortly before serving for the best texture.
What types of berries work best for this recipe?
Strawberries, raspberries, and blackberries complement the pavlova beautifully. Choose berries that are ripe and sweet for the best flavor and texture.
Why are room-temperature eggs important for this recipe?
Room-temperature eggs whip better and achieve more volume, resulting in a fluffier meringue. It’s an essential step for creating that perfect texture in your pavlova!