I started making black elderberry gummies when my kids turned their noses up at straight elderberry syrup. In my kitchen I wanted something portable, familiar-feeling, and easy to portion — a little chewy gummy that still carried the antioxidant punch of elderberry. After a few rounds of testing molds, textures, and temperatures, I landed on a method that reliably makes gummies my whole family reaches for during sniffle season.
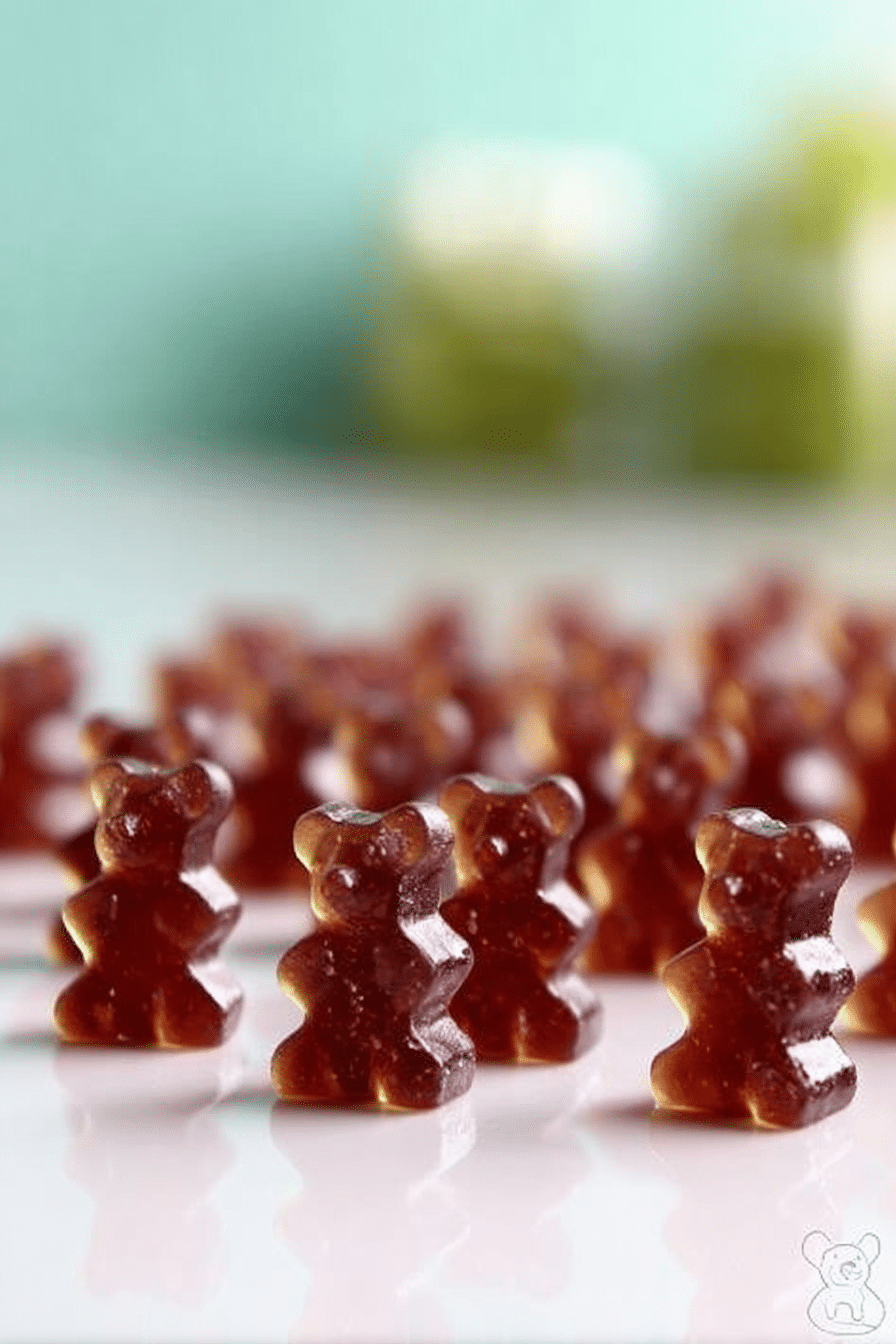
These treats are chewy, slightly tart, and they smell like berries when you pop them out of the mold — the kids call them ‘purple bears’ and it makes the whole immune-support ritual much easier to keep up with. I’ve worked through the sticky messes and floppy gummies so you don’t have to; the tips below are what I wish I’d known the first season I made them.
Making these in batches means you can fill snack tins, tuck packs in lunchboxes, or keep a small jar in the fridge for an after-school routine. I like that they’re portable, shelf-stable for a short time when properly stored, and flavorful enough to win over picky eaters. Read on for everything you need, the why behind elderberries, texture secrets, and simple swaps if you need a vegan version.
Why These Black Elderberry Gummies are Perfect for Kids and Busy Parents
Why These Black Elderberry Gummies are Perfect for Kids and Busy Parents
Black elderberries are traditionally used to support immune health, and putting that flavor into a gummy makes it easy to get kids on board. For busy parents, the big benefits are convenience and portion control: gummies are portable, preschool-friendly, and you can measure out a week’s worth in minutes. The texture — soft, bouncy, and chewy — appeals to most children, and you can play with shapes and colors to make them more fun. Imagine a small tray of purple bears that smell faintly of berries and citrus and fit snugly into snack boxes for little hands.
Everything You Need for Black Elderberry Gummies
Set up a tidy station: a warm pot, a heatproof bowl, your silicone molds, a dropper (if your mold set includes one), and a chilled tray for the finished molds. Here’s how I talk about the ingredients so you can pick what works for your family.
- Homemade or high-quality elderberry syrup – Provides the berry flavor and antioxidant benefits; choose a syrup with a clean ingredient list for the best flavor.
- Water or light fruit juice – Thins the syrup so it pours into molds smoothly without overpowering the elderberry taste.
- Gelatin (grass-fed or preferred brand) – Gives gummies their chew; if you need a vegan option, see the vegan alternatives section below for guidance.
- Vitamin C powder – Optional boost for immune support; add at a cooler temperature so it stays potent.
- Probiotic powder – Optional for gut support; like vitamin C, it should be added after the mixture cools slightly.
- Molds and tools – Flexible silicone molds, a dropper or small measuring cup, and a whisk or small spatula for smoothing lumps.
Why Elderberries Help Support Your Family’s Immune System
Elderberries are rich in anthocyanins — the pigments that give them their deep purple-black color. Anthocyanins are antioxidants that help neutralize free radicals, which supports overall cellular health. Elderberries also contain vitamin C, some dietary fiber, and trace minerals like manganese. While no food is a cure-all, elderberries are a nutrient-dense way to add antioxidant support during cold and flu season, and families have used elderberry preparations traditionally to help with seasonal sniffles.
For a lighter, floral option that still celebrates the elder family, you might enjoy making an elderflower cordial alongside your gummy routine:
Learn about the benefits of elderberries and explore making elderflower cordial as a delightful alternative.
The Secret to a Perfect Gummy Texture Every Time
The texture hinges on two main things: properly blooming the gelatin and precise temperature control. Blooming lets gelatin granules hydrate fully so they dissolve smoothly. If you add gelatin to liquid that’s too hot, you’ll degrade its gelling power; too cool and it won’t dissolve well, leaving lumps or a gritty mouthfeel. The ideal finished gummy should be firm enough to hold its shape but soft enough for little teeth to chew comfortably — think firm jelly, not hard candy.
- Bloom the gelatin first in a small portion of the cold liquid so each granule hydrates.
- Warm the remaining liquid gently — hot but not boiling — before whisking in the bloomed gelatin so it dissolves evenly.
- Avoid overheating once gelatin is added; returning the pot to too-high heat can thin the set and create a weaker chew.
How to Make Black Elderberry Gummies (Step-by-Step)
- Mix your elderberry syrup with the water or light juice in a heatproof pot and warm gently over low heat until hot but not boiling; watch closely to avoid scalding.
- Pour a small portion of that warmed liquid into a separate bowl and sprinkle gelatin over it to bloom; stir gently to hydrate the gelatin granules.
- When the stovetop liquid is hot (steam rising, not simmering), remove the pot from heat and whisk in the bloomed gelatin until completely smooth.
- If you’re adding vitamin C or probiotics, allow the mixture to cool to about 105–110°F before stirring them in so the active ingredients aren’t destroyed.
- Use a dropper or small pouring cup to fill silicone molds; work quickly — the mixture can start to thicken as it cools.
- If the mixture thickens while you’re filling molds, return it to very low heat and whisk until runny again; avoid bringing it to a boil.
- Refrigerate the filled molds until set — usually about an hour or two depending on mold size — then gently pop gummies out and store as directed below.
Pro Tip for black elderberry gummies recipe: Add Vitamin C & Probiotics at 105–110°F
I always add vitamin C powder and probiotic powder at a lower temperature — specifically when the mixture cools to around 105–110°F — because higher heat can damage those delicate compounds. Vitamin C boosts antioxidant support and may help immune response, while probiotics can support gut health. When added at the right temperature, both fold in easily without clumping, and you’ll keep more of their activity intact.
How to Store, Portion, and Add Gummies to Your Family’s Daily Routine
Store gummies in an airtight container in the fridge to keep them fresh and chewy; they’ll last longer chilled. For daily use, portion a small container or snack bag with the number of gummies appropriate for each child so you don’t overdo it. Use them as part of a routine: a gummy with breakfast, one after school, or one before bed. Pairing them with a small cup of water or a fun smoothie can help younger kids swallow them easily and make the moment feel special.
For a refreshing drink, try our easy strawberry smoothie alongside the gummies.
Pair these gummies with a refreshing glass of homemade lemonade for a delightful treat after school.
Easy Flavor Variations and Vegan Alternatives
You can brighten or soften the elderberry flavor with citrus zest, a splash of orange or apple juice, or a touch of vanilla. For a fun dessert twist, chop small gummies into layered treats or fold them into chilled fruit salads.
For vegan families, agar-agar is the most common substitute for gelatin, but it behaves differently: it sets more firmly and can be slightly brittle if used in a one-to-one swap. If you try agar, use a tested agar method and expect a firmer, less chewy texture. Also consider blending in fruit purees to boost flavor and mouthfeel.
Get creative with flavors and consider adding some to a beautiful berry trifle for a unique twist.
Pro Tips, Troubleshooting and Variations
Pro Tips (quick wins)
- Bloom gelatin in cold liquid first for a smooth texture.
- Keep a small ladle of warm liquid on very low heat while you fill molds so the mixture stays pourable.
- Use flexible silicone molds and chill on a flat surface so gummies release cleanly.
- If you add supplements, cool to 105–110°F before stirring them in to preserve potency.
Troubleshooting (what I’ve learned in my kitchen)
- If your gummies are floppy, you likely needed more gelatin or you overheated the mixture; I usually add a touch more gelatin when testing new syrups.
- If the mixture is grainy, the gelatin wasn’t fully dissolved — heat gently and whisk until smooth.
- Sticky gummies can happen if the room is humid; store in the fridge in an airtight container to firm them up.
Variations to try
- Add a little orange or lemon zest for a brighter flavor profile.
- Mix in a mild fruit puree (apple, pear) to soften tartness and add body.
- Try a hybrid set — some molds with gelatin, some with an agar-agar batch — to see which texture your family prefers.
Small changes in temperature, gelatin quality, and syrup concentration will change the final texture — that’s normal. I test small batches first, and once I’m happy I scale up so every batch behaves the same.
Frequently Asked Questions
How many elderberry gummies does this recipe make?
This recipe makes over 225 gummies, so you’ll have plenty to share with your family!
Can I use a different type of gelatin for this recipe?
While this recipe calls for grass-fed gelatin, you can experiment with plant-based alternatives like agar-agar, but the texture may vary.
How should I store these elderberry gummies?
Store your gummies in an airtight container in the fridge to keep them fresh and chewy!
What health benefits do elderberry gummies provide?
Elderberry gummies are packed with antioxidants and are traditionally used to support immune health, especially during cold and flu season.
Can I add other flavors to my gummies?
Absolutely! Feel free to experiment with different fruit juices or natural flavor extracts to customize your gummies.
Black Elderberry Gummies Recipe
Ingredients
Method
- Mix together the elderberry syrup and water.
- Pour 1/2 cup of the liquid into a small bowl. Place the remaining liquid in a small saucepan or pot. Turn the burner to low heat.
- When the liquid is hot but not boiling, remove the saucepan/pot from heat.
- Add 1 tablespoon of the gelatin to the liquid in the bowl and stir it in with a fork. Repeat this process until all the gelatin has been mixed in.
- Stir in the gelatin mixture into the stovetop liquid and whisk thoroughly.
- Pour the gelatin mixture into your silicone mold.
- Pop them into the fridge to firm up for about 1 - 2 hours.
- When ready, pop them out of the mold and store them in an airtight container in the fridge.