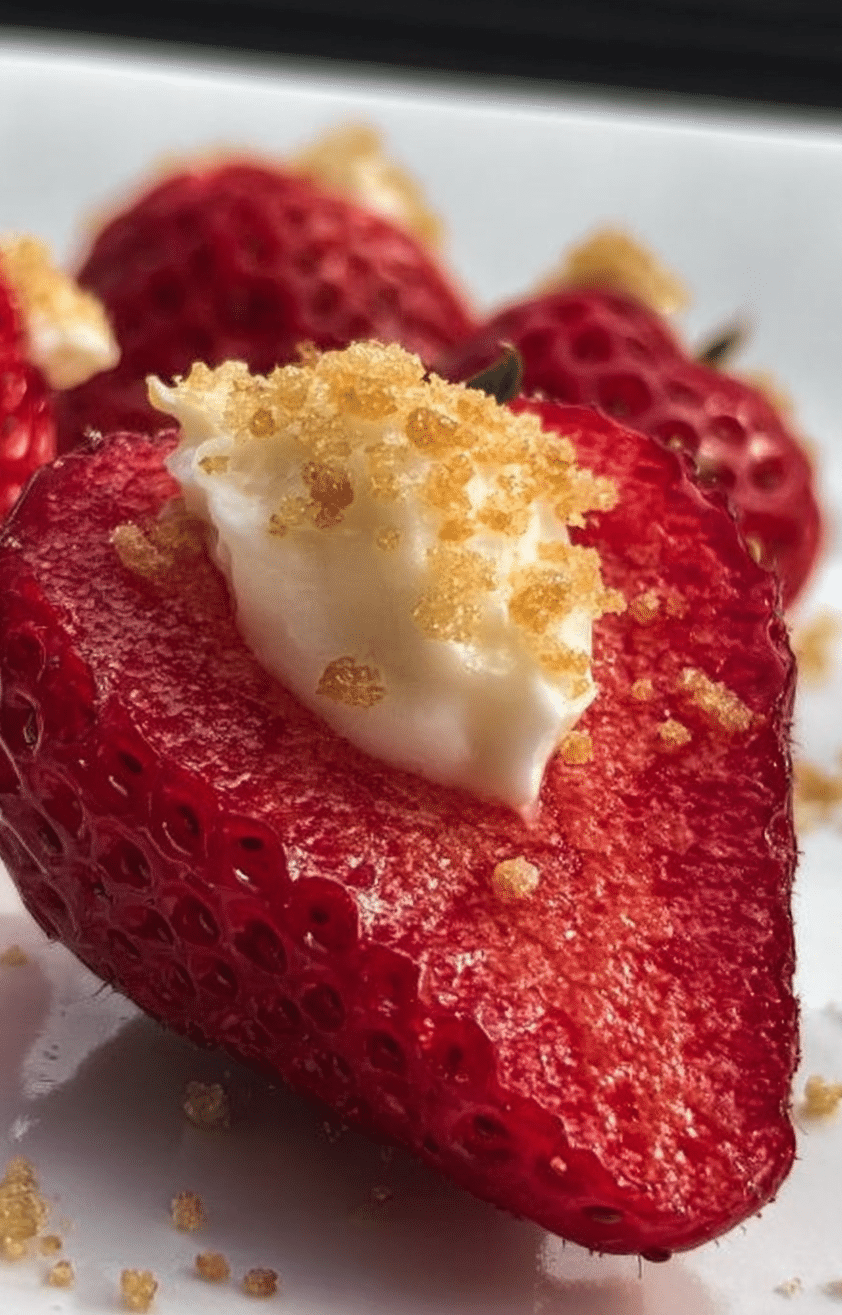
I make these deviled strawberries any time I need a quick, pretty dessert for a crowd — they’re a tiny bit cheeky, entirely portable, and people always smile when they see a tray of red-and-white bite-size cheesecakes. The contrast of glossy strawberries and pillowy cheesecake filling reads like a centerpiece without much fuss, which is exactly what I need when I’m juggling last-minute party details.
I love that these are mostly hands-off: a simple filling comes together in one bowl while you prep the berries, and you can make variations to suit any theme — from patriotic sprinkles for 4th of July to a nut-topped fall version. I’ve learned a few small tricks in my kitchen that stop the filling from weeping and keep the berries from toppling over, and I’ll share those so your tray looks sharp.
They work as both a dessert and a playful appetizer: you can serve them on a platter next to other finger foods, or place them on cupcake liners for a more formal presentation. If you like strawberries in other formats, you might also enjoy pairing them with baked goods like
If you love strawberries, try our Strawberries and Cream Scones for a delightful twist on a classic!
Why these Deviled Strawberries are the perfect quick party dessert
These little bites hit several marks for entertaining: they’re visually striking, fast to assemble, and flexible enough to please different palates. A tray of glossy red berries dotted with creamy white swirls reads as festive and fresh on any table.
Sensory notes: the bright strawberry aroma greets guests at first glance, the creamy filling feels cool and silky on the tongue, and a final sprinkle of crushed graham or nuts adds a welcome crunch. Instead of vague promises about being “easy,” here’s what I mean in concrete terms: most of the work is prep and piping, and you can easily scale the recipe up for a crowd without adding complicated steps.
Everything You Need for Deviled Strawberries
Below are the ingredients and tools that make this recipe smooth and portable. I’ll describe each item’s purpose and common swaps so you can adapt to what you have in your pantry.
- Fresh strawberries – Choose berries that are ripe but still firm so they hold their shape when hollowed and filled.
- Cream cheese – The base that gives the filling its cheesecake flavor and structure; choose full-fat for richness, or reduced-fat if you prefer a lighter bite.
- Whipping cream – Whipped into stiff peaks and folded in to lighten the filling and keep it airy.
- Sour cream – Adds tang and softens the cream cheese; plain yogurt can be a lighter swap.
- Granulated sugar – Sweetens the filling; you can use a finer sugar or confectioners’ style if you want an ultra-smooth texture.
- Vanilla extract – Rounds out the flavor; almond or citrus extract are interesting alternatives.
- Lemon juice – Optional but helpful: a little acid brightens the filling and helps balance the richness.
- Graham cracker crumbs – For a crunchy finish; swap crushed cookies or toasted nuts for gluten-free options.
- Piping bag and tip – Makes presentation effortless; a zip-top bag with the corner snipped works in a pinch.
- Melon baller or small spoon – For hollowing the strawberries with minimal waste; a paring knife works too.
You can also pair these with other strawberry-forward treats—if you want a baked option on the same menu, try
Pair your deviled strawberries with an Easy Strawberry Cold Foam for a refreshing complement!
The Secret to a Stable Cheesecake Filling (so it won’t weep)
- Soften the cream cheese until it’s smooth but not melted — I let it sit at room temperature just long enough to lose its chill, then beat it until creamy. This prevents lumps and helps the filling hold together.
- Whip the cream to stiff peaks so it provides structure. When you fold it in, do so gently with a spatula in large, slow strokes to keep as much air as possible — that air is what keeps the filling light and prevents weeping.
- Add a small amount of acid (lemon juice) for balance. A little acidity brightens the flavor and also tightens the filling slightly, which helps it hold its shape in warm environments.
- Keep everything cold when you’re not assembling. Cold bowls and cold ingredients slow down softening and stop the filling from becoming runny.
How to Hollow Strawberries Without Cracking Them
- Pick ripe-but-firm strawberries — too soft and they’ll collapse, too underripe and they won’t taste sweet enough.
- Slice the berry in half lengthwise and trim a thin slice from the bottom if needed so each half sits flat.
- Use a small melon baller or the tip of a paring knife to scoop a shallow cavity; aim to remove just enough flesh for the filling to sit, not so much that the shell becomes flimsy.
- If you don’t have a melon baller, use a small spoon or the tip of a straw to press out the center gently.
- Work on a flat, dry surface and pat berries dry before filling to reduce slipping and ensure the filling adheres.
Fun flavor twists & seasonal add-ins for more variety
- Chocolate lover’s twist: fold a little melted and cooled chocolate into the cream layer or dip the filled tips in chocolate for a crunchy shell.
- Nutty crunch: sprinkle chopped toasted almonds, pistachios, or pecans on top instead of graham crumbs.
- Fruit-forward: stir in small bits of macerated berries or a swirl of jam to the filling for extra fruit flavor.
- Spice it up: add a pinch of cinnamon or nutmeg for fall gatherings, or a touch of orange zest for holiday platters.
- Seasonal presentation: top with edible flowers in spring, red-white-blue sprinkles for patriotic events, or mini candy pieces for birthday parties. For a playful alternative, considerConsider making Strawberry Cheesecake Tacos for a fun and unique dessert option at your next gathering!
How to Make Deviled Strawberries (Step-by-Step)
- Prep your berries: wash and dry them, remove stems, slice each berry in half, and shave a flat from the back so halves stand upright (about 10 minutes for a medium batch).
- Hollow each half: scoop a shallow cavity using a melon baller or small spoon; take minimal flesh so the shell stays sturdy (another 10–15 minutes depending on quantity).
- Make the filling: beat cream cheese until smooth, mix in sour cream, sugar, vanilla, and optional lemon, then whip cream to stiff peaks and fold it in gently (about 10 minutes total).
- Fill the piping bag: transfer the filling into a piping bag fitted with your preferred tip or use a zip-top bag with a corner snipped cleanly (2–3 minutes).
- Pipe and garnish: pipe swirls into each hollowed strawberry half, finish with a sprinkle of graham crumbs or chosen topping, and arrange on a platter (10–20 minutes depending on how fancy you get).
- Serve chilled and enjoy — these are best eaten within a few hours of assembling for peak texture and appearance. If you want another fun pairing,Pair your deviled strawberries with an Easy Strawberry Cold Foam for a refreshing complement!
Pro Tip for Deviled Strawberries: Chill tools and filling for cleaner piping
- I always chill my mixing bowl and whisk for 10–15 minutes before whipping cream — cold equipment helps the cream reach stiff peaks faster and hold them longer.
- Chill the assembled filling briefly before piping if your kitchen is warm; a slightly firmer filling pipes cleaner and holds pretty ridges.
- If using a zip-top bag, refrigerate it for a few minutes after filling so the seam stays firm while you pipe.
- Work in batches: fill, garnish, and plate in groups so the assembled berries spend minimal time at room temperature.
Troubleshooting
- If your filling is runny: I’ve found this usually means the cream wasn’t whipped enough or the cream cheese was over-softened. Chill the bowl and whip to stiffer peaks, then fold in gently.
- If strawberries tip over: trim a thin slice from the back of each half so they sit flat, and avoid over-hollowing the shell.
- If the filling weeps watery liquid: beat the cream and cheese thoroughly, and add a touch more acid (a bit of lemon) to tighten the texture. I sometimes refrigerate the filled berries for 15–20 minutes to firm them up before serving.
- If your toppings get soggy: add crunchy crumbs or nuts just before serving to preserve texture.
How to Store, Make-Ahead, and Adapt Deviled Strawberries (gluten-free, vegan swaps)
Storage and make-ahead strategies help take pressure off party day. You can prep components ahead and assemble near serving time for the freshest result.
- Make-ahead: prepare the filling up to a day in advance and keep it chilled in an airtight container. Hollow the strawberries the day you plan to serve and assemble a few hours before guests arrive.
- Storage after assembly: store assembled berries in a single layer in the fridge on a shallow tray covered loosely with plastic wrap; they’re best within a few hours but will keep visually acceptable for up to a day.
- Gluten-free swaps: replace graham crumbs with crushed gluten-free cookies, toasted coconut, or chopped nuts for a safe crunch.
- Vegan adaptations: use a vegan cream cheese alternative and a stable whipped topping made from coconut cream; note texture will differ slightly, so chill well and fold gently to maintain airiness.
- Want a different dessert to serve alongside? For a complementary, shareable cake tryLooking for more fruity desserts? Check out our Strawberry Lemon Cake that pairs wonderfully with your deviled strawberries!
Serving suggestions: arrange the filled berries on a tiered tray or on parchment-lined platters, alternating toppings for color contrast. Small cupcake liners or mini spoons make them easy for guests to grab and go.
Frequently Asked Questions
Can I make these deviled strawberries in advance? Yes! You can prepare the cheesecake filling ahead of time and hollow out the strawberries. Just assemble them a few hours before serving to keep them fresh.
What if I don’t have heavy whipping cream? You can substitute with whipped topping or use a mixture of cream cheese and sour cream for the filling, but it may alter the texture a bit.
How do I make the filling stable? To achieve a stable filling, whip the cream until stiff peaks form and gently fold it into the cream cheese mixture, ensuring not to deflate it.
Can I add different flavors to the filling? Absolutely! You can mix in flavors like chocolate syrup, peanut butter, or seasonal fruits for a fun twist.
Are there any gluten-free options for this recipe? Yes! You can replace graham cracker crumbs with gluten-free alternatives, such as crushed gluten-free cookies or nuts.
Deviled Strawberries
Ingredients
Method
- Prep the strawberries by cutting off the stems and slicing them in half. Cut a small sliver off of the back of each strawberry half to sit up straight. Hollow out the middle using a small melon baller.1 cup heavy whipping cream
- In a medium bowl, beat the heavy whipping cream until stiff peaks form (about 5 minutes).1 package (8 ounce) cream cheese, softened
- In a separate bowl, mix together the softened cream cheese, sour cream, sugar, vanilla extract, and lemon juice until smooth.1/3 cup sour cream, 2/3 cup white granulated sugar, 1 tsp vanilla extract, 1 tbsp fresh lemon juice (optional), 1/2 cup graham cracker crumbs
- Fold the whipped cream into the cream cheese mixture until well incorporated.1 package (8 ounce) cream cheese, softened
- Fill a piping bag with the cream cheese mixture and pipe it onto each sliced strawberry. Finish with a sprinkle of graham cracker crumbs.
- Serve and enjoy!