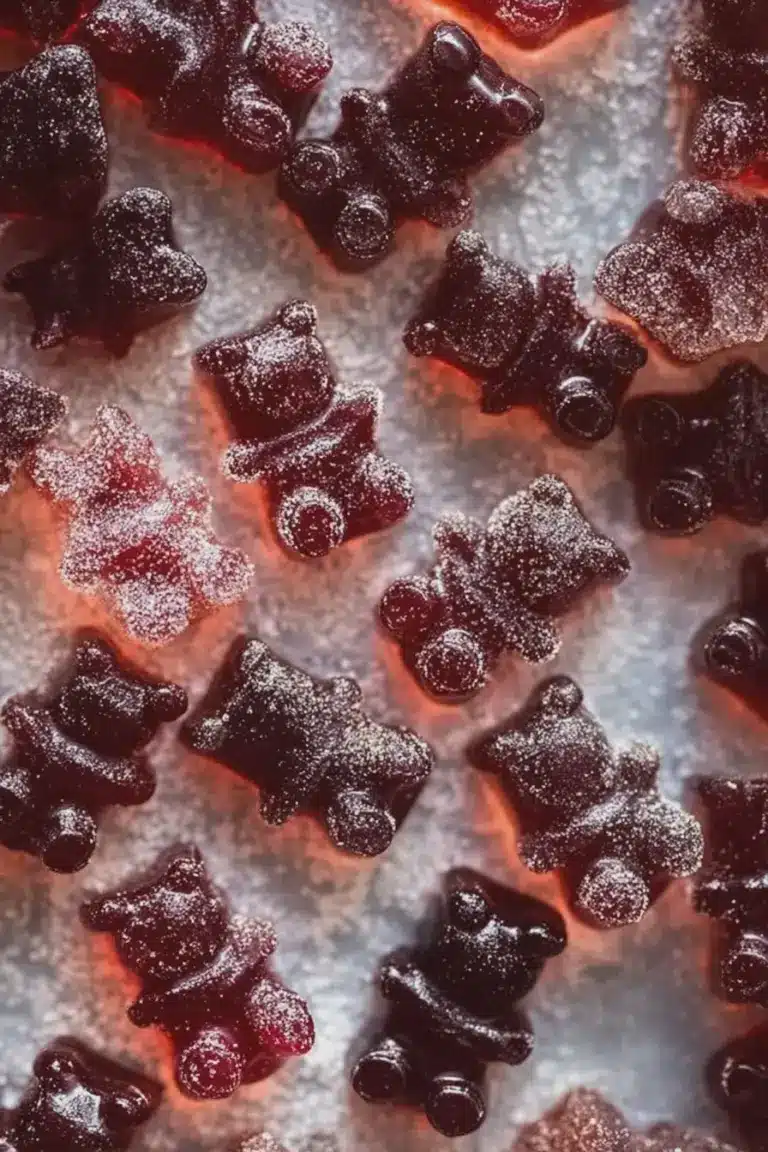
I make these sour watermelon gummies when the kids want something bright and fun but I want something I can stand behind nutritionally. Over the years I’ve learned which watermelons give the best color and juice, how to coax a clean set from gelatin, and how to dial the tartness so the little ones come back for a second piece. These gummies are a regular in my fridge during summer because they look like candy and behave like a sensible snack.
I love that the recipe relies on a handful of whole-food ingredients you can recognize on the shelf. In my kitchen I use grass-fed gelatin because it gives a cleaner mouthfeel and a little extra protein. Fresh lemon brightens the flavor and helps balance watermelon sweetness without refined sugar if you don’t want it. When I make a batch, the scent of watermelon and lemon fills the room — it practically sells itself to picky eaters.
My approach is practical: keep tools ready, strain for a clear look, and be patient while the gummies set. I’ll walk you through ingredient choices, the small technique points that make a difference, and a few simple troubleshooting fixes so your batch comes out just the way you want it.
Why these homemade sour watermelon gummies are perfect for health-conscious parents
These gummies trade artificial colors, sweeteners, and stabilizers for fresh fruit and real gelatin. That matters when you want snacks that contribute something useful to a child’s diet instead of empty sugar. The bright pink color comes naturally from ripe watermelon, and the lemon gives a fresh sour note that makes each piece feel like a grown-up treat for small mouths.
Grass-fed gelatin brings a mild amount of protein and collagen-supporting amino acids to the recipe, while watermelon supplies hydration and micronutrients. For parents who want treats without artificial ingredients, these gummies are an easy win: they look like candy, taste like summer, and fit into a balanced snack rotation.
Everything You Need for Homemade Sour Watermelon Gummies
Below I talk about the ingredients and tools conversationally so you know why each one matters and what you can swap without losing texture or flavor.
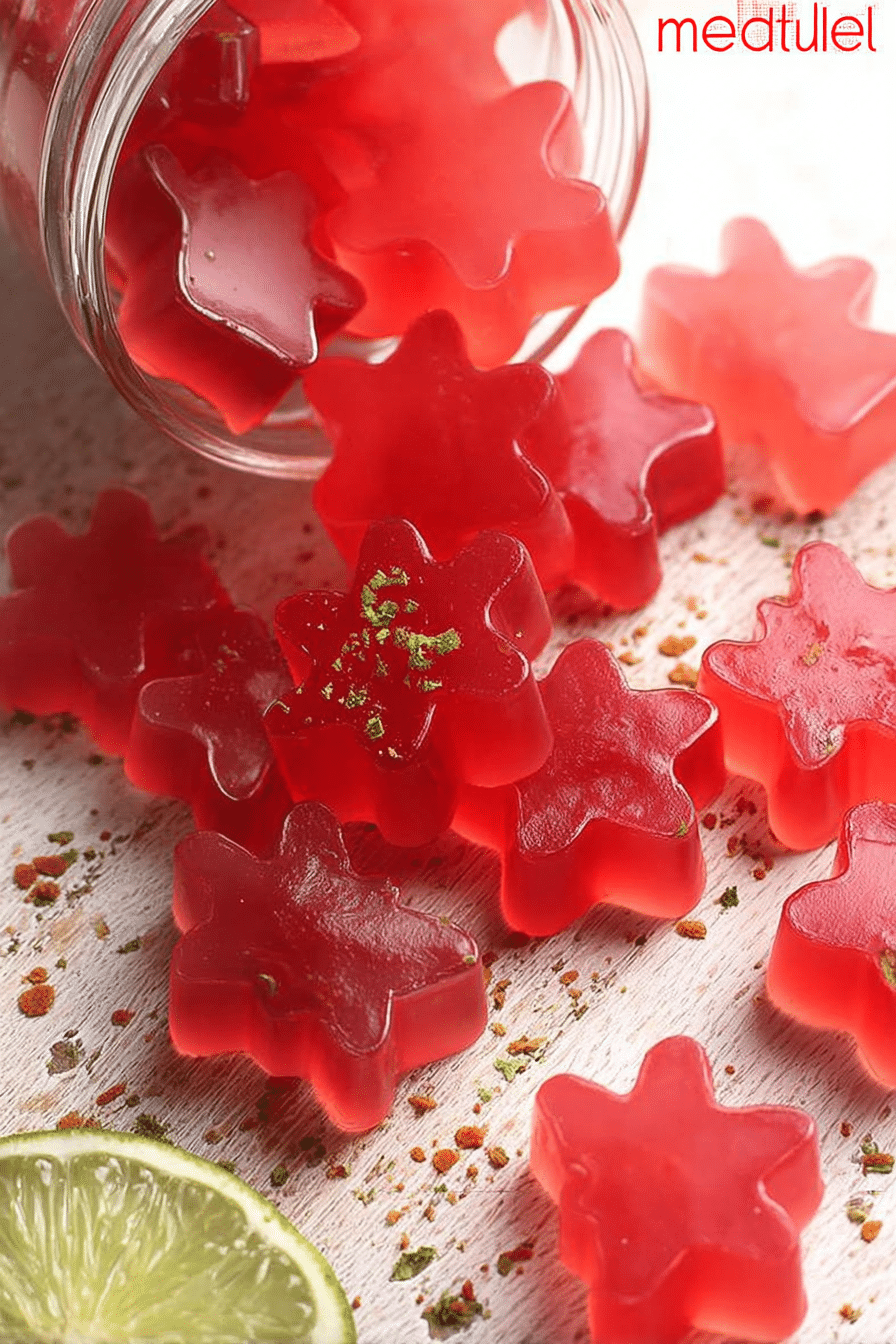
- * Fresh watermelon – The backbone of the flavor and color; pick very ripe fruit for sweetness and juice.
- * Unflavored gelatin (grass-fed, if possible) – The setting agent that gives gummies their chew; plays a big role in texture.
- * Fresh lemon juice – Adds the sour kick and preserves brightness; helps balance sweetness naturally.
- * Honey or optional sweetener – For extra sweetness if your watermelon is underripe; you can swap with sugar-free options listed below.
- * Alternative sweeteners – Stevia, monk fruit, or erythritol work if you want a sugar-free batch; adjust to taste.
- * Fine mesh strainer – For a clear, foam-free juice that yields evenly textured gummies.
- * Saucepan and whisk – To warm the juice gently and dissolve the gelatin completely.
- * Molds or a shallow baking dish – Use silicone molds for fun shapes or a dish you can slice; choose what your family will enjoy.
The Secret to the Perfect Texture
The single most important technique is blooming the gelatin properly and never subjecting it to high heat. Blooming lets gelatin hydrate so it dissolves smoothly; high heat will damage its setting ability. Pay attention to timing and temperature and you’ll get gummies with a clean, springy bite that isn’t rubbery.
- Bloom the gelatin: Sprinkle gelatin over a portion of the cold juice and give it a few minutes to absorb the liquid so it swells and softens.
- Warm gently: Heat the remaining juice over low-medium heat — you only want it warm enough to dissolve the gelatin, not boiling. Remove from the heat as soon as the gelatin melts.
- Whisk to combine: Add the bloomed gelatin to the warm juice and whisk until completely smooth with no visible grains.
- Troubleshooting (I use these fixes in my kitchen):
- If gummies are too soft: add a bit more gelatin next time or reduce the liquid slightly.
- If gummies are too firm: use a touch less gelatin or increase the proportion of juice.
- If mixture separates or becomes cloudy: strain before pouring and avoid overheating the gelatin.
- If gummies are sticky after setting: store them between sheets of parchment or toss lightly in a tiny amount of cornstarch or arrowroot.
How to Choose the Best Watermelon for Maximum Juice and Sweetness
Choosing the right watermelon makes the recipe easier and more reliable. You want a melon that is ripe, sweet, and heavy for its size so you get plenty of juice and vivid color.
Look for a deep, consistent exterior color with a creamy yellow spot where it sat on the ground; that spot usually indicates ripeness. Tap the melon — a ripe one sounds hollow and resonant. When you cut it open, ripe watermelon will be vibrant in color, with a fragrant, slightly sugary scent that tells you it will need little to no added sweetener.
For variations in flavor, try mixing watermelon with other ripe fruits (listed below) but keep an eye on acidity and enzymes that affect setting. For a guide to fruit pairings you can also try a simple Easy Fruit Salad to experiment with combinations before you make gummies.
Nutrition Spotlight: Collagen, Hydration and Vitamin Boosts in Every Bite
These gummies offer more than a sweet moment — they bring small nutritional benefits that matter when you’re feeding kids regularly. Gelatin is a source of amino acids that support connective tissue and can be a gentle way to add some protein to snacks. Watermelon is mostly water, so it helps with hydration, and it contributes vitamins and phytonutrients like vitamin C, A precursors, and lycopene.
Lemon juice increases vitamin C and brightens flavor, which can make a snack feel fresher without added sugar. I like to pair flavors that add both taste and nutritional value so treats contribute to overall balance.
For another nutritious gummy option, check out our Black Elderberry Gummies that offer great health benefits.
How to Make Homemade Sour Watermelon Gummies (Step-by-Step)
- Prepare your tools so everything is within reach: blender, fine mesh strainer, saucepan, whisk, molds or a shallow dish.
- Blend fresh watermelon until completely smooth and strain through the fine mesh to remove pulp and foam for a clear, glossy finish.
- Reserve a portion of the chilled juice and sprinkle the gelatin evenly over it; let it sit so the gelatin can bloom and absorb the liquid.
- Gently warm the remaining juice in a saucepan over low-medium heat — you want it warm, not boiling.
- Add the bloomed gelatin to the warm juice and whisk until fully dissolved and smooth, with no grit.
- Stir in fresh lemon juice and sweeten to taste with honey or your chosen alternative; taste and adjust the sour-sweet balance for kids.
- Pour the mixture into molds or a refrigerator-friendly baking dish, tapping gently to remove air bubbles.
- Chill in the refrigerator until firmly set (allow at least two hours); unmold or slice and store as directed below.
These steps keep the process simple and reduce the chance of overheating gelatin or trapping foam that dulls the color.
Note: The Pro Tips, Troubleshooting points, and Variations below are presented as bulleted lists for quick scanning.
Pro Tip for Homemade Sour Watermelon Gummies: Sugar-Free Alternatives & Texture Fixes
- Sweetener swaps: If you prefer sugar-free, use a powdered stevia blend, monk fruit, or erythritol; add gradually and taste as you go since sweetness perception varies with fruit ripeness.
- Adjusting texture: To firm up a batch, add a small additional amount of gelatin next time; to soften, reduce gelatin slightly or increase the juice proportion.
- Fix for grainy gelatin: If you see graininess, rewarm gently while whisking until smooth — avoid boiling.
- Non-gelatin option: If you want a firmer, plant-based version, compare textures using agar agar.
If you’re looking for a different texture, consider using our Agar Agar Fruit Jelly as a comparison for achieving a firm gummy consistency.
- Reduce stickiness: Store gummies between parchment sheets or dust very lightly with arrowroot/cornstarch before packaging.
How to Store and Serve Homemade Sour Watermelon Gummies
Store gummies in an airtight container in the refrigerator; keep layers separated with parchment so they don’t stick together. They keep best when enjoyed within a week — beyond that they may lose some chew and become sticky. Freezing is not recommended because ice crystals change the texture and can make gummies mealy when thawed.
Serve them in small silicone molds for portion control or present them on a colorful platter to make them more appealing to kids. Pair these gummies with light drinks for warm days:
Pair these gummies with refreshing drinks like Homemade Lemonade for a delightful treat on warm days.
Variations: Using Different Fruits for Unique Gummies
- Strawberry or raspberry: These are natural pairings for watermelon and keep a similar set; they add a deeper red color and a familiar berry flavor.
- Mango or peach: Use for a sweeter, tropical profile; be mindful that very fibrous purées may need extra straining for a smooth set.
- Pineapple caution: Fresh pineapple contains enzymes that prevent gelatin from setting unless the juice is heated to deactivate those enzymes first.
- Proportions: When mixing fruits, keep a dominant fruit to maintain flavor and balance acidity so the gelatin sets consistently.
- Seasonal play: I like to use whatever is at peak ripeness—seasonality gives you the best natural sweetness with less added sugar.
- Try a fruit test: If you want help finding combinations, make a simple Easy Fruit Salad first to test flavors before committing to a full gummy batch.
Step-by-Step Video Tutorials for Visual Learners
For visual learners, a short video that shows blending, straining, blooming gelatin, and pouring into molds can remove uncertainty and make the steps easier to follow. A clear, step-by-step demonstration highlights small but important moves — like skimming foam or checking that gelatin has fully dissolved — that written steps sometimes miss.
In a video I would demonstrate the full sequence: how to judge watermelon ripeness by color, blending and straining for clarity, the exact look of properly bloomed gelatin, and how to handle molds so gummy edges are clean. Visual pacing also improves accessibility: captions, slowed segments for the bloom step, and close-ups of texture changes help parents replicate the batch in their own kitchen.
Frequently Asked Questions
Are these homemade sour watermelon gummies healthy for kids?
Absolutely! These gummies are made with fresh watermelon and grass-fed gelatin, giving them a nutritious twist that health-conscious parents will love.
Can I use bottled watermelon juice instead of fresh watermelon?
While fresh watermelon yields the best flavor and nutrients, you can use bottled watermelon juice in a pinch. Just make sure it’s 100% juice without added sugars.
What can I substitute for honey in this recipe?
If you’re looking for a sugar-free option, you can use a sugar substitute like stevia or simply omit the honey if your watermelon is sweet enough!
How do I store the homemade gummies?
Store your gummies in an airtight container in the fridge. They can last up to a week, but they’re best enjoyed fresh!
Can I add other fruits to this recipe?
Yes! You can experiment with other fruits purees like strawberries or raspberries to create unique flavors for your gummies.
Homemade Sour Watermelon Gummies
Ingredients
Method
- Add the fresh watermelon to a blender and process until smooth.
- Pour the blended watermelon through a fine mesh strainer into a Pyrex measuring cup or similar. You should have about 2 cups / 480 milliliters of juice. Skim any white foam from the top of the juice and discard.
- Pour half of the watermelon juice into a saucepan, leaving the other half behind in the measuring cup. Sprinkle the unflavored gelatin powder over the reserved juice. Let it sit for a few minutes until it is absorbed by the liquid.
- While the gelatin is blooming, warm the watermelon juice in the saucepan over a low medium heat. You do not want or need to bring it to a boil. Add the bloomed gelatin to the warm watermelon juice, whisking until it melts and combines into a smooth liquid. Stir in the lemon juice and, if using, the honey, to taste.
- Pour the gelatin mixture into molds or a refrigerator & knife friendly baking dish. Let chill for at least 2 hours before removing from the molds or slicing into pieces.